
Google 로그인을 앱에 통합하여 사용자가 Google 계정으로 Firebase 인증을 받도록 설정할 수 있습니다.
시작하기 전에
Swift Package Manager를 사용해 Firebase 종속 항목을 설치하고 관리하세요.
- 앱 프로젝트를 연 상태로 Xcode에서 File(파일) > Add Packages(패키지 추가)로 이동합니다.
- 메시지가 표시되면 Firebase Apple 플랫폼 SDK 저장소를 추가합니다.
- Firebase Authentication 라이브러리를 선택합니다.
- 타겟 빌드 설정의 Other Linker Flags(기타 링커 플래그) 섹션에
-ObjC플래그를 추가합니다. - 완료되면 Xcode가 백그라운드에서 자동으로 종속 항목을 확인하고 다운로드하기 시작합니다.
https://github.com/firebase/firebase-ios-sdk.git
프로젝트에 Google 로그인 SDK 추가
앱 프로젝트를 연 상태로 Xcode에서 File(파일) > Add Packages(패키지 추가)로 이동합니다.
메시지가 표시되면 Google 로그인 SDK 저장소를 추가합니다.
https://github.com/google/GoogleSignIn-iOS완료되면 Xcode가 백그라운드에서 자동으로 종속 항목을 확인하고 다운로드하기 시작합니다.
Firebase 프로젝트에서 Google 로그인 사용 설정
사용자가 Google 로그인을 사용하여 로그인할 수 있게 하려면 먼저 Firebase 프로젝트에서 Google 로그인 제공업체를 사용 설정해야 합니다.
- Firebase Console에서 인증 섹션을 엽니다.
- 로그인 방법 탭에서 Google 제공업체를 사용 설정합니다.
저장을 클릭합니다.
프로젝트의
GoogleService-Info.plist파일의 새 사본을 다운로드하여 Xcode 프로젝트에 복사합니다. 기존 버전을 새 버전으로 덮어씁니다. (iOS 프로젝트에 Firebase 추가를 참조하세요.)
필수 헤더 파일 가져오기
먼저 Firebase SDK와 Google 로그인 SDK의 헤더 파일을 앱으로 가져와야 합니다.
Swift
import FirebaseAuth
import GoogleSignIn
Objective-C
@import FirebaseCore;
@import GoogleSignIn;
Google 로그인 구현
다음 단계를 진행하여 Google 로그인을 구현합니다. iOS에서 Google 로그인을 사용하는 방법은 Google 로그인 개발자 문서에서 자세히 볼 수 있습니다.
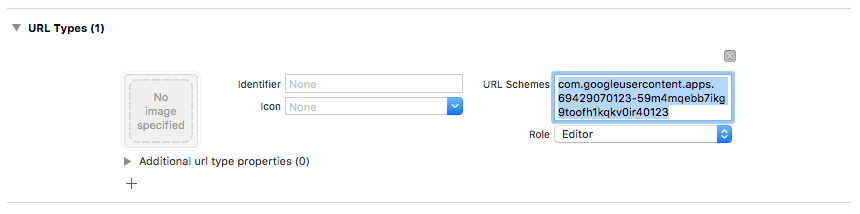
- 다음과 같이 Xcode 프로젝트에 커스텀 URL 스킴을 추가합니다.
- 왼쪽 트리 보기에서 프로젝트 이름을 클릭하여 프로젝트 구성을 엽니다. 대상 섹션에서 앱을 선택하고 정보 탭을 선택한 후 URL 유형 섹션을 펼칩니다.
- + 버튼을 클릭하고 반전된 클라이언트 ID의 URL 스키마를 추가합니다. 이 값을 찾으려면
GoogleService-Info.plist REVERSED_CLIENT_ID키를 찾습니다. 이 키의 값을 복사하여 구성 페이지의 URL 스킴 상자에 붙여넣습니다. 다른 필드는 그대로 둡니다.완성된 구성은 다음과 같은 형태이며 애플리케이션별 값이 적용됩니다.
- 앱 대리자의
application:didFinishLaunchingWithOptions:메서드에서FirebaseApp객체를 구성합니다.Swift
// Use Firebase library to configure APIs
FirebaseApp.configure()
Objective-C
// Use Firebase library to configure APIs
[FIRApp configure];
- 앱 대리자의
application:openURL:options:메서드를 구현합니다. 이 메서드는GIDSignIn인스턴스의handleURL메서드를 호출하여 인증 프로세스가 끝날 때 애플리케이션이 수신하는 URL을 적절히 처리합니다.Swift
func scene(_ scene: UIScene, openURLContexts URLContexts: Set<UIOpenURLContext>) {
  // ...
}
  return GIDSignIn.sharedInstance.handle(url)
}
Objective-C
- (BOOL)application:(nonnull UIApplication *)application
            openURL:(nonnull NSURL *)url
            options:(nonnull NSDictionary<NSString *, id> *)options {
  return [[GIDSignIn sharedInstance] handleURL:url];
}
- 앱의 프레젠테이션 뷰 컨트롤러 및 클라이언트 ID를 Google 로그인 제공업체의
signIn메서드에 전달한 후 반환되는 Google 인증 토큰으로부터 Firebase 인증 사용자 인증 정보를 만듭니다.Swift
guard let clientID = FirebaseApp.app()?.options.clientID else { return }

// Create Google Sign In configuration object.
let config = GIDConfiguration(clientID: clientID)
GIDSignIn.sharedInstance.configuration = config

// Start the sign in flow!
GIDSignIn.sharedInstance.signIn(withPresenting: viewController) { result, error in
  guard error == nil else {
    // ...
    return
  }

  guard let user = result?.user,
        let idToken = user.idToken?.tokenString
  else {
    // ...
    return
  }

  let credential = GoogleAuthProvider.credential(withIDToken: idToken,
                                                 accessToken: user.accessToken.tokenString)
  self.signIn(with: credential)
}
Objective-C
GIDConfiguration *config = [[GIDConfiguration alloc] initWithClientID:[FIRApp defaultApp].options.clientID];
[GIDSignIn.sharedInstance setConfiguration:config];

__weak __auto_type weakSelf = self;
[GIDSignIn.sharedInstance signInWithPresentingViewController:self
      completion:^(GIDSignInResult * _Nullable result, NSError * _Nullable error) {
  __auto_type strongSelf = weakSelf;
  if (strongSelf == nil) { return; }

  if (error == nil) {
    FIRAuthCredential *credential =
    [FIRGoogleAuthProvider credentialWithIDToken:result.user.idToken.tokenString
                                     accessToken:result.user.accessToken.tokenString];
    // ...
  } else {
    // ...
  }
}];
- 스토리보드나 XIB 파일에
GIDSignInButton을 추가하거나 프로그래매틱 방식으로 인스턴스화합니다. 스토리보드 또는 XIB 파일에 버튼을 추가하려면 뷰를 추가하고 커스텀 클래스를GIDSignInButton으로 설정합니다. - 선택: 버튼을 맞춤설정하려면 다음 절차를
진행합니다.
Swift
- 뷰 컨트롤러에서 로그인 버튼을 속성으로 선언합니다.
@IBOutlet weak var signInButton: GIDSignInButton!
- 버튼을 방금 선언한
signInButton속성에 연결합니다. - GIDSignInButton 객체의 속성을 설정하여 버튼을 맞춤설정합니다.
Objective-C
- 뷰 컨트롤러의 헤더 파일에서 로그인 버튼을 속성으로 선언합니다.
@property(weak, nonatomic) IBOutlet GIDSignInButton *signInButton;
- 버튼을 방금 선언한
signInButton속성에 연결합니다. - GIDSignInButton 객체의 속성을 설정하여 버튼을 맞춤설정합니다.
- 뷰 컨트롤러에서 로그인 버튼을 속성으로 선언합니다.
Firebase에 인증
마지막으로 이전 단계에서 만든 인증 사용자 인증 정보를 사용하여 Firebase 로그인 프로세스를 완료합니다.
Swift
Auth.auth().signIn(with: credential) { result, error in
  guard error == nil else {
    // ...
    return
  }

  // At this point, our user is signed in
}
Objective-C
[[FIRAuth auth] signInWithCredential:credential
                          completion:^(FIRAuthDataResult * _Nullable authResult,
                                       NSError * _Nullable error) {
    if (isMFAEnabled && error && error.code == FIRAuthErrorCodeSecondFactorRequired) {
      FIRMultiFactorResolver *resolver = error.userInfo[FIRAuthErrorUserInfoMultiFactorResolverKey];
      NSMutableString *displayNameString = [NSMutableString string];
      for (FIRMultiFactorInfo *tmpFactorInfo in resolver.hints) {
        [displayNameString appendString:tmpFactorInfo.displayName];
        [displayNameString appendString:@" "];
      }
      [self showTextInputPromptWithMessage:[NSString stringWithFormat:@"Select factor to sign in\n%@", displayNameString]
                           completionBlock:^(BOOL userPressedOK, NSString *_Nullable displayName) {
       FIRPhoneMultiFactorInfo* selectedHint;
       for (FIRMultiFactorInfo *tmpFactorInfo in resolver.hints) {
         if ([displayName isEqualToString:tmpFactorInfo.displayName]) {
           selectedHint = (FIRPhoneMultiFactorInfo *)tmpFactorInfo;
         }
       }
       [FIRPhoneAuthProvider.provider
        verifyPhoneNumberWithMultiFactorInfo:selectedHint
        UIDelegate:nil
        multiFactorSession:resolver.session
        completion:^(NSString * _Nullable verificationID, NSError * _Nullable error) {
          if (error) {
            [self showMessagePrompt:error.localizedDescription];
          } else {
            [self showTextInputPromptWithMessage:[NSString stringWithFormat:@"Verification code for %@", selectedHint.displayName]
                                 completionBlock:^(BOOL userPressedOK, NSString *_Nullable verificationCode) {
             FIRPhoneAuthCredential *credential =
                 [[FIRPhoneAuthProvider provider] credentialWithVerificationID:verificationID
                                                              verificationCode:verificationCode];
             FIRMultiFactorAssertion *assertion = [FIRPhoneMultiFactorGenerator assertionWithCredential:credential];
             [resolver resolveSignInWithAssertion:assertion completion:^(FIRAuthDataResult * _Nullable authResult, NSError * _Nullable error) {
               if (error) {
                 [self showMessagePrompt:error.localizedDescription];
               } else {
                 NSLog(@"Multi factor finanlize sign in succeeded.");
               }
             }];
           }];
          }
        }];
     }];
    }
  else if (error) {
    // ...
    return;
  }
  // User successfully signed in. Get user data from the FIRUser object
  if (authResult == nil) { return; }
  FIRUser *user = authResult.user;
  // ...
}];
다음 단계
사용자가 처음으로 로그인하면 신규 사용자 계정이 생성되고 사용자가 로그인할 때 사용한 사용자 인증 정보(사용자 이름과 비밀번호, 전화번호 또는 인증 제공업체 정보)에 연결됩니다. 이 신규 계정은 Firebase 프로젝트의 일부로 저장되며 사용자의 로그인 방법에 관계없이 프로젝트 내 모든 앱에서 사용자를 식별하는 데 사용될 수 있습니다.
Firebase Realtime Database와 Cloud Storage 보안 규칙의
auth변수에서 로그인한 사용자의 고유 사용자 ID를 가져온 후 이 ID를 통해 사용자가 액세스할 수 있는 데이터를 관리할 수 있습니다.
인증 제공업체의 사용자 인증 정보를 기존 사용자 계정에 연결하면 사용자가 여러 인증 제공업체를 통해 앱에 로그인할 수 있습니다.
사용자를 로그아웃시키려면 signOut:을 호출합니다.
Swift
let firebaseAuth = Auth.auth()
do {
  try firebaseAuth.signOut()
} catch let signOutError as NSError {
  print("Error signing out: %@", signOutError)
}
Objective-C
NSError *signOutError;
BOOL status = [[FIRAuth auth] signOut:&signOutError];
if (!status) {
  NSLog(@"Error signing out: %@", signOutError);
  return;
}
또한 모든 인증 오류에 대한 오류 처리 코드를 추가할 수도 있습니다. 오류 처리를 참조하세요.