
您可以透過 Firebase SDK 將一般 OAuth 登入功能整合至應用程式,執行端對端登入流程,讓使用者透過 GitHub 等 OAuth 提供者向 Firebase 驗證身分。
事前準備
如要使用 GitHub 帳戶登入使用者,請先為 Firebase 專案啟用 GitHub 做為登入供應商:
使用 Swift Package Manager 安裝及管理 Firebase 依附元件。
- 在 Xcode 中保持開啟應用程式專案,然後依序點選「File」(檔案) 和「Add Packages」(新增 Package)。
- 系統提示時,請新增 Firebase Apple 平台 SDK 存放區:
- 選擇 Firebase Authentication 程式庫。
- 將
-ObjC標記新增至目標建構設定的「Other Linker Flags」部分。 - 完成後,Xcode 會自動開始在背景中解析並下載依附元件。
https://github.com/firebase/firebase-ios-sdk.git
現在請執行一些設定步驟:
- 在 Firebase 控制台中,依序前往「安全性」>「驗證」。
- 在「Sign-in method」(登入方法) 分頁中,啟用「GitHub」登入供應商。
-
將該供應商開發人員控制台的「用戶端 ID」和「用戶端密鑰」新增至供應商設定:
- 在 GitHub 上將應用程式註冊為開發人員應用程式,並取得應用程式的 OAuth 2.0 用戶端 ID 和用戶端密鑰。
-
請確認 Firebase OAuth 重新導向 URI (例如
my-app-12345.firebaseapp.com/__/auth/handler) 已在 GitHub 應用程式設定的應用程式設定頁面中,設為授權回呼網址。
- 按一下「儲存」。
使用 Firebase SDK 處理登入流程
如要使用 Firebase Apple 平台 SDK 處理登入流程,請按照下列步驟操作:
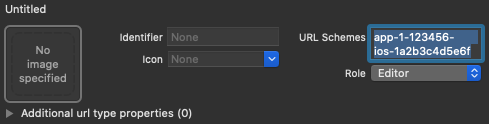
在 Xcode 專案中新增自訂網址架構:
- 開啟專案設定:在左側樹狀檢視中按兩下專案名稱。在「目標」部分選取您的應用程式,然後選取「資訊」分頁標籤,並展開「網址類型」部分。
-
按一下 + 按鈕,然後將編碼後的應用程式 ID 新增為網址配置。將其他欄位留空。
您可以在 Firebase 控制台中找到編碼後的應用程式 ID:依序前往「設定」
>「一般」分頁標籤,然後向下捲動至「您的應用程式」部分,即可查看 iOS 應用程式的詳細資料。 完成後,您的設定應如下所示 (但會使用應用程式專屬值):
使用提供者 ID github.com 建立 OAuthProvider 的執行個體。
Swift
var provider = OAuthProvider(providerID: "github.com")
Objective-C
FIROAuthProvider *provider = [FIROAuthProvider providerWithProviderID:@"github.com"];
選用:指定要隨 OAuth 要求傳送的其他自訂 OAuth 參數。
Swift
    provider.customParameters = [
      "allow_signup": "false"
    ]
Objective-C
[provider setCustomParameters:@{@"allow_signup": @"false"}];
如要瞭解 GitHub 支援的參數,請參閱 GitHub OAuth 說明文件。請注意,您無法使用
setCustomParameters傳遞 Firebase 必要參數。這些參數包括 client_id、redirect_uri、response_type、scope 和 state。選用:指定基本設定檔以外的其他 OAuth 2.0 範圍,以便向驗證供應商要求。如果應用程式需要存取 GitHub API 中的私人使用者資料,您必須在 GitHub 開發人員控制台的「API Permissions」(API 權限) 下方,要求存取 GitHub API 的權限。要求的 OAuth 範圍必須與應用程式 API 權限中預先設定的範圍完全相符。
Swift
    // Request read access to a user's email addresses.
    // This must be preconfigured in the app's API permissions.
    provider.scopes = ["user:email"]
Objective-C
    // Request read access to a user's email addresses.
    // This must be preconfigured in the app's API permissions.
    [provider setScopes:@[@"user:email"]];
詳情請參閱 GitHub 範圍說明文件。
選用:如要自訂應用程式向使用者顯示 reCAPTCHA 時呈現
SFSafariViewController或UIWebView的方式,請建立符合AuthUIDelegate通訊協定的自訂類別,並將其傳遞至credentialWithUIDelegate。使用 OAuth 供應商物件向 Firebase 進行驗證。
Swift
    provider.getCredentialWith(nil) { credential, error in
      if error != nil {
        // Handle error.
      }
      if credential != nil {
        Auth().signIn(with: credential) { authResult, error in
          if error != nil {
            // Handle error.
          }
          // User is signed in.
          // IdP data available in authResult.additionalUserInfo.profile.

          guard let oauthCredential = authResult.credential as? OAuthCredential else { return }
          // GitHub OAuth access token can also be retrieved by:
          // oauthCredential.accessToken
          // GitHub OAuth ID token can be retrieved by calling:
          // oauthCredential.idToken
        }
      }
    }
Objective-C
    [provider getCredentialWithUIDelegate:nil
                               completion:^(FIRAuthCredential *_Nullable credential,
                                            NSError *_Nullable error) {
      if (error) {
       // Handle error.
      }
      if (credential) {
        [[FIRAuth auth] signInWithCredential:credential
                                  completion:^(FIRAuthDataResult *_Nullable authResult,
                                            NSError *_Nullable error) {
          if (error) {
            // Handle error.
          }
          // User is signed in.
          // IdP data available in authResult.additionalUserInfo.profile.

          FIROAuthCredential *oauthCredential = (FIROAuthCredential *)authResult.credential;
          // GitHub OAuth access token can also be retrieved by:
          // oauthCredential.accessToken
          // GitHub OAuth ID token can be retrieved by calling:
          // oauthCredential.idToken
        }];
      }
    }];
您可以使用 OAuth 存取權杖呼叫 GitHub API。
舉例來說,如要取得基本個人資料資訊,您可以呼叫 REST API,並在
Authorization標頭中傳遞存取權杖:https://api.github.com/user
雖然上述範例著重於登入流程,但您也可以將 GitHub 供應商連結至現有使用者。舉例來說,您可以將多個供應商連結至同一位使用者,讓使用者透過任一供應商登入。
Swift
    Auth().currentUser.link(withCredential: credential) { authResult, error in
      if error != nil {
        // Handle error.
      }
      // GitHub credential is linked to the current user.
      // IdP data available in authResult.additionalUserInfo.profile.
      // GitHub OAuth access token can also be retrieved by:
      // (authResult.credential as? OAuthCredential)?.accessToken
      // GitHub OAuth ID token can be retrieved by calling:
      // (authResult.credential as? OAuthCredential)?.idToken
    }
Objective-C
    [[FIRAuth auth].currentUser
        linkWithCredential:credential
                completion:^(FIRAuthDataResult * _Nullable authResult, NSError * _Nullable error) {
      if (error) {
        // Handle error.
      }
      // GitHub credential is linked to the current user.
      // IdP data available in authResult.additionalUserInfo.profile.
      // GitHub OAuth access token is can also be retrieved by:
      // ((FIROAuthCredential *)authResult.credential).accessToken
      // GitHub OAuth ID token can be retrieved by calling:
      // ((FIROAuthCredential *)authResult.credential).idToken
    }];
相同的模式可用於
reauthenticateWithCredential,這可用於擷取需要最近登入的敏感作業的新憑證。Swift
    Auth().currentUser.reauthenticateWithCredential(withCredential: credential) { authResult, error in
      if error != nil {
        // Handle error.
      }
      // User is re-authenticated with fresh tokens minted and
      // should be able to perform sensitive operations like account
      // deletion and email or password update.
      // IdP data available in result.additionalUserInfo.profile.
      // Additional OAuth access token is can also be retrieved by:
      // (authResult.credential as? OAuthCredential)?.accessToken
      // GitHub OAuth ID token can be retrieved by calling:
      // (authResult.credential as? OAuthCredential)?.idToken
    }
Objective-C
    [[FIRAuth auth].currentUser
        reauthenticateWithCredential:credential
                          completion:^(FIRAuthDataResult * _Nullable authResult, NSError * _Nullable error) {
      if (error) {
        // Handle error.
      }
      // User is re-authenticated with fresh tokens minted and
      // should be able to perform sensitive operations like account
      // deletion and email or password update.
      // IdP data available in result.additionalUserInfo.profile.
      // Additional OAuth access token is can also be retrieved by:
      // ((FIROAuthCredential *)authResult.credential).accessToken
      // GitHub OAuth ID token can be retrieved by calling:
      // ((FIROAuthCredential *)authResult.credential).idToken
    }];
後續步驟
使用者首次登入後,系統會建立新的使用者帳戶,並連結至使用者登入時使用的憑證 (即使用者名稱和密碼、電話號碼或驗證供應商資訊)。這個新帳戶會儲存在 Firebase 專案中,可用於識別專案中每個應用程式的使用者,無論使用者登入方式為何。
在 Firebase Realtime Database 和 Cloud Storage 安全規則中,您可以從
auth變數取得已登入使用者的專屬使用者 ID, 並使用該 ID 控制使用者可存取的資料。
您可以將驗證供應商憑證連結至現有使用者帳戶,允許使用者透過多個驗證供應商登入應用程式。
如要登出使用者,請呼叫
signOut:。
Swift
let firebaseAuth = Auth.auth()
do {
  try firebaseAuth.signOut()
} catch let signOutError as NSError {
  print("Error signing out: %@", signOutError)
}
Objective-C
NSError *signOutError;
BOOL status = [[FIRAuth auth] signOut:&signOutError];
if (!status) {
  NSLog(@"Error signing out: %@", signOutError);
  return;
}
您也可以新增錯誤處理程式碼,處理各種驗證錯誤。請參閱「處理錯誤」。