
Swift 4 推出的 Codable API 可讓我們運用編譯器的強大功能,更輕鬆地將序列化格式的資料對應至 Swift 型別。
您可能已使用 Codable 將網路 API 的資料對應至應用程式的資料模型 (反之亦然),但 Codable 的彈性遠遠不只如此。
在本指南中,我們將瞭解如何使用 Codable 將資料從 Cloud Firestore 對應至 Swift 型別,反之亦然。
從 Cloud Firestore 擷取文件時,應用程式會收到鍵/值組合的字典 (或字典陣列,如果您使用會傳回多份文件的作業)。
現在,您當然可以繼續在 Swift 中直接使用字典,而且字典提供極大的彈性,或許正符合您的使用情境。不過,這種做法並非型別安全,而且很容易因屬性名稱拼字錯誤,或忘記對應團隊上週發布新功能時新增的屬性,而導致難以追蹤的錯誤。
過去,許多開發人員會實作簡單的對應層,將字典對應至 Swift 型別,藉此解決這些缺點。但同樣地,這些實作方式大多是根據手動指定 Cloud Firestore 文件與應用程式資料模型對應型別之間的對應關係。
Cloud Firestore 支援 Swift 的 Codable API,因此這項作業變得簡單許多:
- 您不必再手動導入任何對應程式碼。
- 您可以輕鬆定義如何對應名稱不同的屬性。
- 並內建支援許多 Swift 型別。
- 而且可輕鬆新增自訂類型對應的支援。
- 最棒的是,對於簡單的資料模型,您完全不需要編寫任何對應程式碼。
對應資料
Cloud Firestore 會將資料儲存在文件中,並將鍵對應至值。如要從個別文件中擷取資料,可以呼叫 DocumentSnapshot.data(),這會傳回將欄位名稱對應至 Any 的字典:func data() -> [String : Any]?。
也就是說,我們可以透過 Swift 的下標語法存取每個個別欄位。
import FirebaseFirestore

#warning("DO NOT MAP YOUR DOCUMENTS MANUALLY. USE CODABLE INSTEAD.")
func fetchBook(documentId: String) {
  let docRef = db.collection("books").document(documentId)

  docRef.getDocument { document, error in
    if let error = error as NSError? {
      self.errorMessage = "Error getting document: \(error.localizedDescription)"
    }
    else {
      if let document = document {
        let id = document.documentID
        let data = document.data()
        let title = data?["title"] as? String ?? ""
        let numberOfPages = data?["numberOfPages"] as? Int ?? 0
        let author = data?["author"] as? String ?? ""
        self.book = Book(id:id, title: title, numberOfPages: numberOfPages, author: author)
      }
    }
  }
}
雖然這個程式碼看似簡單易於實作,但其實很脆弱、難以維護,而且容易出錯。
如您所見,我們正在對文件欄位的資料型別做出假設。這些資訊可能正確,也可能不正確。
請注意,由於沒有結構定義,您可以輕鬆將新文件新增至集合,並為欄位選擇不同類型。您可能會不小心為 numberOfPages 欄位選擇字串,導致難以找出對應問題。此外,每當新增欄位時,您都必須更新對應程式碼,相當麻煩。
別忘了,我們並未善用 Swift 強大的型別系統,這個系統能準確判斷 Book 各個屬性的正確型別。
究竟什麼是 Codable?
根據 Apple 的文件,Codable 是「可自行轉換為外部表示法,以及從外部表示法轉換而來的型別」。事實上,Codable 是 Encodable 和 Decodable 通訊協定的型別別名。只要讓 Swift 型別符合這個通訊協定,編譯器就會合成編碼/解碼所需的程式碼,以便從序列化格式 (例如 JSON) 建立這個型別的例項。
用於儲存書籍資料的簡單型別可能如下所示:
struct Book: Codable {
  var title: String
  var numberOfPages: Int
  var author: String
}
如您所見,讓型別符合 Codable 的侵入性極低。我們只需要將一致性新增至通訊協定,不需要進行其他變更。
完成這項設定後,我們現在可以輕鬆將書籍編碼為 JSON 物件:
do {
  let book = Book(title: "The Hitchhiker's Guide to the Galaxy",
                  numberOfPages: 816,
                  author: "Douglas Adams")
  let encoder = JSONEncoder()
  let data = try encoder.encode(book)
}
catch {
  print("Error when trying to encode book: \(error)")
}
將 JSON 物件解碼為 Book 執行個體的方式如下:
let decoder = JSONDecoder()
let data = /* fetch data from the network */
let decodedBook = try decoder.decode(Book.self, from: data)
使用 Codable 對應 Cloud Firestore 文件中的簡單型別
Cloud Firestore 支援各種資料類型,從簡單的字串到巢狀對應都有。其中大多數會直接對應至 Swift 的內建型別。在深入瞭解較複雜的資料類型之前,我們先來看看如何對應一些簡單的資料類型。
如要將 Cloud Firestore 文件對應至 Swift 型別,請按照下列步驟操作:
- 請確認您已將
FirebaseFirestore架構新增至專案。您可以使用 Swift 套件管理工具或 CocoaPods 執行這項操作。 - 將
FirebaseFirestore匯入 Swift 檔案。 - 將型別調整為
Codable。 - (選用,如要在
List檢視畫面中使用型別) 在型別中新增id屬性,並使用@DocumentID告知 Cloud Firestore 將此屬性對應至文件 ID。我們將在下方詳細說明。 - 使用
documentReference.data(as: )將文件參照對應至 Swift 型別。 - 使用
documentReference.setData(from: )將 Swift 型別的資料對應至 Cloud Firestore 文件。 - (選用,但極力建議) 導入適當的錯誤處理機制。
請據此更新 Book 型別:
struct Book: Codable {
  @DocumentID var id: String?
  var title: String
  var numberOfPages: Int
  var author: String
}
由於這個型別已可編碼,我們只需要加入 id 屬性,並使用 @DocumentID 屬性包裝函式進行註解。
以先前擷取及對應文件的程式碼片段為例,我們可以將所有手動對應程式碼替換為單行程式碼:
func fetchBook(documentId: String) {
  let docRef = db.collection("books").document(documentId)

  docRef.getDocument { document, error in
    if let error = error as NSError? {
      self.errorMessage = "Error getting document: \(error.localizedDescription)"
    }
    else {
      if let document = document {
        do {
          self.book = try document.data(as: Book.self)
        }
        catch {
          print(error)
        }
      }
    }
  }
}
呼叫 getDocument(as:) 時指定文件類型,即可更簡潔地撰寫這項內容。這會為您執行對應作業,並傳回包含對應文件的 Result 型別,或是在解碼失敗時傳回錯誤:
private func fetchBook(documentId: String) {
  let docRef = db.collection("books").document(documentId)

  docRef.getDocument(as: Book.self) { result in
    switch result {
    case .success(let book):
      // A Book value was successfully initialized from the DocumentSnapshot.
      self.book = book
      self.errorMessage = nil
    case .failure(let error):
      // A Book value could not be initialized from the DocumentSnapshot.
      self.errorMessage = "Error decoding document: \(error.localizedDescription)"
    }
  }
}
如要更新現有文件,只要呼叫 documentReference.setData(from: ) 即可。以下是儲存 Book 執行個體的程式碼,其中包含一些基本錯誤處理:
func updateBook(book: Book) {
  if let id = book.id {
    let docRef = db.collection("books").document(id)
    do {
      try docRef.setData(from: book)
    }
    catch {
      print(error)
    }
  }
}
新增文件時,Cloud Firestore 會自動為文件指派新的文件 ID。即使應用程式目前處於離線狀態,也能使用這項功能。
func addBook(book: Book) {
  let collectionRef = db.collection("books")
  do {
    let newDocReference = try collectionRef.addDocument(from: self.book)
    print("Book stored with new document reference: \(newDocReference)")
  }
  catch {
    print(error)
  }
}
除了對應簡單的資料類型,Cloud Firestore 也支援許多其他資料類型,其中有些是結構化類型,可用於在文件中建立巢狀物件。
巢狀自訂類型
我們要在文件中對應的大部分屬性都是簡單值,例如書名或作者姓名。但如果需要儲存更複雜的物件,該怎麼辦?舉例來說,我們可能想以不同解析度儲存書本封面的網址。
在 Cloud Firestore 中,最簡單的方法是使用對應:

編寫對應的 Swift 結構體時,我們可以利用 Cloud Firestore 支援網址的事實,儲存含有網址的欄位時,系統會將其轉換為字串,反之亦然:
struct CoverImages: Codable {
  var small: URL
  var medium: URL
  var large: URL
}

struct BookWithCoverImages: Codable {
  @DocumentID var id: String?
  var title: String
  var numberOfPages: Int
  var author: String
  var cover: CoverImages?
}
請注意,我們在 Cloud Firestore 文件中為封面地圖定義了結構體 CoverImages。將 BookWithCoverImages 上的封面屬性標示為選用,我們就能處理部分文件可能不含封面屬性的情況。
如果您想知道為什麼沒有擷取或更新資料的程式碼片段,好消息是,您不需要調整從 Cloud Firestore 讀取或寫入資料的程式碼,因為這些作業都適用於我們在初始章節中編寫的程式碼。
陣列
有時我們想在文件中儲存值集合。以書籍類型為例,銀河便車指南這類書籍可能屬於多個類別,例如「科幻」和「喜劇」:

在 Cloud Firestore 中,我們可以使用值陣列來模擬這項操作。任何可編碼的型別 (例如 String、Int 等) 都支援這項功能。以下說明如何將類型陣列新增至 Book 模型:
public struct BookWithGenre: Codable {
  @DocumentID var id: String?
  var title: String
  var numberOfPages: Int
  var author: String
  var genres: [String]
}
由於這適用於任何可編碼的型別,因此我們也可以使用自訂型別。假設我們想為每本書儲存標記清單,除了標記名稱,我們也想儲存標記的顏色,如下所示:
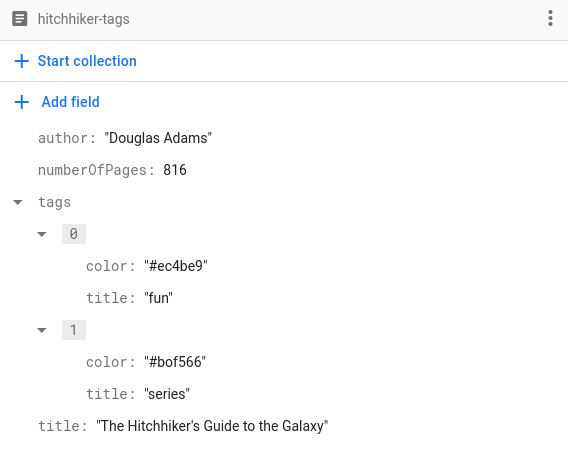
如要以這種方式儲存標記,我們只需要實作 Tag 結構體來代表標記,並將其設為可編碼:
struct Tag: Codable, Hashable {
  var title: String
  var color: String
}
這樣一來,我們就能在 Book 文件中儲存 Tags 陣列!
struct BookWithTags: Codable {
  @DocumentID var id: String?
  var title: String
  var numberOfPages: Int
  var author: String
  var tags: [Tag]
}
簡要說明如何對應文件 ID
在繼續對應更多類型之前,我們先來談談如何對應文件 ID。
在先前的部分範例中,我們使用 @DocumentID 屬性包裝函式,將 Cloud Firestore 文件的文件 ID 對應至 Swift 型別的 id 屬性。這項調整十分重要,原因有幾項:
- 如果使用者進行本機變更,這有助於我們瞭解要更新哪個文件。
- SwiftUI 的
List需要元素為Identifiable,才能防止元素在插入時跳動。
值得注意的是,標示為 @DocumentID 的屬性在寫回文件時,不會由 Cloud Firestore 的編碼器編碼。這是因為文件 ID 並非文件本身的屬性,因此寫入文件會是錯誤的做法。
使用巢狀型別 (例如本指南先前範例中 Book 上的標記陣列) 時,不需要新增 @DocumentID 屬性:巢狀屬性是 Cloud Firestore 文件的一部分,不構成獨立文件。因此不需要文件 ID。
日期和時間
Cloud Firestore 內建處理日期和時間的資料型別,而且由於 Cloud Firestore 支援 Codable,因此使用這些型別非常簡單。
我們來看看這份文件,瞭解 1843 年發明的 Ada 語言,這可是所有程式設計語言的始祖:

用於對應這份文件的 Swift 型別可能如下所示:
struct ProgrammingLanguage: Codable {
  @DocumentID var id: String?
  var name: String
  var year: Date
}
我們不能在不討論 @ServerTimestamp 的情況下,結束日期和時間這個主題。這個屬性包裝函式在處理應用程式中的時間戳記時,功能非常強大。
在任何分散式系統中,個別系統上的時鐘都不太可能完全同步。您可能認為這沒什麼大不了,但請想像一下,如果股票交易系統的時鐘稍微不同步,會造成什麼影響:即使偏差只有一毫秒,執行交易時也可能造成數百萬美元的差異。
Cloud Firestore 會依下列方式處理標有 @ServerTimestamp 的屬性:如果屬性是 nil (例如使用 addDocument() 儲存),Cloud Firestore 會在寫入資料庫時,以目前的伺服器時間戳記填入欄位。如果您在呼叫 addDocument() 或 updateData() 時,欄位不是 nil,Cloud Firestore 會保留屬性值。這樣一來,您就能輕鬆實作 createdAt 和 lastUpdatedAt 等欄位。
地理點
地理位置資訊在我們的應用程式中無所不在。儲存這些資料後,就能使用許多令人期待的功能。舉例來說,儲存工作地點可能很有用,這樣應用程式就能在您抵達目的地時提醒您工作。
Cloud Firestore 內建資料型別 GeoPoint,可儲存任何地點的經緯度。如要從/到 Cloud Firestore 文件對應位置,可以使用 GeoPoint 型別:
struct Office: Codable {
  @DocumentID var id: String?
  var name: String
  var location: GeoPoint
}
Swift 中的對應型別為 CLLocationCoordinate2D,我們可以透過下列作業在這兩種型別之間對應:
CLLocationCoordinate2D(latitude: office.location.latitude,
                      longitude: office.location.longitude)
如要進一步瞭解如何依實體位置查詢文件,請參閱這份解決方案指南。
列舉
列舉可能是 Swift 中最被低估的語言功能之一,它們的用途遠比您想像的更多。列舉的常見用途是模擬某個項目的離散狀態。舉例來說,我們可能會編寫用於管理文章的應用程式。如要追蹤文章的狀態,我們可能會想使用列舉 Status:
enum Status: String, Codable {
  case draft
  case inReview
  case approved
  case published
}
Cloud Firestore 本身不支援列舉 (即無法強制執行值集),但我們仍可利用列舉可輸入型別的事實,並選擇可編碼的型別。在本範例中,我們選擇了 String,這表示儲存在 Cloud Firestore 文件中的所有列舉值都會對應至/對應自字串。
此外,由於 Swift 支援自訂原始值,我們甚至可以自訂哪些值參照哪些列舉案例。舉例來說,如果我們決定將 Status.inReview 案件儲存為「審查中」,可以按照下列方式更新上述列舉:
enum Status: String, Codable {
  case draft
  case inReview = "in review"
  case approved
  case published
}
自訂對應
有時,我們想對應的 Cloud Firestore 文件屬性名稱,與 Swift 資料模型中的屬性名稱不符。舉例來說,某位同事是 Python 開發人員,決定為所有屬性名稱選擇蛇形命名法。
別擔心,Codable 已經為我們準備好一切!
對於這類情況,我們可以運用 CodingKeys。這是可新增至可編碼結構體的列舉,用於指定特定屬性的對應方式。
請參考這份文件:

如要將這份文件對應至具有 String 類型名稱屬性的結構體,我們需要在 ProgrammingLanguage 結構體中新增 CodingKeys 列舉,並指定文件中的屬性名稱:
struct ProgrammingLanguage: Codable {
  @DocumentID var id: String?
  var name: String
  var year: Date

  enum CodingKeys: String, CodingKey {
    case id
    case name = "language_name"
    case year
  }
}
根據預設,Codable API 會使用 Swift 型別的屬性名稱,判斷要對應的 Cloud Firestore 文件屬性名稱。因此只要屬性名稱相符,就不必將 CodingKeys 新增至可編碼的型別。不過,一旦我們對特定型別使用 CodingKeys,就必須新增要對應的所有屬性名稱。
在上述程式碼片段中,我們定義了 id 屬性,可能想在 SwiftUI List 檢視區塊中做為 ID 使用。如果我們未在 CodingKeys 中指定,系統就不會在擷取資料時對應該值,因此會變成 nil。這會導致 List 檢視畫面填入第一份文件。
對應程序會忽略未列為相應 CodingKeys 列舉案例的任何屬性。如果我們想排除部分屬性,不要對應這些屬性,這項功能就非常實用。
舉例來說,如要排除 reasonWhyILoveThis 屬性,使其不會對應至任何項目,只要從 CodingKeys 列舉中移除該屬性即可:
struct ProgrammingLanguage: Identifiable, Codable {
  @DocumentID var id: String?
  var name: String
  var year: Date
  var reasonWhyILoveThis: String = ""

  enum CodingKeys: String, CodingKey {
    case id
    case name = "language_name"
    case year
  }
}
有時我們可能會想將空白屬性寫回 Cloud Firestore 文件。Swift 具有選用項的概念,可表示缺少值,而 Cloud Firestore 也支援 null 值。不過,如果選用項目有 nil 值,編碼選項的預設行為是直接省略這些項目。@ExplicitNull 可讓我們控管編碼時處理 Swift 選用項目的方式:將選用屬性標示為 @ExplicitNull,即可告知 Cloud Firestore 將這個屬性寫入文件,並在屬性包含 nil 值時設為空值。
使用自訂編碼器和解碼器對應顏色
在介紹 Codable 對應資料的最後一個主題中,我們將介紹自訂編碼器和解碼器。本節不會介紹原生 Cloud Firestore 資料型別,但自訂編碼器和解碼器在 Cloud Firestore 應用程式中非常實用。
「如何對應顏色?」是開發人員最常問的問題之一,不僅適用於 Cloud Firestore,也適用於 Swift 和 JSON 之間的對應。市面上有許多解決方案,但大多數都著重於 JSON,而且幾乎都會將顏色對應為由 RGB 元件組成的巢狀字典。
這似乎有更簡單的解決方法。為什麼我們不使用網頁顏色 (或更具體地說,CSS 十六進位顏色標記) 呢?網頁顏色很容易使用 (基本上只是一個字串),甚至還支援透明度!
如要將 Swift Color 對應至十六進位值,我們需要建立 Swift 擴充功能,將 Codable 新增至 Color。
extension Color {

 init(hex: String) {
    let rgba = hex.toRGBA()

    self.init(.sRGB,
              red: Double(rgba.r),
              green: Double(rgba.g),
              blue: Double(rgba.b),
              opacity: Double(rgba.alpha))
    }

    //... (code for translating between hex and RGBA omitted for brevity)

}

extension Color: Codable {

  public init(from decoder: Decoder) throws {
    let container = try decoder.singleValueContainer()
    let hex = try container.decode(String.self)

    self.init(hex: hex)
  }

  public func encode(to encoder: Encoder) throws {
    var container = encoder.singleValueContainer()
    try container.encode(toHex)
  }

}
使用 decoder.singleValueContainer() 時,我們可將 String 解碼為對應的 Color,不必巢狀化 RGBA 元件。此外,您可以在應用程式的網頁 UI 中使用這些值,不必先進行轉換!
這樣一來,我們就能更新對應代碼的程式碼,直接處理代碼顏色,不必在應用程式的 UI 程式碼中手動對應:
struct Tag: Codable, Hashable {
  var title: String
  var color: Color
}

struct BookWithTags: Codable {
  @DocumentID var id: String?
  var title: String
  var numberOfPages: Int
  var author: String
  var tags: [Tag]
}
處理錯誤
在上述程式碼片段中,我們刻意將錯誤處理機制降至最低,但在正式版應用程式中,請務必妥善處理所有錯誤。
以下程式碼片段說明如何處理可能遇到的任何錯誤狀況:
class MappingSimpleTypesViewModel: ObservableObject {
  @Published var book: Book = .empty
  @Published var errorMessage: String?

  private var db = Firestore.firestore()

  func fetchAndMap() {
    fetchBook(documentId: "hitchhiker")
  }

  func fetchAndMapNonExisting() {
    fetchBook(documentId: "does-not-exist")
  }

  func fetchAndTryMappingInvalidData() {
    fetchBook(documentId: "invalid-data")
  }

  private func fetchBook(documentId: String) {
    let docRef = db.collection("books").document(documentId)

    docRef.getDocument(as: Book.self) { result in
      switch result {
      case .success(let book):
        // A Book value was successfully initialized from the DocumentSnapshot.
        self.book = book
        self.errorMessage = nil
      case .failure(let error):
        // A Book value could not be initialized from the DocumentSnapshot.
        switch error {
        case DecodingError.typeMismatch(_, let context):
          self.errorMessage = "\(error.localizedDescription): \(context.debugDescription)"
        case DecodingError.valueNotFound(_, let context):
          self.errorMessage = "\(error.localizedDescription): \(context.debugDescription)"
        case DecodingError.keyNotFound(_, let context):
          self.errorMessage = "\(error.localizedDescription): \(context.debugDescription)"
        case DecodingError.dataCorrupted(let key):
          self.errorMessage = "\(error.localizedDescription): \(key)"
        default:
          self.errorMessage = "Error decoding document: \(error.localizedDescription)"
        }
      }
    }
  }
}
處理最新即時資訊中的錯誤
上一個程式碼片段示範如何處理擷取單一文件時發生的錯誤。除了擷取資料一次,Cloud Firestore 也支援在更新發生時將更新內容傳送至應用程式,也就是使用所謂的快照監聽器:我們可以在集合 (或查詢) 上註冊快照監聽器,而 Cloud Firestore 會在有更新時呼叫監聽器。
以下程式碼片段說明如何註冊快照監聽器、使用 Codable 對應資料,以及處理可能發生的任何錯誤。並說明如何將新文件新增至集合。如您所見,我們不需要更新保存對應文件的本機陣列,因為快照監聽器中的程式碼會處理這項作業。
class MappingColorsViewModel: ObservableObject {
  @Published var colorEntries = [ColorEntry]()
  @Published var newColor = ColorEntry.empty
  @Published var errorMessage: String?

  private var db = Firestore.firestore()
  private var listenerRegistration: ListenerRegistration?

  public func unsubscribe() {
    if listenerRegistration != nil {
      listenerRegistration?.remove()
      listenerRegistration = nil
    }
  }

  func subscribe() {
    if listenerRegistration == nil {
      listenerRegistration = db.collection("colors")
        .addSnapshotListener { [weak self] (querySnapshot, error) in
          guard let documents = querySnapshot?.documents else {
            self?.errorMessage = "No documents in 'colors' collection"
            return
          }

          self?.colorEntries = documents.compactMap { queryDocumentSnapshot in
            let result = Result { try queryDocumentSnapshot.data(as: ColorEntry.self) }

            switch result {
            case .success(let colorEntry):
              if let colorEntry = colorEntry {
                // A ColorEntry value was successfully initialized from the DocumentSnapshot.
                self?.errorMessage = nil
                return colorEntry
              }
              else {
                // A nil value was successfully initialized from the DocumentSnapshot,
                // or the DocumentSnapshot was nil.
                self?.errorMessage = "Document doesn't exist."
                return nil
              }
            case .failure(let error):
              // A ColorEntry value could not be initialized from the DocumentSnapshot.
              switch error {
              case DecodingError.typeMismatch(_, let context):
                self?.errorMessage = "\(error.localizedDescription): \(context.debugDescription)"
              case DecodingError.valueNotFound(_, let context):
                self?.errorMessage = "\(error.localizedDescription): \(context.debugDescription)"
              case DecodingError.keyNotFound(_, let context):
                self?.errorMessage = "\(error.localizedDescription): \(context.debugDescription)"
              case DecodingError.dataCorrupted(let key):
                self?.errorMessage = "\(error.localizedDescription): \(key)"
              default:
                self?.errorMessage = "Error decoding document: \(error.localizedDescription)"
              }
              return nil
            }
          }
        }
    }
  }

  func addColorEntry() {
    let collectionRef = db.collection("colors")
    do {
      let newDocReference = try collectionRef.addDocument(from: newColor)
      print("ColorEntry stored with new document reference: \(newDocReference)")
    }
    catch {
      print(error)
    }
  }
}
本文使用的所有程式碼片段都屬於範例應用程式,您可以從這個 GitHub 存放區下載。
現在就開始使用 Codable 吧!
Swift 的 Codable API 提供強大且彈性的方式,可將序列化格式的資料對應至應用程式資料模型,反之亦然。在本指南中,您已瞭解在以 Cloud Firestore 做為資料儲存空間的應用程式中,使用這項功能有多麼簡單。
從簡單資料類型的基本範例開始,我們逐步提高資料模型的複雜度,同時能夠依賴 Codable 和 Firebase 的實作項目為我們執行對應作業。
如要進一步瞭解 Codable,建議參閱下列資源:
- John Sundell 撰寫了一篇很棒的文章,介紹 Codable 的基本概念。
- 如果你喜歡看書,可以參考 Mattt 的「Flight School Guide to Swift Codable」。
- 最後,Donny Wals 針對 Codable 推出了一整套系列文章。
雖然我們已盡力編譯完整的Cloud Firestore文件對應指南,但這並非詳盡無遺,您可能使用其他策略來對應類型。請使用下方的「傳送意見」按鈕,告訴我們您用於對應其他類型 Cloud Firestore 資料或以 Swift 表示資料的策略。
沒有任何理由不使用 Cloud Firestore 的 Codable 支援功能。