
अपने ऐप्लिकेशन में Firebase SDK का इस्तेमाल करके, सामान्य OAuth लॉगिन को इंटिग्रेट किया जा सकता है. इससे, उपयोगकर्ताओं को Twitter जैसे OAuth प्रोवाइडर का इस्तेमाल करके, Firebase से पुष्टि करने की सुविधा मिलती है. इससे, साइन-इन करने की पूरी प्रोसेस को पूरा किया जा सकता है.
शुरू करने से पहले
Firebase डिपेंडेंसी इंस्टॉल और मैनेज करने के लिए, Swift Package Manager का इस्तेमाल करें.
- Xcode में, अपना ऐप्लिकेशन प्रोजेक्ट खोलें. इसके बाद, File > Add Packages पर जाएं.
- जब आपसे कहा जाए, तब Firebase Apple प्लैटफ़ॉर्म SDK टूल की रिपॉज़िटरी जोड़ें:
- Firebase Authentication लाइब्रेरी चुनें.
- टारगेट की बिल्ड सेटिंग के Other Linker Flags सेक्शन में
-ObjCफ़्लैग जोड़ें. - इसके बाद, Xcode आपके पैकेज की डिपेंडेंसी से जुड़ी समस्या को हल करना शुरू कर देगा और उन्हें बैकग्राउंड में डाउनलोड करेगा.
https://github.com/firebase/firebase-ios-sdk.git
Twitter खातों का इस्तेमाल करके उपयोगकर्ताओं को साइन इन करने की सुविधा देने के लिए, आपको सबसे पहले अपने Firebase प्रोजेक्ट के लिए Twitter को साइन-इन सेवा देने वाली कंपनी के तौर पर चालू करना होगा:
अपने
Podfileमें ये पॉड शामिल करें:pod 'FirebaseAuth'
- Firebase कंसोल में, Auth सेक्शन खोलें.
- साइन इन करने का तरीका टैब पर जाकर, Twitter सेवा देने वाली कंपनी को चालू करें.
- एपीआई की सेवा देने वाली कंपनी के डेवलपर कंसोल से एपीआई कुंजी और एपीआई सीक्रेट को, सेवा देने वाली कंपनी के कॉन्फ़िगरेशन में जोड़ें:
- Twitter पर अपने ऐप्लिकेशन को डेवलपर ऐप्लिकेशन के तौर पर रजिस्टर करें. इसके बाद, अपने ऐप्लिकेशन का OAuth एपीआई पासकोड और एपीआई सीक्रेट पाएं.
- पक्का करें कि Firebase का OAuth रीडायरेक्ट यूआरआई (जैसे कि
my-app-12345.firebaseapp.com/__/auth/handler) को Twitter ऐप्लिकेशन के कॉन्फ़िगरेशन में, आपके ऐप्लिकेशन की सेटिंग वाले पेज पर अनुमति देने के बाद वापस कॉल करने वाले यूआरएल के तौर पर सेट किया गया हो.
- सेव करें पर क्लिक करें.
Firebase SDK की मदद से, साइन-इन फ़्लो को मैनेज करना
Firebase Apple प्लैटफ़ॉर्म SDK टूल की मदद से, साइन-इन फ़्लो को मैनेज करने के लिए यह तरीका अपनाएं:
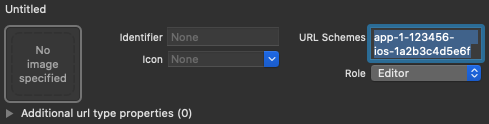
अपने Xcode प्रोजेक्ट में कस्टम यूआरएल स्कीम जोड़ें:
- अपने प्रोजेक्ट का कॉन्फ़िगरेशन खोलें: बाईं ओर मौजूद ट्री व्यू में, प्रोजेक्ट के नाम पर दो बार क्लिक करें. टारगेट सेक्शन में जाकर, अपना ऐप्लिकेशन चुनें. इसके बाद, जानकारी टैब चुनें और यूआरएल टाइप सेक्शन को बड़ा करें.
- + बटन पर क्लिक करें और अपने एन्कोड किए गए ऐप्लिकेशन आईडी को यूआरएल
स्कीम के तौर पर जोड़ें. आपको एन्कोड किया गया ऐप्लिकेशन आईडी, Firebase कंसोल के सामान्य सेटिंग पेज पर मिलेगा. यह आईडी, iOS ऐप्लिकेशन के सेक्शन में मौजूद होता है. अन्य फ़ील्ड खाली छोड़ दें.
सेट अप पूरा होने के बाद, आपका कॉन्फ़िगरेशन कुछ ऐसा दिखेगा. हालांकि, इसमें आपके ऐप्लिकेशन के हिसाब से वैल्यू होंगी:
प्रदाता आईडी twitter.com का इस्तेमाल करके, OAuthProvider का एक इंस्टेंस बनाएं.
Swift
var provider = OAuthProvider(providerID: "twitter.com")
Objective-C
FIROAuthProvider *provider = [FIROAuthProvider providerWithProviderID:@"twitter.com"];
ज़रूरी नहीं: OAuth के ऐसे अन्य कस्टम पैरामीटर तय करें जिन्हें आपको OAuth अनुरोध के साथ भेजना है.
Swift
    provider.customParameters = [
      "lang": "fr"
      ]
Objective-C
[provider setCustomParameters:@{@"lang": @"fr"}];
Twitter के साथ काम करने वाले पैरामीटर के बारे में जानने के लिए, Twitter OAuth का दस्तावेज़ देखें. ध्यान दें कि
setCustomParametersके साथ, Firebase के लिए ज़रूरी पैरामीटर पास नहीं किए जा सकते. ये पैरामीटर client_id, redirect_uri, response_type, scope, और state हैं.ज़रूरी नहीं: अगर आपको यह तय करना है कि आपका ऐप्लिकेशन, उपयोगकर्ता को reCAPTCHA दिखाते समय
SFSafariViewControllerयाUIWebViewको कैसे दिखाएगा, तोAuthUIDelegateप्रोटोकॉल के मुताबिक एक कस्टम क्लास बनाएं और उसेcredentialWithUIDelegateको पास करें.OAuth प्रोवाइडर ऑब्जेक्ट का इस्तेमाल करके, Firebase से पुष्टि करें.
Swift
    provider.getCredentialWith(nil) { credential, error in
      if error != nil {
        // Handle error.
      }
      if credential != nil {
        Auth.auth().signIn(with: credential) { authResult, error in
          if error != nil {
            // Handle error.
          }
          // User is signed in.
          // IdP data available in authResult.additionalUserInfo.profile.
          // Twitter OAuth access token can also be retrieved by:
          // (authResult.credential as? OAuthCredential)?.accessToken
          // Twitter OAuth ID token can be retrieved by calling:
          // (authResult.credential as? OAuthCredential)?.idToken
          // Twitter OAuth secret can be retrieved by calling:
          // (authResult.credential as? OAuthCredential)?.secret
        }
      }
    }
Objective-C
    [provider getCredentialWithUIDelegate:nil
                               completion:^(FIRAuthCredential *_Nullable credential, NSError *_Nullable error) {
      if (error) {
       // Handle error.
      }
      if (credential) {
        [[FIRAuth auth] signInWithCredential:credential
                                  completion:^(FIRAuthDataResult *_Nullable authResult, NSError *_Nullable error) {
          if (error) {
            // Handle error.
          }
          // User is signed in.
          // IdP data available in authResult.additionalUserInfo.profile.
          // Twitter OAuth access token can also be retrieved by:
          // authResult.credential.accessToken
          // Twitter OAuth ID token can be retrieved by calling:
          // authResult.credential.idToken
          // Twitter OAuth secret can be retrieved by calling:
          // authResult.credential.secret
        }];
      }
    }];
OAuth ऐक्सेस टोकन का इस्तेमाल करके, Twitter API को कॉल किया जा सकता है.
उदाहरण के लिए, प्रोफ़ाइल की बुनियादी जानकारी पाने के लिए, REST API को कॉल किया जा सकता है. इसके लिए,
Authorizationहेडर में ऐक्सेस टोकन पास करें:https://api.twitter.com/labs/1/users?usernames=TwitterDev
ऊपर दिए गए उदाहरणों में, साइन-इन फ़्लो पर फ़ोकस किया गया है. हालांकि, आपके पास किसी मौजूदा उपयोगकर्ता के खाते को Twitter से लिंक करने का विकल्प भी होता है. उदाहरण के लिए, एक ही उपयोगकर्ता के खाते से कई सेवा देने वाली कंपनियों को लिंक किया जा सकता है. इससे उपयोगकर्ता, इनमें से किसी भी कंपनी के खाते से साइन इन कर सकता है.
Swift
    Auth().currentUser.link(withCredential: credential) { authResult, error in
      if error != nil {
        // Handle error.
      }
      // Twitter credential is linked to the current user.
      // IdP data available in authResult.additionalUserInfo.profile.
      // Twitter OAuth access token can also be retrieved by:
      // (authResult.credential as? OAuthCredential)?.accessToken
      // Twitter OAuth ID token can be retrieved by calling:
      // (authResult.credential as? OAuthCredential)?.idToken
      // Twitter OAuth secret can be retrieved by calling:
      // (authResult.credential as? OAuthCredential)?.secret
    }
Objective-C
    [[FIRAuth auth].currentUser
        linkWithCredential:credential
                completion:^(FIRAuthDataResult * _Nullable authResult, NSError * _Nullable error) {
      if (error) {
        // Handle error.
      }
      // Twitter credential is linked to the current user.
      // IdP data available in authResult.additionalUserInfo.profile.
      // Twitter OAuth access token is can also be retrieved by:
      // ((FIROAuthCredential *)authResult.credential).accessToken
      // Twitter OAuth ID token can be retrieved by calling:
      // ((FIROAuthCredential *)authResult.credential).idToken
      // Twitter OAuth secret can be retrieved by calling:
      // ((FIROAuthCredential *)authResult.credential).secret
    }];
इसी पैटर्न का इस्तेमाल
reauthenticateWithCredentialके साथ किया जा सकता है. इसका इस्तेमाल, संवेदनशील कार्रवाइयों के लिए नए क्रेडेंशियल वापस पाने के लिए किया जा सकता है. इन कार्रवाइयों के लिए, हाल ही में लॉग इन करना ज़रूरी होता है.Swift
    Auth().currentUser.reauthenticateWithCredential(withCredential: credential) { authResult, error in
      if error != nil {
        // Handle error.
      }
      // User is re-authenticated with fresh tokens minted and
      // should be able to perform sensitive operations like account
      // deletion and email or password update.
      // IdP data available in result.additionalUserInfo.profile.
      // Additional OAuth access token is can also be retrieved by:
      // (authResult.credential as? OAuthCredential)?.accessToken
      // Twitter OAuth ID token can be retrieved by calling:
      // (authResult.credential as? OAuthCredential)?.idToken
      // Twitter OAuth secret can be retrieved by calling:
      // (authResult.credential as? OAuthCredential)?.secret
    }
Objective-C
    [[FIRAuth auth].currentUser
        reauthenticateWithCredential:credential
                          completion:^(FIRAuthDataResult * _Nullable authResult, NSError * _Nullable error) {
      if (error) {
        // Handle error.
      }
      // User is re-authenticated with fresh tokens minted and
      // should be able to perform sensitive operations like account
      // deletion and email or password update.
      // IdP data available in result.additionalUserInfo.profile.
      // Additional OAuth access token is can also be retrieved by:
      // ((FIROAuthCredential *)authResult.credential).accessToken
      // Twitter OAuth ID token can be retrieved by calling:
      // ((FIROAuthCredential *)authResult.credential).idToken
      // Twitter OAuth secret can be retrieved by calling:
      // ((FIROAuthCredential *)authResult.credential).secret
    }];
अगले चरण
जब कोई उपयोगकर्ता पहली बार साइन इन करता है, तो एक नया उपयोगकर्ता खाता बनता है. यह खाता, उन क्रेडेंशियल से लिंक होता है जिनका इस्तेमाल करके उपयोगकर्ता ने साइन इन किया है. जैसे, उपयोगकर्ता का नाम और पासवर्ड, फ़ोन नंबर या पुष्टि करने वाली कंपनी की जानकारी. यह नया खाता, आपके Firebase प्रोजेक्ट के हिस्से के तौर पर सेव किया जाता है. इसका इस्तेमाल, आपके प्रोजेक्ट के हर ऐप्लिकेशन में किसी उपयोगकर्ता की पहचान करने के लिए किया जा सकता है. इससे कोई फ़र्क़ नहीं पड़ता कि उपयोगकर्ता ने किस तरह से साइन इन किया है.
-
अपने ऐप्लिकेशन में,
Userऑब्जेक्ट से उपयोगकर्ता की प्रोफ़ाइल की बुनियादी जानकारी पाई जा सकती है. उपयोगकर्ताओं को मैनेज करना लेख पढ़ें. अपने Firebase Realtime Database और Cloud Storage सुरक्षा नियमों में,
authवैरिएबल से साइन इन किए हुए उपयोगकर्ता का यूनीक User-ID पाया जा सकता है. साथ ही, इसका इस्तेमाल यह कंट्रोल करने के लिए किया जा सकता है कि कोई उपयोगकर्ता किस डेटा को ऐक्सेस कर सकता है.
उपयोगकर्ताओं को पुष्टि करने वाले कई प्रोवाइडर का इस्तेमाल करके, आपके ऐप्लिकेशन में साइन इन करने की अनुमति दी जा सकती है. इसके लिए, पुष्टि करने वाले प्रोवाइडर के क्रेडेंशियल को किसी मौजूदा उपयोगकर्ता खाते से लिंक करें.
किसी उपयोगकर्ता को साइन आउट करने के लिए,
signOut: को कॉल करें.
Swift
let firebaseAuth = Auth.auth()
do {
  try firebaseAuth.signOut()
} catch let signOutError as NSError {
  print("Error signing out: %@", signOutError)
}
Objective-C
NSError *signOutError;
BOOL status = [[FIRAuth auth] signOut:&signOutError];
if (!status) {
  NSLog(@"Error signing out: %@", signOutError);
  return;
}
आपको पुष्टि करने से जुड़ी सभी गड़बड़ियों के लिए, गड़बड़ी मैनेज करने वाला कोड भी जोड़ना पड़ सकता है. गड़बड़ियां ठीक करना लेख पढ़ें.