Sử dụng bộ sưu tập để sắp xếp ngăn nắp các trang
Lưu và phân loại nội dung dựa trên lựa chọn ưu tiên của bạn.
Với ứng dụng Next.js hoặc Angular hiện có (Next.js phiên bản 13.5.x trở lên hoặc Angular 18.2.x trở lên) trong kho lưu trữ GitHub, bạn có thể bắt đầu sử dụng App Hosting một cách dễ dàng bằng cách tạo một phần phụ trợ App Hosting rồi bắt đầu triển khai bằng cách đẩy đến nhánh hoạt động. Nếu bạn không có ứng dụng, hãy dùng một trong các ứng dụng mẫu của chúng tôi để thực hiện các bước được mô tả trong hướng dẫn này.
Trước khi bắt đầu
Trước khi có thể thiết lập Firebase App Hosting, bạn cần tạo một dự án Firebase (nếu chưa có) và nâng cấp lên gói Blaze.
Bước 0 (không bắt buộc): Tạo kho lưu trữ và ứng dụng web trên GitHub
Nếu bạn chưa có ứng dụng web nằm trong một kho lưu trữ GitHub hoặc nếu bạn muốn thử quy trình này với một ứng dụng mẫu, hãy bắt đầu bằng cách khởi tạo một trong các mẫu của chúng tôi, cho Next.js hoặc Angular:
npm init @apphosting
Bạn có thể chạy ứng dụng mẫu cục bộ bằng cách sử dụng next dev hoặc ng start. Để tiếp tục, hãy tạo một kho lưu trữ GitHub mới và đẩy mã mẫu vừa khởi tạo vào đó.
Bước 1: Tạo một phần phụ trợ App Hosting
Phần phụ trợ App Hosting là tập hợp các tài nguyên được quản lý mà App Hosting tạo ra để xây dựng và chạy ứng dụng web của bạn.
Bảng điều khiển của Firebase: Trong trình đơn Tạo, hãy chọn Lưu trữ ứng dụng rồi chọn Bắt đầu.
CLI: (Phiên bản 13.15.4 trở lên) Để tạo một phần phụ trợ, hãy chạy lệnh sau từ gốc của thư mục dự án cục bộ, cung cấp projectID làm đối số:
Đối với cả bảng điều khiển hoặc CLI, hãy làm theo lời nhắc để chọn một khu vực, thiết lập kết nối GitHub và định cấu hình các chế độ cài đặt triển khai cơ bản sau:
Đặt thư mục gốc của ứng dụng (mặc định là /)
Đây thường là nơi lưu trữ tệp package.json của bạn.
Đặt nhánh trực tiếp
Đây là nhánh của kho lưu trữ GitHub được triển khai vào URL trực tiếp của bạn. Đây thường là nhánh mà các nhánh tính năng hoặc nhánh phát triển được hợp nhất.
Chấp nhận hoặc từ chối tính năng phát hành tự động
Tính năng phát hành tự động được bật theo mặc định. Sau khi hoàn tất quá trình tạo phần phụ trợ, bạn có thể chọn triển khai ứng dụng của mình ngay lập tức lên App Hosting.
Đặt tên cho phần phụ trợ của bạn.
Bước 2: Xem ứng dụng đã triển khai
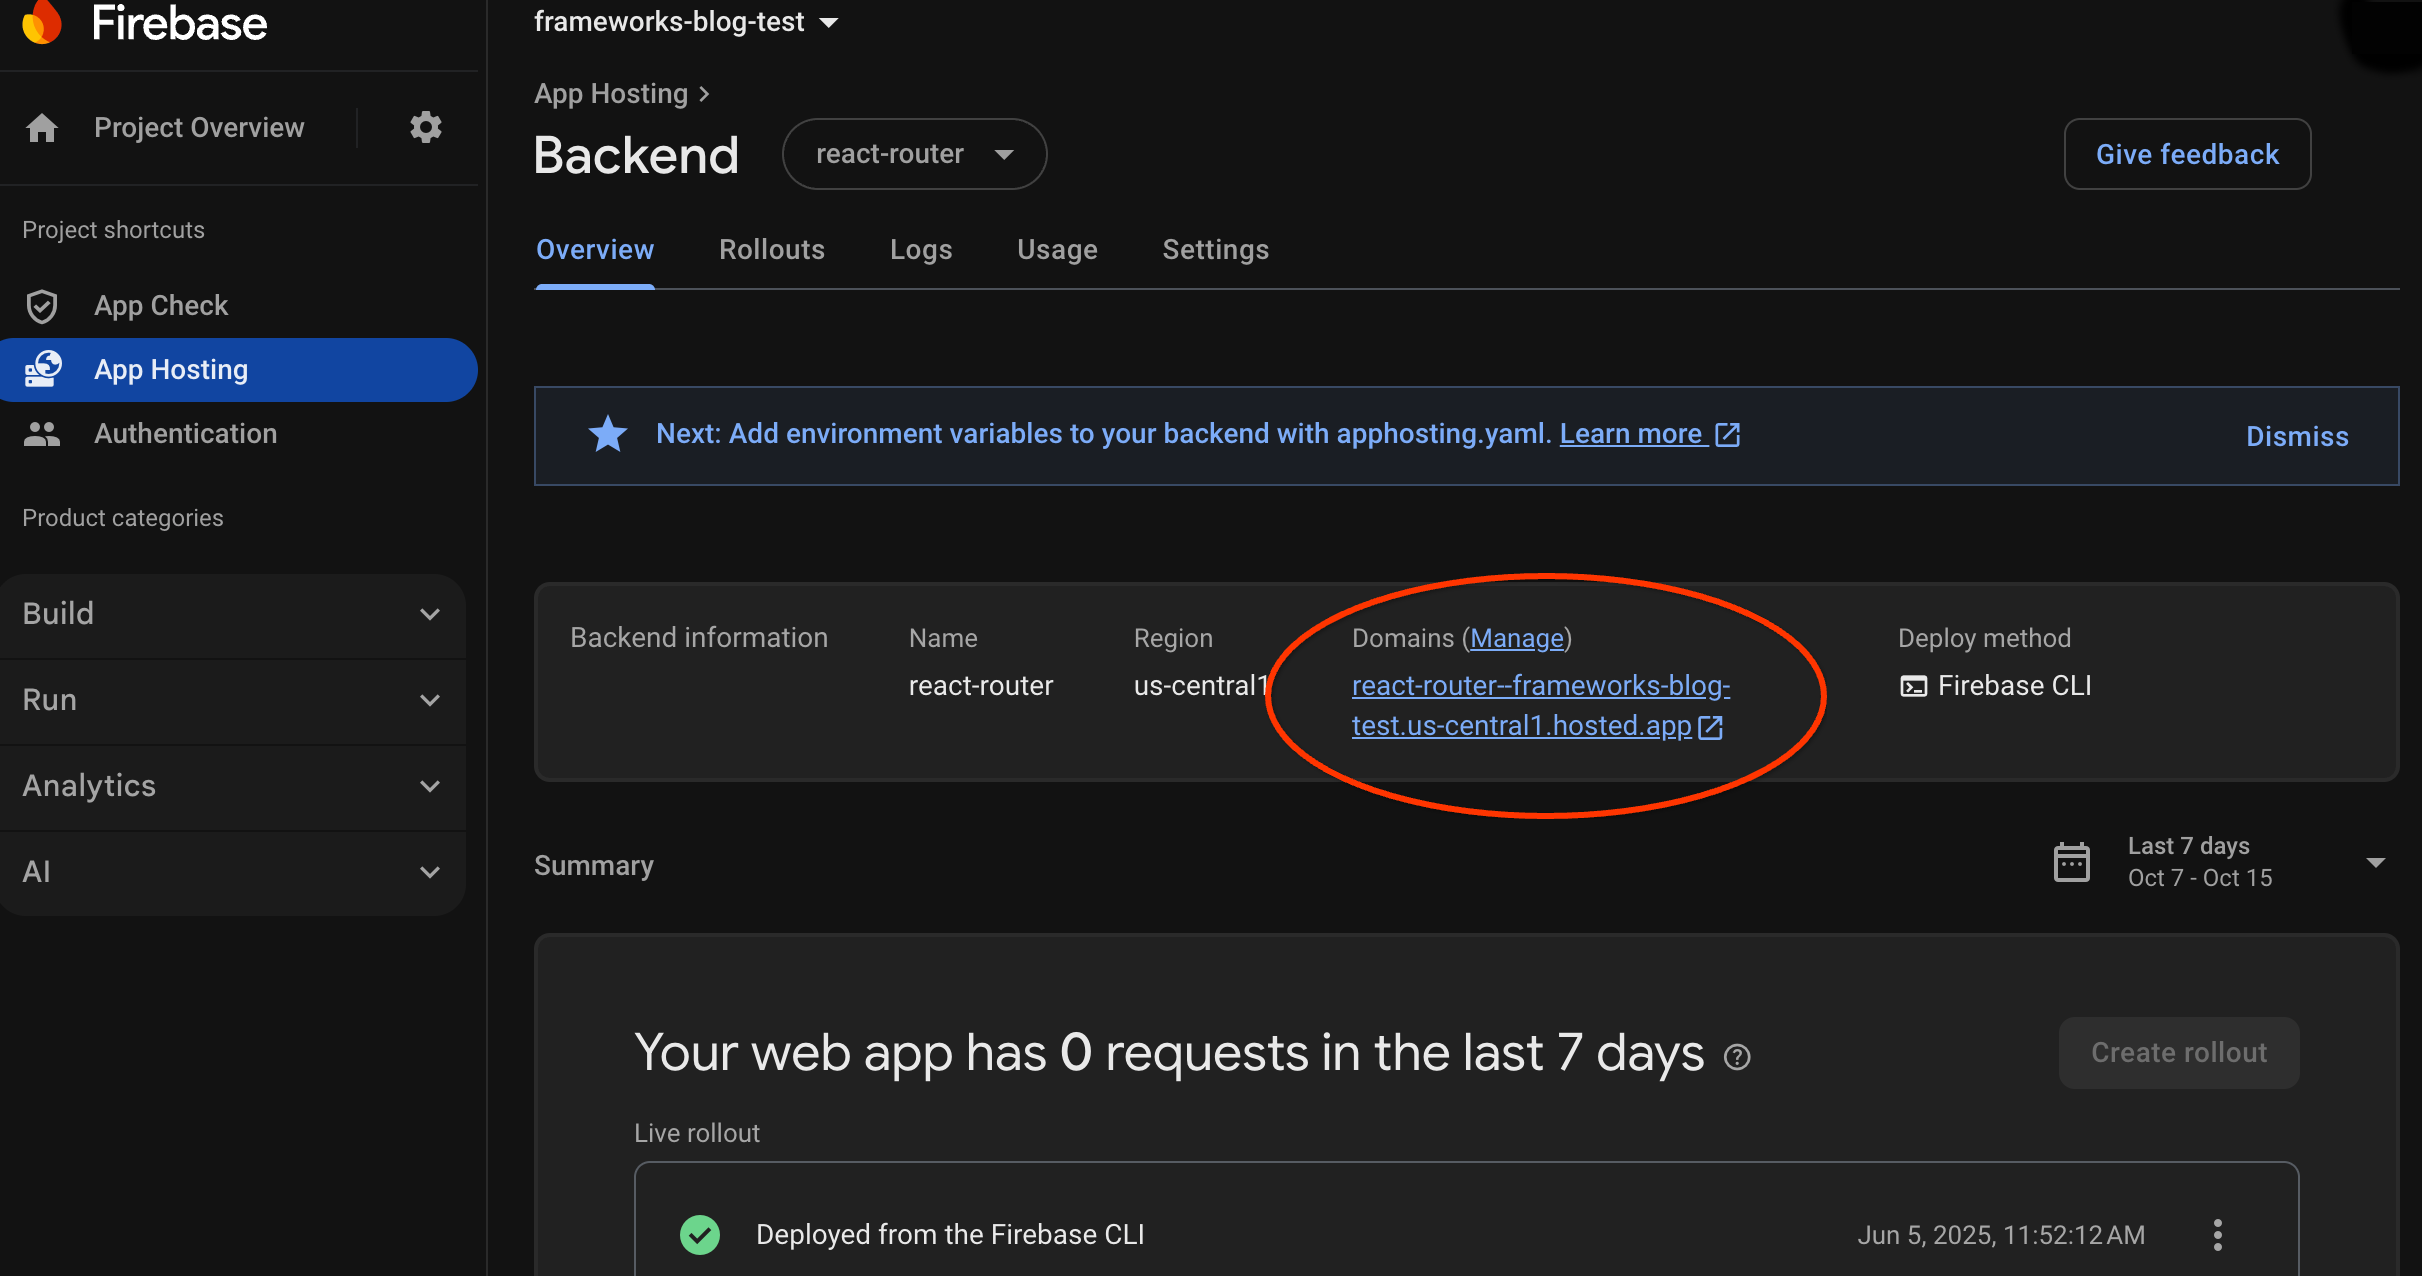
Khi bạn tạo một phần phụ trợ, Firebase sẽ cung cấp cho bạn một miền con miễn phí để người dùng cuối có thể truy cập vào ứng dụng web của bạn. Miền con này có định dạng backend-id--project-id.us-central1.hosted.app.
Để xem URL của ứng dụng web, hãy kiểm tra bảng điều khiển của Firebase hoặc chạy lệnh CLI sau:
Bước 3: Kích hoạt quy trình phát hành bằng cách đẩy một thay đổi
Sau khi tạo phần phụ trợ và có một URL đang hoạt động, bạn có thể kích hoạt việc triển khai phiên bản mới của ứng dụng web bất cứ khi nào bạn đẩy các thay đổi vào nhánh đang hoạt động của kho lưu trữ GitHub. Cách thực hiện kiểm thử chế độ thiết lập App Hosting:
Trong GitHub, hãy đẩy một thay đổi vào nhánh đang hoạt động của ứng dụng web.
Mở thẻ App Hosting trong bảng điều khiển Firebase rồi chọn Xem trang tổng quan cho phần phụ trợ của bạn.
Danh sách bảng cho thấy cam kết cụ thể được liên kết với quy trình phát hành được kích hoạt bởi thay đổi của bạn.
Các bước tiếp theo
Tìm hiểu sâu hơn: xem qua một lớp học lập trình Firebase tích hợp ứng dụng được lưu trữ với Firebase Authentication và các tính năng AI của Google: Next.js | Angular
[null,null,["Cập nhật lần gần đây nhất: 2025-08-23 UTC."],[],[],null,["\u003cbr /\u003e\n\nWith an existing Next.js or Angular app (Next.js versions 13.5.x+\nor Angular 18.2.x+)\nin a GitHub repository, getting started with App Hosting can be as\nstraightforward as creating an App Hosting backend and then starting a\nrollout with a push to your live branch. If you don't have an app, use one of\nour sample apps to walk through the steps described in this guide.\n\nBefore you begin\n\nBefore you can set up Firebase App Hosting, you'll need to create a Firebase\nproject (if you don't already have one) and upgrade to the Blaze plan.\n\nTo create a project:\n\nNew to Firebase or Cloud\n\n\nFollow these steps if you're new to Firebase or Google Cloud. \n\nYou can also follow these steps if you want to create a wholly new\nFirebase project (and its underlying Google Cloud project).\n\n1. Sign into the [Firebase console](//console.firebase.google.com/).\n2. Click the button to create a new Firebase project.\n3. In the text field, enter a **project name**.\n\n If you're part of a Google Cloud org, you can optionally select which\n folder you create your project in.\n | Your project name is used as a display name in Firebase interfaces, and Firebase auto-creates a unique project ID based on this project name. Note that you can optionally click the **Edit** icon now to set your preferred project ID, but you cannot change this ID after project creation. Learn about [how Firebase uses the\n | project ID](/docs/projects/learn-more#project-id).\n4. If prompted, review and accept the [Firebase terms](/terms), then click **Continue**.\n5. *(Optional)* Enable AI assistance in the Firebase console (called \"Gemini in Firebase\"), which can help you get started and streamline your development process.\n6. *(Optional)* Set up Google Analytics for your project,\n which enables an optimal experience using these Firebase products:\n [Firebase A/B Testing](/docs/ab-testing),\n [Cloud Messaging](/docs/cloud-messaging),\n [Crashlytics](/docs/crashlytics),\n [In-App Messaging](/docs/in-app-messaging), and\n [Remote Config](/docs/remote-config)\n (including\n [Personalization](/docs/remote-config/personalization)).\n\n Either select an existing\n [Google Analytics account](//support.google.com/analytics/answer/1009618)\n or create a new account. If you create a new account, select your\n [Analytics reporting location](/docs/projects/locations),\n then accept the data sharing settings and Google Analytics terms\n for your project.\n | You can always set up Google Analytics later in the [*Integrations* tab](//console.firebase.google.com/project/_/settings/integrations) of your settings *Project settings*.\n7. Click **Create project**.\n\nFirebase creates your project, provisions some initial resources, and\nenables important APIs. When the process completes, you'll be taken to the\noverview page for your Firebase project in the Firebase console.\n\nExisting Cloud project\n\n\nFollow these steps if you want to start using Firebase with an existing\nGoogle Cloud project. Learn more about\n[\"adding\nFirebase\" to an existing Google Cloud project](/docs/projects/use-firebase-with-existing-cloud-project).\n\n1. Sign into the [Firebase console](//console.firebase.google.com/) with the account that gives you access to the existing Google Cloud project.\n2. Click the button to create a new Firebase project.\n3. At the bottom of the page, click **Add Firebase to Google Cloud project**.\n4. In the text field, start entering the **project name** of the existing project, and then select the project from the displayed list.\n5. Click **Open project**.\n6. If prompted, review and accept the [Firebase terms](/terms), then click **Continue**.\n7. *(Optional)* Enable AI assistance in the Firebase console (called \"Gemini in Firebase\"), which can help you get started and streamline your development process.\n8. *(Optional)* Set up Google Analytics for your project,\n which enables an optimal experience using these Firebase products:\n [Firebase A/B Testing](/docs/ab-testing),\n [Cloud Messaging](/docs/cloud-messaging),\n [Crashlytics](/docs/crashlytics),\n [In-App Messaging](/docs/in-app-messaging), and\n [Remote Config](/docs/remote-config)\n (including\n [Personalization](/docs/remote-config/personalization)).\n\n Either select an existing\n [Google Analytics account](//support.google.com/analytics/answer/1009618)\n or create a new account. If you create a new account, select your\n [Analytics reporting location](/docs/projects/locations),\n then accept the data sharing settings and Google Analytics terms\n for your project.\n | You can always set up Google Analytics later in the [*Integrations* tab](//console.firebase.google.com/project/_/settings/integrations) of your settings *Project settings*.\n9. Click **Add Firebase**.\n\nFirebase\n[adds\nFirebase to your existing project](/docs/projects/use-firebase-with-existing-cloud-project#faq_what-happens-when-add-firebase).\nWhen the process completes, you'll be taken to the overview page for your\nFirebase project in the Firebase console.\n\nStep 0 (optional): Create a GitHub repository and web app\n\nIf you don't already have a web app residing in a GitHub repository, or if you'd\nrather try the flow with a sample app, start by initializing one of our samples,\nfor either Next.js or Angular: \n\n npm init @apphosting\n\nYou can run the sample app locally using `next dev` or `ng start`. To continue,\n[create a new GitHub repository](https://docs.github.com/en/repositories/creating-and-managing-repositories/creating-a-new-repository)\nand push the newly-initialized sample code to it.\n\nStep 1: Create an App Hosting backend\n\nAn App Hosting backend is the collection of managed resources that\nApp Hosting creates to build and run your web app.\n| A project Owner must create the *first* App Hosting backend for a project. After this initial setup, App Hosting Admins also can create and manage additional backends. For details, see [Firebase App Hosting IAM roles](/docs/projects/iam/roles-predefined-product#app-hosting).\n\n**Firebase console** : From the **Build** menu, select **App Hosting** and then\n**Get started**.\n\n**CLI:** (Version 13.15.4 or later) To create a backend, run the following\ncommand from the root of your local project directory, supplying your\n[projectID](/docs/projects/learn-more#project-id) as an argument: \n\n firebase apphosting:backends:create --project \u003cvar label=\"project ID\" translate=\"no\"\u003ePROJECT_ID\u003c/var\u003e\n\nFor both console or CLI, follow the prompts to choose a\n[region](/docs/app-hosting/about-app-hosting#locations), set up a\n[GitHub connection](/docs/app-hosting/about-app-hosting#repo-integration),\nand configure these basic deployment settings:\n\n- Set **your app's root directory** (defaults to `/`)\n\n This is usually where your `package.json` file is located.\n\n\u003c!-- --\u003e\n\n- Set the **live branch**\n\n This is the branch of your GitHub repository that gets deployed to your\n live URL. Often, it's the branch into which feature branches or development\n branches are merged.\n- Accept or decline **automatic rollouts**\n\n Automatic rollouts are enabled by default. At completion of backend creation,\n you can choose for your app to be deployed to App Hosting immediately.\n- Assign a name to your backend.\n\nStep 2: View the deployed app\n\nWhen you create a backend, Firebase gives you a no-cost subdomain where end\nusers can visit your web app. Its format\nis \u003cvar translate=\"no\"\u003ebackend-id\u003c/var\u003e`--`\u003cvar translate=\"no\"\u003eproject-id\u003c/var\u003e`.us-central1.hosted.app`.\n\nTo view your web app's URL, check the Firebase console, or run the following CLI\ncommand: \n\n firebase apphosting:backends:get --project \u003cvar translate=\"no\"\u003ePROJECT_ID\u003c/var\u003e \u003cvar translate=\"no\"\u003e{BACKEND_ID}\u003c/var\u003e\n\n| **Note:** After creating your backend, it may take around five minutes for your app's URL to work.\n\nStep 3: Trigger a rollout by pushing a change\n\nOnce your backend is created and you have a live URL, you can\ntrigger the rollout of a new version of your web app whenever you push\nchanges into the live branch of your GitHub repository. To perform a\ntest of your App Hosting setup:\n\n1. In GitHub, push a change to the live branch of the web app.\n2. Open the [App Hosting tab](//console.firebase.google.com/project/_/apphosting) in the Firebase console and select **View dashboard** for your backend. The table list displays the specific commit associated with the rollout triggered by your change.\n\nNext steps\n\n- Go deeper: walk through a Firebase codelab that integrates a hosted app with Firebase Authentication and Google AI features: [Next.js](https://firebase.google.com/codelabs/firebase-nextjs) \\| [Angular](https://firebase.google.com/codelabs/firebase-web)\n- [Connect a custom domain](/docs/app-hosting/custom-domain).\n- [Configure your backend](/docs/app-hosting/configure)---set environment variables, store secret parameters, and more.\n- [Monitor rollouts, site usage, and logs](/docs/app-hosting/rollouts)."]]