
Bạn có thể cho phép người dùng xác thực bằng Firebase thông qua các nhà cung cấp OAuth như Twitter bằng cách tích hợp tính năng Đăng nhập OAuth chung vào ứng dụng bằng Firebase SDK để thực hiện quy trình đăng nhập từ đầu đến cuối.
Trước khi bắt đầu
Sử dụng Swift Package Manager để cài đặt và quản lý các phần phụ thuộc của Firebase.
- Trong Xcode, khi dự án ứng dụng của bạn đang mở, hãy chuyển đến File > Add Packages (Tệp > Thêm gói).
- Khi được nhắc, hãy thêm kho lưu trữ SDK Firebase cho các nền tảng của Apple:
- Chọn thư viện Firebase Authentication.
- Thêm cờ
-ObjCvào mục Cờ trình liên kết khác trong chế độ cài đặt bản dựng của mục tiêu. - Khi hoàn tất, Xcode sẽ tự động bắt đầu phân giải và tải các phần phụ thuộc của bạn xuống ở chế độ nền.
https://github.com/firebase/firebase-ios-sdk.git
Để đăng nhập người dùng bằng tài khoản Twitter, trước tiên, bạn phải bật Twitter làm nhà cung cấp dịch vụ đăng nhập cho dự án Firebase của mình:
Thêm các nhóm sau vào
Podfilecủa bạn:pod 'FirebaseAuth'
- Trong bảng điều khiển Firebase, hãy mở mục Xác thực.
- Trên thẻ Phương thức đăng nhập, hãy bật trình cung cấp Twitter.
- Thêm khoá API và khoá bí mật API từ bảng điều khiển dành cho nhà phát triển của nhà cung cấp đó vào cấu hình nhà cung cấp:
- Đăng ký ứng dụng làm ứng dụng dành cho nhà phát triển trên Twitter và nhận khoá API OAuth cũng như khoá bí mật API của ứng dụng.
- Đảm bảo rằng URI chuyển hướng OAuth của Firebase (ví dụ:
my-app-12345.firebaseapp.com/__/auth/handler) được đặt làm URL gọi lại uỷ quyền trong trang cài đặt của ứng dụng trên cấu hình ứng dụng Twitter.
- Nhấp vào Lưu.
Xử lý quy trình đăng nhập bằng Firebase SDK
Để xử lý quy trình đăng nhập bằng Firebase Apple Platforms SDK, hãy làm theo các bước sau:
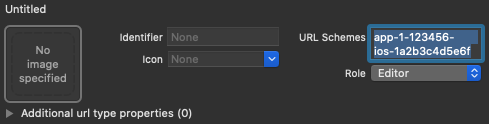
Thêm giản đồ URL tuỳ chỉnh vào dự án Xcode:
- Mở cấu hình dự án: nhấp đúp vào tên dự án trong chế độ xem dạng cây bên trái. Chọn ứng dụng của bạn trong mục MỤC TIÊU, sau đó chọn thẻ Thông tin rồi mở rộng mục Loại URL.
- Nhấp vào nút + rồi thêm Mã ứng dụng đã mã hoá dưới dạng một lược đồ URL. Bạn có thể tìm thấy Mã ứng dụng được mã hoá trên trang Cài đặt chung của bảng điều khiển Firebase, trong mục dành cho ứng dụng iOS của bạn. Hãy để trống các trường khác.
Sau khi hoàn tất, cấu hình của bạn sẽ có dạng tương tự như sau (nhưng có các giá trị dành riêng cho ứng dụng của bạn):
Tạo một phiên bản OAuthProvider bằng cách sử dụng mã nhận dạng nhà cung cấp twitter.com.
Swift
var provider = OAuthProvider(providerID: "twitter.com")
Objective-C
FIROAuthProvider *provider = [FIROAuthProvider providerWithProviderID:@"twitter.com"];
Không bắt buộc: Chỉ định các thông số OAuth tuỳ chỉnh bổ sung mà bạn muốn gửi cùng với yêu cầu OAuth.
Swift
    provider.customParameters = [
      "lang": "fr"
      ]
Objective-C
[provider setCustomParameters:@{@"lang": @"fr"}];
Để biết các tham số mà Twitter hỗ trợ, hãy xem tài liệu về OAuth của Twitter. Xin lưu ý rằng bạn không thể truyền các tham số bắt buộc của Firebase bằng
setCustomParameters. Các thông số này là client_id, redirect_uri, response_type, scope và state.Không bắt buộc: Nếu bạn muốn tuỳ chỉnh cách ứng dụng của mình trình bày
SFSafariViewControllerhoặcUIWebViewkhi hiển thị reCAPTCHA cho người dùng, hãy tạo một lớp tuỳ chỉnh tuân theo giao thứcAuthUIDelegatevà truyền lớp đó đếncredentialWithUIDelegate.Xác thực bằng Firebase thông qua đối tượng trình cung cấp OAuth.
Swift
    provider.getCredentialWith(nil) { credential, error in
      if error != nil {
        // Handle error.
      }
      if credential != nil {
        Auth.auth().signIn(with: credential) { authResult, error in
          if error != nil {
            // Handle error.
          }
          // User is signed in.
          // IdP data available in authResult.additionalUserInfo.profile.
          // Twitter OAuth access token can also be retrieved by:
          // (authResult.credential as? OAuthCredential)?.accessToken
          // Twitter OAuth ID token can be retrieved by calling:
          // (authResult.credential as? OAuthCredential)?.idToken
          // Twitter OAuth secret can be retrieved by calling:
          // (authResult.credential as? OAuthCredential)?.secret
        }
      }
    }
Objective-C
    [provider getCredentialWithUIDelegate:nil
                               completion:^(FIRAuthCredential *_Nullable credential, NSError *_Nullable error) {
      if (error) {
       // Handle error.
      }
      if (credential) {
        [[FIRAuth auth] signInWithCredential:credential
                                  completion:^(FIRAuthDataResult *_Nullable authResult, NSError *_Nullable error) {
          if (error) {
            // Handle error.
          }
          // User is signed in.
          // IdP data available in authResult.additionalUserInfo.profile.
          // Twitter OAuth access token can also be retrieved by:
          // authResult.credential.accessToken
          // Twitter OAuth ID token can be retrieved by calling:
          // authResult.credential.idToken
          // Twitter OAuth secret can be retrieved by calling:
          // authResult.credential.secret
        }];
      }
    }];
Bạn có thể gọi Twitter API bằng mã truy cập OAuth.
Ví dụ: để lấy thông tin cơ bản về hồ sơ, bạn có thể gọi API REST, truyền mã truy cập trong tiêu đề
Authorization:https://api.twitter.com/labs/1/users?usernames=TwitterDev
Mặc dù các ví dụ trên tập trung vào quy trình đăng nhập, nhưng bạn cũng có thể liên kết một nhà cung cấp Twitter với một người dùng hiện có. Ví dụ: bạn có thể liên kết nhiều nhà cung cấp với cùng một người dùng, cho phép họ đăng nhập bằng một trong hai nhà cung cấp.
Swift
    Auth().currentUser.link(withCredential: credential) { authResult, error in
      if error != nil {
        // Handle error.
      }
      // Twitter credential is linked to the current user.
      // IdP data available in authResult.additionalUserInfo.profile.
      // Twitter OAuth access token can also be retrieved by:
      // (authResult.credential as? OAuthCredential)?.accessToken
      // Twitter OAuth ID token can be retrieved by calling:
      // (authResult.credential as? OAuthCredential)?.idToken
      // Twitter OAuth secret can be retrieved by calling:
      // (authResult.credential as? OAuthCredential)?.secret
    }
Objective-C
    [[FIRAuth auth].currentUser
        linkWithCredential:credential
                completion:^(FIRAuthDataResult * _Nullable authResult, NSError * _Nullable error) {
      if (error) {
        // Handle error.
      }
      // Twitter credential is linked to the current user.
      // IdP data available in authResult.additionalUserInfo.profile.
      // Twitter OAuth access token is can also be retrieved by:
      // ((FIROAuthCredential *)authResult.credential).accessToken
      // Twitter OAuth ID token can be retrieved by calling:
      // ((FIROAuthCredential *)authResult.credential).idToken
      // Twitter OAuth secret can be retrieved by calling:
      // ((FIROAuthCredential *)authResult.credential).secret
    }];
Bạn có thể sử dụng cùng một mẫu với
reauthenticateWithCredential. Mẫu này có thể dùng để truy xuất thông tin đăng nhập mới cho các thao tác nhạy cảm đòi hỏi phải đăng nhập gần đây.Swift
    Auth().currentUser.reauthenticateWithCredential(withCredential: credential) { authResult, error in
      if error != nil {
        // Handle error.
      }
      // User is re-authenticated with fresh tokens minted and
      // should be able to perform sensitive operations like account
      // deletion and email or password update.
      // IdP data available in result.additionalUserInfo.profile.
      // Additional OAuth access token is can also be retrieved by:
      // (authResult.credential as? OAuthCredential)?.accessToken
      // Twitter OAuth ID token can be retrieved by calling:
      // (authResult.credential as? OAuthCredential)?.idToken
      // Twitter OAuth secret can be retrieved by calling:
      // (authResult.credential as? OAuthCredential)?.secret
    }
Objective-C
    [[FIRAuth auth].currentUser
        reauthenticateWithCredential:credential
                          completion:^(FIRAuthDataResult * _Nullable authResult, NSError * _Nullable error) {
      if (error) {
        // Handle error.
      }
      // User is re-authenticated with fresh tokens minted and
      // should be able to perform sensitive operations like account
      // deletion and email or password update.
      // IdP data available in result.additionalUserInfo.profile.
      // Additional OAuth access token is can also be retrieved by:
      // ((FIROAuthCredential *)authResult.credential).accessToken
      // Twitter OAuth ID token can be retrieved by calling:
      // ((FIROAuthCredential *)authResult.credential).idToken
      // Twitter OAuth secret can be retrieved by calling:
      // ((FIROAuthCredential *)authResult.credential).secret
    }];
Các bước tiếp theo
Sau khi người dùng đăng nhập lần đầu tiên, một tài khoản người dùng mới sẽ được tạo và liên kết với thông tin đăng nhập (tức là tên người dùng và mật khẩu, số điện thoại hoặc thông tin nhà cung cấp dịch vụ uỷ quyền) mà người dùng đã đăng nhập. Tài khoản mới này được lưu trữ trong dự án Firebase của bạn và có thể dùng để xác định một người dùng trên mọi ứng dụng trong dự án, bất kể người dùng đăng nhập bằng cách nào.
-
Trong các ứng dụng, bạn có thể lấy thông tin cơ bản về hồ sơ của người dùng từ đối tượng
User. Hãy xem phần Quản lý người dùng. Trong Firebase Realtime Database và Cloud Storage Quy tắc bảo mật, bạn có thể lấy mã nhận dạng người dùng riêng biệt của người dùng đã đăng nhập từ biến
authvà dùng mã nhận dạng đó để kiểm soát dữ liệu mà người dùng có thể truy cập.
Bạn có thể cho phép người dùng đăng nhập vào ứng dụng của bạn bằng nhiều trình cung cấp dịch vụ xác thực bằng cách liên kết thông tin đăng nhập của trình cung cấp dịch vụ xác thực với một tài khoản người dùng hiện có.
Để đăng xuất người dùng, hãy gọi
signOut:.
Swift
let firebaseAuth = Auth.auth()
do {
  try firebaseAuth.signOut()
} catch let signOutError as NSError {
  print("Error signing out: %@", signOutError)
}
Objective-C
NSError *signOutError;
BOOL status = [[FIRAuth auth] signOut:&signOutError];
if (!status) {
  NSLog(@"Error signing out: %@", signOutError);
  return;
}
Bạn cũng có thể muốn thêm mã xử lý lỗi cho toàn bộ các lỗi xác thực. Xem phần Xử lý lỗi.