
如果您已升級至 Firebase Authentication with Identity Platform,可以為 iOS 應用程式新增簡訊多重驗證。
多重驗證可以為應用程式提供更完善的安全防護機制。攻擊者通常會竊取密碼及盜用社群媒體帳戶,但簡訊攔截則牽涉較為複雜的作業。
事前準備
啟用至少一個支援多重驗證的提供者。 所有供應商都支援多重驗證,但電話驗證、匿名驗證和 Apple Game Center 除外。
確認應用程式會驗證使用者電子郵件地址。多重驗證需要電子郵件驗證。 這樣一來,惡意人士就無法使用不屬於自己的電子郵件註冊服務,然後新增第二個驗證因素,將真正的擁有者鎖在門外。
啟用多重驗證
在「登入方法」分頁的「進階」部分,啟用「簡訊多重驗證」。
您也應輸入要用來測試應用程式的電話號碼。 雖然這不是必要步驟,我們仍強烈建議您註冊測試電話號碼,以免在開發期間發生節流情形。
如果尚未授權應用程式的網域,請按照下列步驟操作:
在 Firebase 控制台中,依序前往「Security」(安全性) >「Authentication」(驗證) >「Settings」(設定) 分頁。
在「Authorized domains」(已授權網域) 區段,按一下「Add domain」(新增網域),並新增您的網域。
驗證應用程式
Firebase需要驗證簡訊要求是否來自您的應用程式。您可以透過下列兩種方式驗證:
無聲 APNs 通知:首次登入使用者時,Firebase 可以向使用者的裝置傳送無聲推播通知。應用程式收到通知後,即可繼續進行驗證。 請注意,自 iOS 8.0 起,您不需要要求使用者允許推播通知,即可使用這個方法。
reCAPTCHA 驗證:如果無法傳送無聲通知 (例如使用者已停用背景重新整理,或您在 iOS 模擬器中測試應用程式),可以使用 reCAPTCHA。在許多情況下,reCAPTCHA 會自動解決,不需使用者操作。
使用靜音通知
如要啟用 APNs 通知,以便搭配 Firebase 使用,請按照下列步驟操作:
在 Xcode 中,為專案啟用推播通知。
使用 Firebase 主控台上傳 APN 驗證金鑰 (變更會自動套用至 Google Cloud Firebase)。如果還沒有 APN 驗證金鑰,請參閱「使用 FCM 設定 APN」,瞭解如何取得金鑰。
在 Firebase 控制台中,依序前往「設定」
>「一般」。然後按一下「雲端通訊」分頁標籤。 在「APNs 驗證金鑰」下方的「iOS 應用程式設定」部分,按一下「上傳」,上傳開發或正式版驗證金鑰,或兩者皆上傳。至少擇一提供。
選取鑰匙。
新增金鑰的 ID。您可以在 Apple Developer Member Center 的「Certificates, Identifiers & Profiles」(憑證、ID 與設定檔) 下方找到金鑰 ID。
點選「上傳」。
如果您已有 APN 憑證,可以改為上傳憑證。
使用 reCAPTCHA 驗證
如要讓用戶端 SDK 使用 reCAPTCHA,請按照下列步驟操作:
在 Xcode 中開啟專案設定。
在左側樹狀檢視中,按兩下專案名稱。
從「目標」部分選取應用程式。
選取「資訊」分頁標籤。
展開「網址類型」部分。
按一下「+」按鈕。
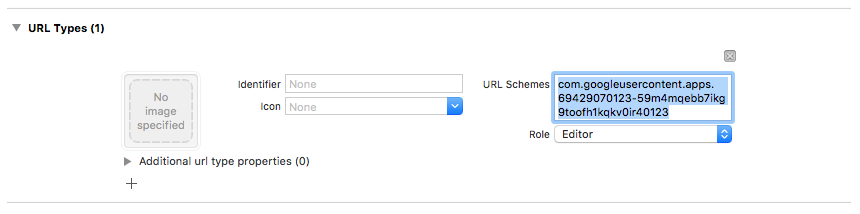
在「URL Schemes」(網址架構) 欄位中輸入反向用戶端 ID。您可以在
GoogleService-Info.plist設定檔中找到這個值,顯示為REVERSED_CLIENT_ID。
完成後,設定應如下所示:
(選用) 您可以自訂應用程式顯示 reCAPTCHA 時呈現 SFSafariViewController 或 UIWebView 的方式。如要執行這項操作,請建立符合 FIRAuthUIDelegate 通訊協定的自訂類別,並將其傳遞至 verifyPhoneNumber:UIDelegate:completion:。
選擇註冊模式
您可以選擇應用程式是否需要多重驗證,以及如何和何時註冊使用者。常見的模式包括:
在註冊程序中,為使用者註冊第二個驗證因素。如果應用程式要求所有使用者啟用多重驗證,請使用這個方法。請注意,帳戶必須先驗證電子郵件地址,才能註冊第二個驗證因素,因此註冊流程必須配合這項規定。
在註冊期間提供可略過的選項,讓使用者註冊第二重驗證。如果應用程式希望鼓勵使用者啟用多重驗證,但並非強制要求,則可能較適合採用這種做法。
讓使用者在帳戶或個人資料管理頁面新增第二個驗證要素,而非在註冊畫面新增。這麼做可減少註冊程序中的操作阻力,同時仍為注重安全性的使用者提供多重驗證功能。
當使用者想存取安全要求較高的功能時,逐步要求新增第二重驗證資訊。
註冊第二個驗證步驟
如要為使用者註冊新的次要驗證因素,請按照下列步驟操作:
重新驗證使用者。
要求使用者輸入電話號碼。
取得使用者的多重驗證工作階段:
Swift
authResult.user.multiFactor.getSessionWithCompletion() { (session, error) in
  // ...
}
Objective-C
[authResult.user.multiFactor
  getSessionWithCompletion:^(FIRMultiFactorSession * _Nullable session,
                            NSError * _Nullable error) {
    // ...
}];
將驗證訊息傳送至使用者的手機。確認電話號碼的格式為開頭加上
+,且不含其他標點符號或空白字元 (例如:+15105551234)Swift
// Send SMS verification code.
PhoneAuthProvider.provider().verifyPhoneNumber(
  phoneNumber,
  uiDelegate: nil,
  multiFactorSession: session) { (verificationId, error) in
    // verificationId will be needed for enrollment completion.
}
Objective-C
// Send SMS verification code.
[FIRPhoneAuthProvider.provider verifyPhoneNumber:phoneNumber
                                      UIDelegate:nil
                              multiFactorSession:session
                                      completion:^(NSString * _Nullable verificationID,
                                                    NSError * _Nullable error) {
    // verificationId will be needed for enrollment completion.
}];
雖然不是必要步驟,但建議您事先告知使用者會收到簡訊,並說明會收取標準費率。
verifyPhoneNumber()方法會使用無聲推播通知,在背景啟動應用程式驗證程序。如果無法使用無聲推播通知,系統會改為發出 reCAPTCHA 驗證問題。簡訊驗證碼傳送完畢後,請要求使用者驗證該驗證碼。然後,使用他們的回覆建構
PhoneAuthCredential:Swift
// Ask user for the verification code. Then:
let credential = PhoneAuthProvider.provider().credential(
  withVerificationID: verificationId,
  verificationCode: verificationCode)
Objective-C
// Ask user for the SMS verification code. Then:
FIRPhoneAuthCredential *credential = [FIRPhoneAuthProvider.provider
                                       credentialWithVerificationID:verificationID
                                       verificationCode:kPhoneSecondFactorVerificationCode];
初始化斷言物件:
Swift
let assertion = PhoneMultiFactorGenerator.assertion(with: credential)Objective-C
FIRMultiFactorAssertion *assertion = [FIRPhoneMultiFactorGenerator assertionWithCredential:credential];完成註冊。你也可以選擇指定第二個驗證因素的顯示名稱。如果使用者有多個第二重驗證方法,這項功能就非常實用,因為驗證流程會遮蓋電話號碼 (例如 +1******1234)。
Swift
// Complete enrollment. This will update the underlying tokens
// and trigger ID token change listener.
user.multiFactor.enroll(with: assertion, displayName: displayName) { (error) in
  // ...
}
Objective-C
// Complete enrollment. This will update the underlying tokens
// and trigger ID token change listener.
[authResult.user.multiFactor enrollWithAssertion:assertion
                                     displayName:nil
                                      completion:^(NSError * _Nullable error) {
    // ...
}];
以下程式碼完整示範如何註冊第二個驗證因素:
Swift
let user = Auth.auth().currentUser
user?.multiFactor.getSessionWithCompletion({ (session, error) in
  // Send SMS verification code.
  PhoneAuthProvider.provider().verifyPhoneNumber(
    phoneNumber,
    uiDelegate: nil,
    multiFactorSession: session
  ) { (verificationId, error) in
    // verificationId will be needed for enrollment completion.
    // Ask user for the verification code.
    let credential = PhoneAuthProvider.provider().credential(
      withVerificationID: verificationId!,
      verificationCode: phoneSecondFactorVerificationCode)
    let assertion = PhoneMultiFactorGenerator.assertion(with: credential)
    // Complete enrollment. This will update the underlying tokens
    // and trigger ID token change listener.
    user?.multiFactor.enroll(with: assertion, displayName: displayName) { (error) in
      // ...
    }
  }
})
Objective-C
FIRUser *user = FIRAuth.auth.currentUser;
[user.multiFactor getSessionWithCompletion:^(FIRMultiFactorSession * _Nullable session,
                                              NSError * _Nullable error) {
    // Send SMS verification code.
    [FIRPhoneAuthProvider.provider
      verifyPhoneNumber:phoneNumber
      UIDelegate:nil
      multiFactorSession:session
      completion:^(NSString * _Nullable verificationID, NSError * _Nullable error) {
        // verificationId will be needed for enrollment completion.

        // Ask user for the verification code.
        // ...

        // Then:
        FIRPhoneAuthCredential *credential =
            [FIRPhoneAuthProvider.provider credentialWithVerificationID:verificationID
                                                        verificationCode:kPhoneSecondFactorVerificationCode];
        FIRMultiFactorAssertion *assertion =
            [FIRPhoneMultiFactorGenerator assertionWithCredential:credential];

        // Complete enrollment. This will update the underlying tokens
        // and trigger ID token change listener.
        [user.multiFactor enrollWithAssertion:assertion
                                  displayName:displayName
                                    completion:^(NSError * _Nullable error) {
            // ...
        }];
    }];
}];
恭喜!您已成功為使用者註冊第二個驗證因素。
透過第二個驗證要素登入使用者
如要透過雙重驗證簡訊驗證登入使用者,請按照下列步驟操作:
使用者的第一個驗證因素登入,然後擷取指出需要多重驗證的錯誤。這項錯誤包含解析器、已註冊第二重驗證要素的提示,以及證明使用者已透過第一重驗證成功驗證的基礎工作階段。
舉例來說,如果使用者第一個驗證因素是電子郵件和密碼:
Swift
Auth.auth().signIn(
  withEmail: email,
  password: password
) { (result, error) in
  let authError = error as NSError
  if authError?.code == AuthErrorCode.secondFactorRequired.rawValue {
    // The user is a multi-factor user. Second factor challenge is required.
    let resolver =
      authError!.userInfo[AuthErrorUserInfoMultiFactorResolverKey] as! MultiFactorResolver
    // ...
  } else {
    // Handle other errors such as wrong password.
  }
}
Objective-C
[FIRAuth.auth signInWithEmail:email
                     password:password
                   completion:^(FIRAuthDataResult * _Nullable authResult,
                                NSError * _Nullable error) {
    if (error == nil || error.code != FIRAuthErrorCodeSecondFactorRequired) {
        // User is not enrolled with a second factor and is successfully signed in.
        // ...
    } else {
        // The user is a multi-factor user. Second factor challenge is required.
    }
}];
如果使用者的第一個驗證因素是同盟供應商 (例如 OAuth),請在呼叫
getCredentialWith()後擷取錯誤。如果使用者已註冊多個次要驗證因素,請詢問要使用哪一個。你可以使用
resolver.hints[selectedIndex].phoneNumber取得經過遮蓋的電話號碼,並使用resolver.hints[selectedIndex].displayName取得顯示名稱。Swift
// Ask user which second factor to use. Then:
if resolver.hints[selectedIndex].factorID == PhoneMultiFactorID {
  // User selected a phone second factor.
  // ...
} else if resolver.hints[selectedIndex].factorID == TotpMultiFactorID {
  // User selected a TOTP second factor.
  // ...
} else {
  // Unsupported second factor.
}
Objective-C
FIRMultiFactorResolver *resolver =
    (FIRMultiFactorResolver *) error.userInfo[FIRAuthErrorUserInfoMultiFactorResolverKey];

// Ask user which second factor to use. Then:
FIRPhoneMultiFactorInfo *hint = (FIRPhoneMultiFactorInfo *) resolver.hints[selectedIndex];
if (hint.factorID == FIRPhoneMultiFactorID) {
  // User selected a phone second factor.
  // ...
} else if (hint.factorID == FIRTOTPMultiFactorID) {
  // User selected a TOTP second factor.
  // ...
} else {
  // Unsupported second factor.
}
將驗證訊息傳送至使用者的手機:
Swift
// Send SMS verification code.
let hint = resolver.hints[selectedIndex] as! PhoneMultiFactorInfo
PhoneAuthProvider.provider().verifyPhoneNumber(
  with: hint,
  uiDelegate: nil,
  multiFactorSession: resolver.session
) { (verificationId, error) in
  // verificationId will be needed for sign-in completion.
}
Objective-C
// Send SMS verification code
[FIRPhoneAuthProvider.provider
  verifyPhoneNumberWithMultiFactorInfo:hint
  UIDelegate:nil
  multiFactorSession:resolver.session
  completion:^(NSString * _Nullable verificationID, NSError * _Nullable error) {
    if (error != nil) {
        // Failed to verify phone number.
    }
}];
簡訊驗證碼傳送完畢後,請要求使用者驗證該驗證碼,並使用驗證碼建構
PhoneAuthCredential:Swift
// Ask user for the verification code. Then:
let credential = PhoneAuthProvider.provider().credential(
  withVerificationID: verificationId!,
  verificationCode: verificationCodeFromUser)
Objective-C
// Ask user for the SMS verification code. Then:
FIRPhoneAuthCredential *credential =
    [FIRPhoneAuthProvider.provider
      credentialWithVerificationID:verificationID
                  verificationCode:verificationCodeFromUser];
使用憑證初始化斷言物件:
Swift
let assertion = PhoneMultiFactorGenerator.assertion(with: credential)Objective-C
FIRMultiFactorAssertion *assertion =
    [FIRPhoneMultiFactorGenerator assertionWithCredential:credential];
解決登入問題。然後存取原始登入結果,其中包含標準的供應商專屬資料和驗證憑證:
Swift
// Complete sign-in. This will also trigger the Auth state listeners.
resolver.resolveSignIn(with: assertion) { (authResult, error) in
  // authResult will also contain the user, additionalUserInfo, optional
  // credential (null for email/password) associated with the first factor sign-in.

  // For example, if the user signed in with Google as a first factor,
  // authResult.additionalUserInfo will contain data related to Google provider that
  // the user signed in with.

  // user.credential contains the Google OAuth credential.
  // user.credential.accessToken contains the Google OAuth access token.
  // user.credential.idToken contains the Google OAuth ID token.
}
Objective-C
// Complete sign-in.
[resolver resolveSignInWithAssertion:assertion
                          completion:^(FIRAuthDataResult * _Nullable authResult,
                                        NSError * _Nullable error) {
    if (error != nil) {
        // User successfully signed in with the second factor phone number.
    }
}];
以下程式碼完整示範如何登入多重驗證使用者:
Swift
Auth.auth().signIn(
  withEmail: email,
  password: password
) { (result, error) in
  let authError = error as NSError?
  if authError?.code == AuthErrorCode.secondFactorRequired.rawValue {
    let resolver =
      authError!.userInfo[AuthErrorUserInfoMultiFactorResolverKey] as! MultiFactorResolver

    // Ask user which second factor to use.
    // ...

    // Then:
    let hint = resolver.hints[selectedIndex] as! PhoneMultiFactorInfo

    // Send SMS verification code
    PhoneAuthProvider.provider().verifyPhoneNumber(
      with: hint,
      uiDelegate: nil,
      multiFactorSession: resolver.session
    ) { (verificationId, error) in
      if error != nil {
        // Failed to verify phone number.
      }
      // Ask user for the SMS verification code.
      // ...

      // Then:
      let credential = PhoneAuthProvider.provider().credential(
        withVerificationID: verificationId!,
        verificationCode: verificationCodeFromUser)
      let assertion = PhoneMultiFactorGenerator.assertion(with: credential)

      // Complete sign-in.
      resolver.resolveSignIn(with: assertion) { (authResult, error) in
        if error != nil {
          // User successfully signed in with the second factor phone number.
        }
      }
    }
  }
}
Objective-C
[FIRAuth.auth signInWithEmail:email
                     password:password
                   completion:^(FIRAuthDataResult * _Nullable authResult,
                               NSError * _Nullable error) {
    if (error == nil || error.code != FIRAuthErrorCodeSecondFactorRequired) {
        // User is not enrolled with a second factor and is successfully signed in.
        // ...
    } else {
        FIRMultiFactorResolver *resolver =
            (FIRMultiFactorResolver *) error.userInfo[FIRAuthErrorUserInfoMultiFactorResolverKey];

        // Ask user which second factor to use.
        // ...

        // Then:
        FIRPhoneMultiFactorInfo *hint = (FIRPhoneMultiFactorInfo *) resolver.hints[selectedIndex];

        // Send SMS verification code
        [FIRPhoneAuthProvider.provider
          verifyPhoneNumberWithMultiFactorInfo:hint
                                    UIDelegate:nil
                            multiFactorSession:resolver.session
                                    completion:^(NSString * _Nullable verificationID,
                                                NSError * _Nullable error) {
            if (error != nil) {
                // Failed to verify phone number.
            }

            // Ask user for the SMS verification code.
            // ...

            // Then:
            FIRPhoneAuthCredential *credential =
                [FIRPhoneAuthProvider.provider
                  credentialWithVerificationID:verificationID
                              verificationCode:kPhoneSecondFactorVerificationCode];
            FIRMultiFactorAssertion *assertion =
                [FIRPhoneMultiFactorGenerator assertionWithCredential:credential];

            // Complete sign-in.
            [resolver resolveSignInWithAssertion:assertion
                                      completion:^(FIRAuthDataResult * _Nullable authResult,
                                                    NSError * _Nullable error) {
                if (error != nil) {
                    // User successfully signed in with the second factor phone number.
                }
            }];
        }];
    }
}];
恭喜!您已成功使用多重驗證登入使用者。
後續步驟
- 使用 Admin SDK,以程式輔助的方式管理多重驗證使用者。