
如果您已升級至 Firebase Authentication with Identity Platform,可以為 iOS 應用程式新增簡訊多重驗證。
多重驗證可以為應用程式提供更完善的安全防護機制。攻擊者通常會竊取密碼及盜用社群媒體帳戶,但簡訊攔截則牽涉較為複雜的作業。
事前準備
啟用至少一個支援多重驗證的供應商。 所有供應商都支援多重驗證,但電話驗證、匿名驗證和 Apple Game Center 除外。
請確認應用程式會驗證使用者電子郵件。多重驗證需要電子郵件驗證。 這樣一來,惡意人士就無法使用不屬於自己的電子郵件註冊服務,然後新增第二個驗證因素,將真正的擁有者鎖在門外。
啟用多重驗證
在「進階」部分,啟用「簡訊多重驗證」。
您也應輸入要用來測試應用程式的電話號碼。 雖然這不是必要步驟,我們仍強烈建議您註冊測試電話號碼,以免在開發期間發生節流情形。
驗證應用程式
Firebase 必須驗證簡訊要求是否來自您的應用程式。您可以透過下列兩種方式驗證:
無聲 APNs 通知:首次登入使用者時,Firebase 可以向使用者的裝置傳送無聲推播通知。應用程式收到通知後,即可繼續進行驗證。 請注意,從 iOS 8.0 開始,您不需要要求使用者允許推播通知,即可使用這個方法。
reCAPTCHA 驗證:如果無法傳送無聲通知 (例如使用者已停用背景重新整理,或您在 iOS 模擬器中測試應用程式),可以使用 reCAPTCHA。在許多情況下,reCAPTCHA 會自動解決,使用者不需操作。
使用靜音通知
如要啟用 APNs 通知,以便搭配 Firebase 使用,請按照下列步驟操作:
在 Xcode 中,為專案啟用推播通知。
使用 Firebase 控制台上傳 APN 驗證金鑰 (變更會自動帶入 Google Cloud Firebase)。如果沒有 APN 驗證金鑰,請參閱「使用 FCM 設定 APN」,瞭解如何取得金鑰。
開啟 Firebase 控制台。
前往「專案設定」。
選取「Cloud Messaging」分頁標籤。
在「APNs 驗證金鑰」下方的「iOS 應用程式設定」部分中,按一下「上傳」,上傳開發或正式版驗證金鑰,或兩者皆上傳。或至少擇一提供。
選取鑰匙。
新增金鑰的 ID。您可以在 Apple Developer Member Center 的「Certificates, Identifiers & Profiles」(憑證、ID 與設定檔) 下方找到金鑰 ID。
按一下 [上傳]。
如果您已有 APN 憑證,可以改為上傳憑證。
使用 reCAPTCHA 驗證
如要讓用戶端 SDK 使用 reCAPTCHA,請按照下列步驟操作:
在 Xcode 中開啟專案設定。
在左側樹狀檢視中,按兩下專案名稱。
從「目標」部分選取應用程式。
選取「資訊」分頁標籤。
展開「網址類型」部分。
按一下「+」按鈕。
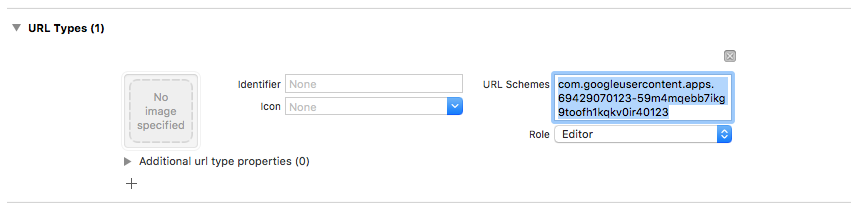
在「URL Schemes」欄位中輸入反向用戶端 ID。您可以在
GoogleService-Info.plist設定檔中找到這個值,顯示為REVERSED_CLIENT_ID。
完成後,設定看起來應與下列內容相似:
您也可以自訂應用程式顯示 reCAPTCHA 時呈現 SFSafariViewController 或 UIWebView 的方式。如要執行這項操作,請建立符合 FIRAuthUIDelegate 通訊協定的自訂類別,並傳遞至 verifyPhoneNumber:UIDelegate:completion:。
選擇註冊模式
您可以選擇應用程式是否需要多重驗證,以及如何和何時註冊使用者。常見的模式包括:
在註冊程序中,為使用者註冊第二重驗證。如果應用程式要求所有使用者都必須進行多重驗證,請使用這個方法。請注意,帳戶必須先驗證電子郵件地址,才能註冊第二個驗證因素,因此註冊流程必須配合這項規定。
在註冊期間提供可略過的選項,讓使用者註冊第二個驗證因素。如果應用程式希望使用者啟用多重驗證,但並非強制要求,則可能適合採用這種做法。
讓使用者在帳戶或個人資料管理頁面新增第二個驗證要素,而非在註冊畫面新增。這樣可盡量減少註冊程序中的阻礙,同時仍為注重安全性的使用者提供多重驗證功能。
當使用者想存取安全性要求較高的功能時,逐步要求新增第二個驗證因素。
註冊第二個驗證步驟
如要為使用者註冊新的次要驗證因素,請按照下列步驟操作:
重新驗證使用者。
要求使用者輸入電話號碼。
取得使用者的多重驗證工作階段:
Swift
authResult.user.multiFactor.getSessionWithCompletion() { (session, error) in
  // ...
}
Objective-C
[authResult.user.multiFactor
  getSessionWithCompletion:^(FIRMultiFactorSession * _Nullable session,
                            NSError * _Nullable error) {
    // ...
}];
將驗證訊息傳送至使用者的手機。確認電話號碼的格式為開頭加上
+,且不含其他標點符號或空白字元 (例如:+15105551234)Swift
// Send SMS verification code.
PhoneAuthProvider.provider().verifyPhoneNumber(
  phoneNumber,
  uiDelegate: nil,
  multiFactorSession: session) { (verificationId, error) in
    // verificationId will be needed for enrollment completion.
}
Objective-C
// Send SMS verification code.
[FIRPhoneAuthProvider.provider verifyPhoneNumber:phoneNumber
                                      UIDelegate:nil
                              multiFactorSession:session
                                      completion:^(NSString * _Nullable verificationID,
                                                    NSError * _Nullable error) {
    // verificationId will be needed for enrollment completion.
}];
雖然不是必要步驟,但建議您事先告知使用者會收到簡訊,並說明會收取標準費用。
verifyPhoneNumber()方法會使用無聲推播通知,在背景啟動應用程式驗證程序。如果無法使用無聲推播通知,系統會改為發出 reCAPTCHA 驗證問題。簡訊驗證碼傳送完畢後,請使用者驗證該驗證碼。然後,使用他們的回覆建構
PhoneAuthCredential:Swift
// Ask user for the verification code. Then:
let credential = PhoneAuthProvider.provider().credential(
  withVerificationID: verificationId,
  verificationCode: verificationCode)
Objective-C
// Ask user for the SMS verification code. Then:
FIRPhoneAuthCredential *credential = [FIRPhoneAuthProvider.provider
                                       credentialWithVerificationID:verificationID
                                       verificationCode:kPhoneSecondFactorVerificationCode];
初始化斷言物件:
Swift
let assertion = PhoneMultiFactorGenerator.assertion(with: credential)Objective-C
FIRMultiFactorAssertion *assertion = [FIRPhoneMultiFactorGenerator assertionWithCredential:credential];完成註冊。你也可以選擇指定第二個驗證因素的顯示名稱。如果使用者有多個第二要素,這項功能就非常實用,因為驗證流程會遮蓋電話號碼 (例如 +1******1234)。
Swift
// Complete enrollment. This will update the underlying tokens
// and trigger ID token change listener.
user.multiFactor.enroll(with: assertion, displayName: displayName) { (error) in
  // ...
}
Objective-C
// Complete enrollment. This will update the underlying tokens
// and trigger ID token change listener.
[authResult.user.multiFactor enrollWithAssertion:assertion
                                     displayName:nil
                                      completion:^(NSError * _Nullable error) {
    // ...
}];
以下程式碼完整示範如何註冊第二個驗證因素:
Swift
let user = Auth.auth().currentUser
user?.multiFactor.getSessionWithCompletion({ (session, error) in
  // Send SMS verification code.
  PhoneAuthProvider.provider().verifyPhoneNumber(
    phoneNumber,
    uiDelegate: nil,
    multiFactorSession: session
  ) { (verificationId, error) in
    // verificationId will be needed for enrollment completion.
    // Ask user for the verification code.
    let credential = PhoneAuthProvider.provider().credential(
      withVerificationID: verificationId!,
      verificationCode: phoneSecondFactorVerificationCode)
    let assertion = PhoneMultiFactorGenerator.assertion(with: credential)
    // Complete enrollment. This will update the underlying tokens
    // and trigger ID token change listener.
    user?.multiFactor.enroll(with: assertion, displayName: displayName) { (error) in
      // ...
    }
  }
})
Objective-C
FIRUser *user = FIRAuth.auth.currentUser;
[user.multiFactor getSessionWithCompletion:^(FIRMultiFactorSession * _Nullable session,
                                              NSError * _Nullable error) {
    // Send SMS verification code.
    [FIRPhoneAuthProvider.provider
      verifyPhoneNumber:phoneNumber
      UIDelegate:nil
      multiFactorSession:session
      completion:^(NSString * _Nullable verificationID, NSError * _Nullable error) {
        // verificationId will be needed for enrollment completion.

        // Ask user for the verification code.
        // ...

        // Then:
        FIRPhoneAuthCredential *credential =
            [FIRPhoneAuthProvider.provider credentialWithVerificationID:verificationID
                                                        verificationCode:kPhoneSecondFactorVerificationCode];
        FIRMultiFactorAssertion *assertion =
            [FIRPhoneMultiFactorGenerator assertionWithCredential:credential];

        // Complete enrollment. This will update the underlying tokens
        // and trigger ID token change listener.
        [user.multiFactor enrollWithAssertion:assertion
                                  displayName:displayName
                                    completion:^(NSError * _Nullable error) {
            // ...
        }];
    }];
}];
恭喜!您已成功為使用者註冊第二個驗證因素。
透過第二個驗證因素登入使用者
如要透過簡訊雙重驗證登入使用者,請按照下列步驟操作:
使用者的第一個驗證因素登入,然後擷取指出需要多重驗證的錯誤。這個錯誤包含解析器、已註冊雙重驗證的提示,以及證明使用者已透過第一重驗證成功驗證的基礎工作階段。
舉例來說,如果使用者第一個驗證因素是電子郵件地址和密碼:
Swift
Auth.auth().signIn(
  withEmail: email,
  password: password
) { (result, error) in
  let authError = error as NSError
  if authError?.code == AuthErrorCode.secondFactorRequired.rawValue {
    // The user is a multi-factor user. Second factor challenge is required.
    let resolver =
      authError!.userInfo[AuthErrorUserInfoMultiFactorResolverKey] as! MultiFactorResolver
    // ...
  } else {
    // Handle other errors such as wrong password.
  }
}
Objective-C
[FIRAuth.auth signInWithEmail:email
                     password:password
                   completion:^(FIRAuthDataResult * _Nullable authResult,
                                NSError * _Nullable error) {
    if (error == nil || error.code != FIRAuthErrorCodeSecondFactorRequired) {
        // User is not enrolled with a second factor and is successfully signed in.
        // ...
    } else {
        // The user is a multi-factor user. Second factor challenge is required.
    }
}];
如果使用者的第一個驗證因素是同盟供應商 (例如 OAuth),請在呼叫
getCredentialWith()後擷取錯誤。如果使用者已註冊多個次要驗證因素,請詢問要使用哪一個。您可以使用
resolver.hints[selectedIndex].phoneNumber取得經過遮蓋的電話號碼,並使用resolver.hints[selectedIndex].displayName取得顯示名稱。Swift
// Ask user which second factor to use. Then:
if resolver.hints[selectedIndex].factorID == PhoneMultiFactorID {
  // User selected a phone second factor.
  // ...
} else if resolver.hints[selectedIndex].factorID == TotpMultiFactorID {
  // User selected a TOTP second factor.
  // ...
} else {
  // Unsupported second factor.
}
Objective-C
FIRMultiFactorResolver *resolver =
    (FIRMultiFactorResolver *) error.userInfo[FIRAuthErrorUserInfoMultiFactorResolverKey];

// Ask user which second factor to use. Then:
FIRPhoneMultiFactorInfo *hint = (FIRPhoneMultiFactorInfo *) resolver.hints[selectedIndex];
if (hint.factorID == FIRPhoneMultiFactorID) {
  // User selected a phone second factor.
  // ...
} else if (hint.factorID == FIRTOTPMultiFactorID) {
  // User selected a TOTP second factor.
  // ...
} else {
  // Unsupported second factor.
}
將驗證訊息傳送至使用者的手機:
Swift
// Send SMS verification code.
let hint = resolver.hints[selectedIndex] as! PhoneMultiFactorInfo
PhoneAuthProvider.provider().verifyPhoneNumber(
  with: hint,
  uiDelegate: nil,
  multiFactorSession: resolver.session
) { (verificationId, error) in
  // verificationId will be needed for sign-in completion.
}
Objective-C
// Send SMS verification code
[FIRPhoneAuthProvider.provider
  verifyPhoneNumberWithMultiFactorInfo:hint
  UIDelegate:nil
  multiFactorSession:resolver.session
  completion:^(NSString * _Nullable verificationID, NSError * _Nullable error) {
    if (error != nil) {
        // Failed to verify phone number.
    }
}];
簡訊驗證碼傳送完畢後,請要求使用者驗證該驗證碼,並使用驗證碼建構
PhoneAuthCredential:Swift
// Ask user for the verification code. Then:
let credential = PhoneAuthProvider.provider().credential(
  withVerificationID: verificationId!,
  verificationCode: verificationCodeFromUser)
Objective-C
// Ask user for the SMS verification code. Then:
FIRPhoneAuthCredential *credential =
    [FIRPhoneAuthProvider.provider
      credentialWithVerificationID:verificationID
                  verificationCode:verificationCodeFromUser];
使用憑證初始化斷言物件:
Swift
let assertion = PhoneMultiFactorGenerator.assertion(with: credential)Objective-C
FIRMultiFactorAssertion *assertion =
    [FIRPhoneMultiFactorGenerator assertionWithCredential:credential];
解決登入問題。然後存取原始登入結果,其中包含標準的供應商專屬資料和驗證憑證:
Swift
// Complete sign-in. This will also trigger the Auth state listeners.
resolver.resolveSignIn(with: assertion) { (authResult, error) in
  // authResult will also contain the user, additionalUserInfo, optional
  // credential (null for email/password) associated with the first factor sign-in.

  // For example, if the user signed in with Google as a first factor,
  // authResult.additionalUserInfo will contain data related to Google provider that
  // the user signed in with.

  // user.credential contains the Google OAuth credential.
  // user.credential.accessToken contains the Google OAuth access token.
  // user.credential.idToken contains the Google OAuth ID token.
}
Objective-C
// Complete sign-in.
[resolver resolveSignInWithAssertion:assertion
                          completion:^(FIRAuthDataResult * _Nullable authResult,
                                        NSError * _Nullable error) {
    if (error != nil) {
        // User successfully signed in with the second factor phone number.
    }
}];
以下程式碼完整示範如何登入多重驗證使用者:
Swift
Auth.auth().signIn(
  withEmail: email,
  password: password
) { (result, error) in
  let authError = error as NSError?
  if authError?.code == AuthErrorCode.secondFactorRequired.rawValue {
    let resolver =
      authError!.userInfo[AuthErrorUserInfoMultiFactorResolverKey] as! MultiFactorResolver

    // Ask user which second factor to use.
    // ...

    // Then:
    let hint = resolver.hints[selectedIndex] as! PhoneMultiFactorInfo

    // Send SMS verification code
    PhoneAuthProvider.provider().verifyPhoneNumber(
      with: hint,
      uiDelegate: nil,
      multiFactorSession: resolver.session
    ) { (verificationId, error) in
      if error != nil {
        // Failed to verify phone number.
      }
      // Ask user for the SMS verification code.
      // ...

      // Then:
      let credential = PhoneAuthProvider.provider().credential(
        withVerificationID: verificationId!,
        verificationCode: verificationCodeFromUser)
      let assertion = PhoneMultiFactorGenerator.assertion(with: credential)

      // Complete sign-in.
      resolver.resolveSignIn(with: assertion) { (authResult, error) in
        if error != nil {
          // User successfully signed in with the second factor phone number.
        }
      }
    }
  }
}
Objective-C
[FIRAuth.auth signInWithEmail:email
                     password:password
                   completion:^(FIRAuthDataResult * _Nullable authResult,
                               NSError * _Nullable error) {
    if (error == nil || error.code != FIRAuthErrorCodeSecondFactorRequired) {
        // User is not enrolled with a second factor and is successfully signed in.
        // ...
    } else {
        FIRMultiFactorResolver *resolver =
            (FIRMultiFactorResolver *) error.userInfo[FIRAuthErrorUserInfoMultiFactorResolverKey];

        // Ask user which second factor to use.
        // ...

        // Then:
        FIRPhoneMultiFactorInfo *hint = (FIRPhoneMultiFactorInfo *) resolver.hints[selectedIndex];

        // Send SMS verification code
        [FIRPhoneAuthProvider.provider
          verifyPhoneNumberWithMultiFactorInfo:hint
                                    UIDelegate:nil
                            multiFactorSession:resolver.session
                                    completion:^(NSString * _Nullable verificationID,
                                                NSError * _Nullable error) {
            if (error != nil) {
                // Failed to verify phone number.
            }

            // Ask user for the SMS verification code.
            // ...

            // Then:
            FIRPhoneAuthCredential *credential =
                [FIRPhoneAuthProvider.provider
                  credentialWithVerificationID:verificationID
                              verificationCode:kPhoneSecondFactorVerificationCode];
            FIRMultiFactorAssertion *assertion =
                [FIRPhoneMultiFactorGenerator assertionWithCredential:credential];

            // Complete sign-in.
            [resolver resolveSignInWithAssertion:assertion
                                      completion:^(FIRAuthDataResult * _Nullable authResult,
                                                    NSError * _Nullable error) {
                if (error != nil) {
                    // User successfully signed in with the second factor phone number.
                }
            }];
        }];
    }
}];
恭喜!您已成功使用多重驗證登入使用者。
後續步驟
- 使用 Admin SDK,以程式輔助的方式管理多重驗證使用者。