
Możesz umożliwić użytkownikom uwierzytelnianie w Firebase za pomocą dostawców OAuth, takich jak Twitter, przez zintegrowanie w aplikacji ogólnego logowania OAuth za pomocą pakietu SDK Firebase, aby przeprowadzić cały proces logowania.
Zanim zaczniesz
Do instalacji zależności Firebase i do zarządzania nimi możesz używać menedżera pakietów Swift.
- Po otwarciu projektu aplikacji wybierz w Xcode opcję File > Add Packages (Plik > Dodaj pakiety).
- Gdy pojawi się prośba, dodaj repozytorium pakietu SDK Firebase na platformy Apple:
- Wybierz bibliotekę Firebase Authentication.
- Dodaj flagę
-ObjCdo sekcji Other Linker Flags (Inne flagi linkera) w ustawieniach kompilacji projektu. - Gdy skończysz, Xcode zacznie automatycznie wyszukiwać i pobierać zależności w tle.
https://github.com/firebase/firebase-ios-sdk.git
Aby logować użytkowników za pomocą kont Twittera, musisz najpierw włączyć Twittera jako dostawcę logowania w projekcie Firebase:
W
Podfileumieść te elementy:pod 'FirebaseAuth'
- W Firebasekonsoli otwórz sekcję Uwierzytelnianie.
- Na karcie Metoda logowania włącz dostawcę Twitter.
- Dodaj klucz interfejsu API i tajny klucz interfejsu API z konsoli deweloperskiej tego dostawcy do konfiguracji dostawcy:
- Zarejestruj aplikację jako aplikację deweloperską na Twitterze i uzyskaj klucz API OAuth oraz tajny klucz API.
- Upewnij się, że identyfikator URI przekierowania protokołu OAuth w Firebase (np.
my-app-12345.firebaseapp.com/__/auth/handler) jest ustawiony jako adres URL wywołania zwrotnego autoryzacji na stronie ustawień aplikacji w konfiguracji aplikacji korzystającej z Twittera.
- Kliknij Zapisz.
Obsługa procesu logowania za pomocą pakietu Firebase SDK
Aby obsłużyć proces logowania za pomocą pakietu Firebase SDK na platformy Apple, wykonaj te czynności:
Dodaj niestandardowe schematy URL do projektu w Xcode:
- Otwórz konfigurację projektu: w widoku drzewa po lewej stronie kliknij dwukrotnie nazwę projektu. W sekcji MIEJSCA DOCELOWE wybierz aplikację, a potem kliknij kartę Informacje i rozwiń sekcję Typy adresów URL.
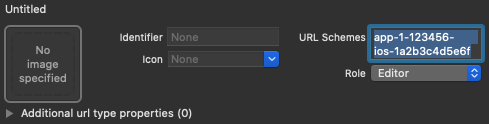
- Kliknij przycisk + i dodaj zakodowany identyfikator aplikacji jako schemat adresu URL. Zakodowany identyfikator aplikacji znajdziesz na stronie Ustawienia ogólne w konsoli Firebase w sekcji dotyczącej aplikacji na iOS. Pozostałe pola pozostaw puste.
Po zakończeniu konfiguracja powinna wyglądać podobnie do poniższej (ale z wartościami specyficznymi dla Twojej aplikacji):
Utwórz instancję OAuthProvider, używając identyfikatora dostawcy twitter.com.
Swift
var provider = OAuthProvider(providerID: "twitter.com")
Objective-C
FIROAuthProvider *provider = [FIROAuthProvider providerWithProviderID:@"twitter.com"];
Opcjonalnie: określ dodatkowe parametry niestandardowe OAuth, które chcesz wysłać z żądaniem OAuth.
Swift
    provider.customParameters = [
      "lang": "fr"
      ]
Objective-C
[provider setCustomParameters:@{@"lang": @"fr"}];
Listę parametrów obsługiwanych przez Twittera znajdziesz w dokumentacji OAuth Twittera. Pamiętaj, że nie możesz przekazywać parametrów wymaganych przez Firebase za pomocą znaku
setCustomParameters. Są to parametry client_id, redirect_uri, response_type, scope i state.Opcjonalnie: jeśli chcesz dostosować sposób wyświetlania przez aplikację symbolu
SFSafariViewControllerlubUIWebViewpodczas wyświetlania reCAPTCHA użytkownikowi, utwórz klasę niestandardową zgodną z protokołemAuthUIDelegatei przekaż ją docredentialWithUIDelegate.Uwierzytelnij w Firebase za pomocą obiektu dostawcy OAuth.
Swift
    provider.getCredentialWith(nil) { credential, error in
      if error != nil {
        // Handle error.
      }
      if credential != nil {
        Auth.auth().signIn(with: credential) { authResult, error in
          if error != nil {
            // Handle error.
          }
          // User is signed in.
          // IdP data available in authResult.additionalUserInfo.profile.
          // Twitter OAuth access token can also be retrieved by:
          // (authResult.credential as? OAuthCredential)?.accessToken
          // Twitter OAuth ID token can be retrieved by calling:
          // (authResult.credential as? OAuthCredential)?.idToken
          // Twitter OAuth secret can be retrieved by calling:
          // (authResult.credential as? OAuthCredential)?.secret
        }
      }
    }
Objective-C
    [provider getCredentialWithUIDelegate:nil
                               completion:^(FIRAuthCredential *_Nullable credential, NSError *_Nullable error) {
      if (error) {
       // Handle error.
      }
      if (credential) {
        [[FIRAuth auth] signInWithCredential:credential
                                  completion:^(FIRAuthDataResult *_Nullable authResult, NSError *_Nullable error) {
          if (error) {
            // Handle error.
          }
          // User is signed in.
          // IdP data available in authResult.additionalUserInfo.profile.
          // Twitter OAuth access token can also be retrieved by:
          // authResult.credential.accessToken
          // Twitter OAuth ID token can be retrieved by calling:
          // authResult.credential.idToken
          // Twitter OAuth secret can be retrieved by calling:
          // authResult.credential.secret
        }];
      }
    }];
Za pomocą tokena dostępu OAuth możesz wywoływać interfejs API Twittera.
Aby na przykład uzyskać podstawowe informacje o profilu, możesz wywołać interfejs API REST, przekazując token dostępu w nagłówku
Authorization:https://api.twitter.com/labs/1/users?usernames=TwitterDev
Powyższe przykłady dotyczą procesów logowania, ale możesz też połączyć dostawcę Twittera z istniejącym użytkownikiem. Możesz na przykład połączyć wielu dostawców z tym samym użytkownikiem, aby mógł on logować się za pomocą dowolnego z nich.
Swift
    Auth().currentUser.link(withCredential: credential) { authResult, error in
      if error != nil {
        // Handle error.
      }
      // Twitter credential is linked to the current user.
      // IdP data available in authResult.additionalUserInfo.profile.
      // Twitter OAuth access token can also be retrieved by:
      // (authResult.credential as? OAuthCredential)?.accessToken
      // Twitter OAuth ID token can be retrieved by calling:
      // (authResult.credential as? OAuthCredential)?.idToken
      // Twitter OAuth secret can be retrieved by calling:
      // (authResult.credential as? OAuthCredential)?.secret
    }
Objective-C
    [[FIRAuth auth].currentUser
        linkWithCredential:credential
                completion:^(FIRAuthDataResult * _Nullable authResult, NSError * _Nullable error) {
      if (error) {
        // Handle error.
      }
      // Twitter credential is linked to the current user.
      // IdP data available in authResult.additionalUserInfo.profile.
      // Twitter OAuth access token is can also be retrieved by:
      // ((FIROAuthCredential *)authResult.credential).accessToken
      // Twitter OAuth ID token can be retrieved by calling:
      // ((FIROAuthCredential *)authResult.credential).idToken
      // Twitter OAuth secret can be retrieved by calling:
      // ((FIROAuthCredential *)authResult.credential).secret
    }];
Ten sam wzorzec można zastosować w przypadku funkcji
reauthenticateWithCredential, która umożliwia pobieranie nowych danych logowania do operacji związanych z poufnymi danymi, które wymagają niedawnego zalogowania się.Swift
    Auth().currentUser.reauthenticateWithCredential(withCredential: credential) { authResult, error in
      if error != nil {
        // Handle error.
      }
      // User is re-authenticated with fresh tokens minted and
      // should be able to perform sensitive operations like account
      // deletion and email or password update.
      // IdP data available in result.additionalUserInfo.profile.
      // Additional OAuth access token is can also be retrieved by:
      // (authResult.credential as? OAuthCredential)?.accessToken
      // Twitter OAuth ID token can be retrieved by calling:
      // (authResult.credential as? OAuthCredential)?.idToken
      // Twitter OAuth secret can be retrieved by calling:
      // (authResult.credential as? OAuthCredential)?.secret
    }
Objective-C
    [[FIRAuth auth].currentUser
        reauthenticateWithCredential:credential
                          completion:^(FIRAuthDataResult * _Nullable authResult, NSError * _Nullable error) {
      if (error) {
        // Handle error.
      }
      // User is re-authenticated with fresh tokens minted and
      // should be able to perform sensitive operations like account
      // deletion and email or password update.
      // IdP data available in result.additionalUserInfo.profile.
      // Additional OAuth access token is can also be retrieved by:
      // ((FIROAuthCredential *)authResult.credential).accessToken
      // Twitter OAuth ID token can be retrieved by calling:
      // ((FIROAuthCredential *)authResult.credential).idToken
      // Twitter OAuth secret can be retrieved by calling:
      // ((FIROAuthCredential *)authResult.credential).secret
    }];
Dalsze kroki
Gdy użytkownik zaloguje się po raz pierwszy, zostanie utworzone nowe konto użytkownika i powiązane z danymi logowania, czyli nazwą użytkownika i hasłem, numerem telefonu lub informacjami o dostawcy uwierzytelniania, za pomocą których użytkownik się zalogował. Nowe konto jest przechowywane w projekcie Firebase i może służyć do identyfikowania użytkownika we wszystkich aplikacjach w projekcie, niezależnie od sposobu logowania.
-
W aplikacjach możesz uzyskać podstawowe informacje o profilu użytkownika z obiektu
User. Zobacz Zarządzanie użytkownikami. W Firebase Realtime Database i Cloud Storage regułach bezpieczeństwa możesz pobrać unikalny identyfikator zalogowanego użytkownika ze zmiennej
authi użyć go do kontrolowania, do jakich danych użytkownik ma dostęp.
Możesz zezwolić użytkownikom na logowanie się w aplikacji za pomocą wielu dostawców uwierzytelniania, łącząc dane logowania dostawcy uwierzytelniania z istniejącym kontem użytkownika.
Aby wylogować użytkownika, wywołaj funkcję
signOut:.
Swift
let firebaseAuth = Auth.auth()
do {
  try firebaseAuth.signOut()
} catch let signOutError as NSError {
  print("Error signing out: %@", signOutError)
}
Objective-C
NSError *signOutError;
BOOL status = [[FIRAuth auth] signOut:&signOutError];
if (!status) {
  NSLog(@"Error signing out: %@", signOutError);
  return;
}
Możesz też dodać kod obsługi błędów dla pełnego zakresu błędów uwierzytelniania. Patrz Obsługa błędów.