Google Cloud 插件会将 Firebase Genkit 遥测数据和日志记录数据导出到 Cloud Observability 套件。
安装
npm i --save @genkit-ai/google-cloud在本地运行包含此插件的 Genkit 代码时,您还需要安装 Google Cloud CLI 工具。
设置 Google Cloud 账号
此插件需要 Google Cloud 账号/项目。所有 Firebase 项目都默认包含一个(GCP 控制台),您也可以访问 https://cloud.google.com 进行注册。
在添加此插件之前,请确保您的 GCP 项目已启用以下 API:
这些 API 应该会在您的项目的 API 信息中心内列出。
点击此处可详细了解如何启用和停用 API。
Genkit 配置
如需启用 Cloud Tracing、Logging 和 Monitoring(指标),只需调用 enableGoogleCloudTelemetry() 即可:
import { enableGoogleCloudTelemetry } from '@genkit-ai/google-cloud';

enableGoogleCloudTelemetry();
在生产环境中运行时,系统会自动导出遥测数据。
身份验证和授权
该插件需要 Google Cloud 项目 ID 和应用凭据。
Google Cloud
如果您将代码部署到 Google Cloud 环境(Cloud Functions、Cloud Run 等),系统会通过应用默认凭据自动发现项目 ID 和凭据。
您需要通过 IAM 控制台向运行代码的服务账号(即“附加的服务账号”)应用以下角色:
roles/monitoring.metricWriterroles/cloudtrace.agentroles/logging.logWriter
本地开发
在本地开发时,为了让用户凭据可供插件使用,您需要执行额外的步骤。
将
GCLOUD_PROJECT环境变量设置为您的 Google Cloud 项目。使用
gcloudCLI 进行身份验证:gcloud auth application-default login
Google Cloud 之外的生产环境
不过,我们仍建议您尽可能利用应用默认凭据流程,将凭据提供给该插件。
通常,这涉及生成服务账号密钥/密钥对,并将这些凭据部署到生产环境。
按照相关说明设置服务账号密钥。
确保该服务账号具有以下角色:
roles/monitoring.metricWriterroles/cloudtrace.agentroles/logging.logWriter
将凭据文件部署到生产环境(不要签入源代码)
将
GOOGLE_APPLICATION_CREDENTIALS环境变量设置为凭据文件的路径。GOOGLE_APPLICATION_CREDENTIALS = "path/to/your/key/file"
在某些无服务器环境中,您可能无法部署凭据文件。在这种情况下,您可以使用凭据文件的内容设置 GCLOUD_SERVICE_ACCOUNT_CREDS 环境变量,以替代上述第 3 步和第 4 步,如下所示:
GCLOUD_SERVICE_ACCOUNT_CREDS='{
  "type": "service_account",
  "project_id": "your-project-id",
  "private_key_id": "your-private-key-id",
  "private_key": "your-private-key",
  "client_email": "your-client-email",
  "client_id": "your-client-id",
  "auth_uri": "https://accounts.google.com/o/oauth2/auth",
  "token_uri": "https://accounts.google.com/o/oauth2/token",
  "auth_provider_x509_cert_url": "https://www.googleapis.com/oauth2/v1/certs",
  "client_x509_cert_url": "your-cert-url"
}'
插件配置
enableGoogleCloudTelemetry() 函数接受一个可选的配置对象,用于配置 OpenTelemetry NodeSDK 实例。
import { AlwaysOnSampler } from '@opentelemetry/sdk-trace-base';

enableGoogleCloudTelemetry({
  forceDevExport: false, // Set this to true to export telemetry for local runs
  sampler: new AlwaysOnSampler(),
  autoInstrumentation: true,
  autoInstrumentationConfig: {
    '@opentelemetry/instrumentation-fs': { enabled: false },
    '@opentelemetry/instrumentation-dns': { enabled: false },
    '@opentelemetry/instrumentation-net': { enabled: false },
  },
  metricExportIntervalMillis: 5_000,
});
配置对象可让您对遥测数据导出的各个方面进行精细控制,如下所述。
凭据
允许使用 google-auth 库中的 JWTInput 直接指定凭据。
采样器
如果导出所有轨迹不切实际,OpenTelemetry 允许对轨迹进行采样。
有四种预配置的采样器:
- AlwaysOnSampler - 对所有轨迹进行采样
- AlwaysOffSampler - 不采样任何轨迹
- ParentBased - 基于父级 span 的样本
- TraceIdRatioBased - 按可配置的百分比对轨迹进行采样
autoInstrumentation 和 autoInstrumentationConfig
启用自动插桩后,OpenTelemetry 便可从第三方库捕获遥测数据,而无需修改代码。
metricExportIntervalMillis
此字段指定指标导出间隔(以毫秒为单位)。
metricExportTimeoutMillis
此字段指定指标导出的超时时间(以毫秒为单位)。
disableMetrics
提供替换项,用于停用指标导出,同时仍导出轨迹和日志。
disableTraces
提供一个替换项,用于停用跟踪记录导出功能,同时仍导出指标和日志。
disableLoggingInputAndOutput
提供了用于停用收集输入和输出日志的替换项。
forceDevExport
此选项会在 Genkit 在 dev 环境(例如本地)中运行时强制其导出遥测数据和日志数据。
测试您的集成
配置插件时,请使用 forceDevExport: true 为本地运行启用遥测数据导出。前往 Google Cloud Logs、Metrics 或 Trace Explorer 查看遥测数据。
Google Cloud Observability 套件
部署代码(例如流)后,请前往 Cloud Monitoring 信息中心,然后选择您的项目。在这里,您可以轻松在“日志”“指标”和“轨迹”浏览器之间切换,以便进行生产环境监控。

日志和跟踪记录
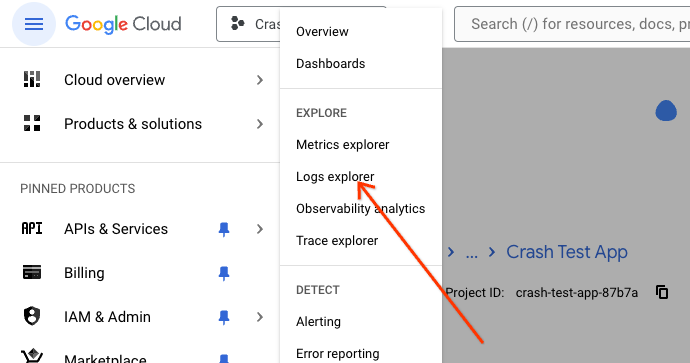
在左侧菜单中,点击“探索”标题下的“日志浏览器”。
您会在此处看到与已部署的 Genkit 代码关联的所有日志,包括 console.log()。任何带有前缀 [genkit] 的日志都是 Genkit 内部日志,其中包含一些可能对调试有用的信息。例如,格式为 Config[...] 的 Genkit 日志包含用于特定 LLM 推理的温度和 topK 值等元数据。格式为 Output[...] 的日志包含 LLM 回答,而 Input[...] 日志包含提示。Cloud Logging 具有强大的 ACL,可对敏感日志的访问权限进行精细控制。

系统会打开一个轨迹预览窗格,您可在其中快速浏览轨迹的详细信息。如需查看完整详情,请点击窗格右上角的“在 Trace 中查看”链接。

Cloud Trace 中最突出的导航元素是跟踪记录散点图。该散点图包含在给定时间范围内收集的所有跟踪记录。

点击每个数据点会在散点图下方显示详细信息。

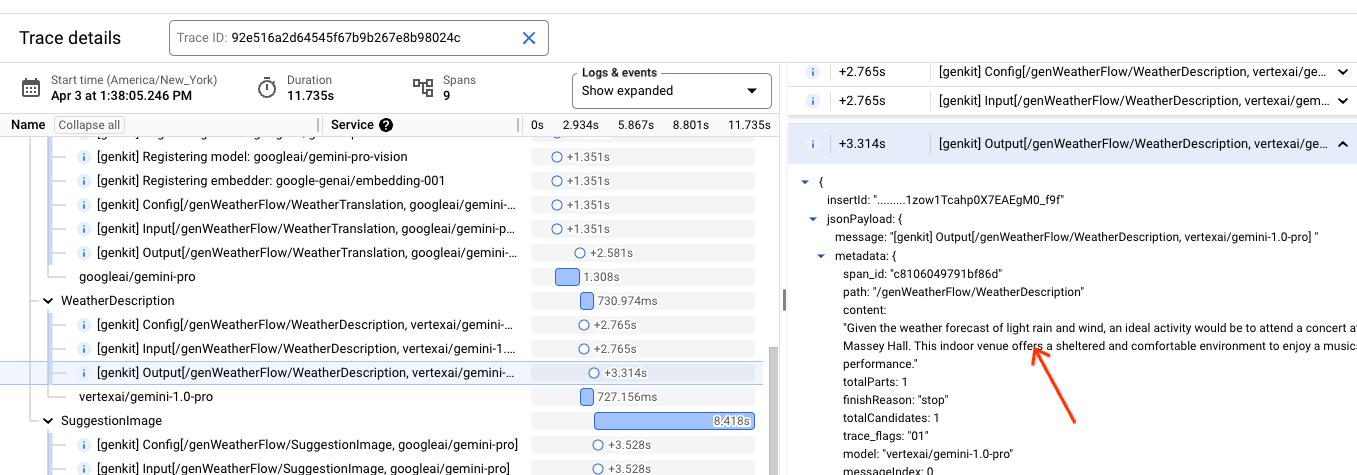
详细视图包含流程形状(包括所有步骤)和重要时间信息。Cloud Trace 能够在此视图中交织与给定跟踪记录关联的所有日志。在“日志和事件”下拉菜单中,选择“显示展开的内容”选项。

在生成的视图中,您可以详细检查跟踪记录的上下文中的日志,包括提示和 LLM 回答。
指标
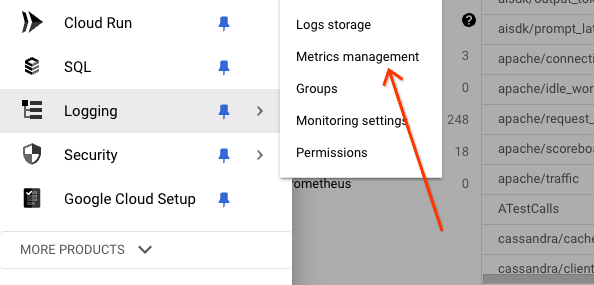
如需查看 Genkit 导出的所有指标,请点击左侧菜单中“配置”标题下的“指标管理”。
指标管理控制台包含一个表格视图,其中包含所有收集的指标,包括与 Cloud Run 及其周围环境相关的指标。点击“工作负载”选项会显示一个包含 Genkit 收集的指标的列表。任何带有前缀 genkit 的指标都是内部 Genkit 指标。
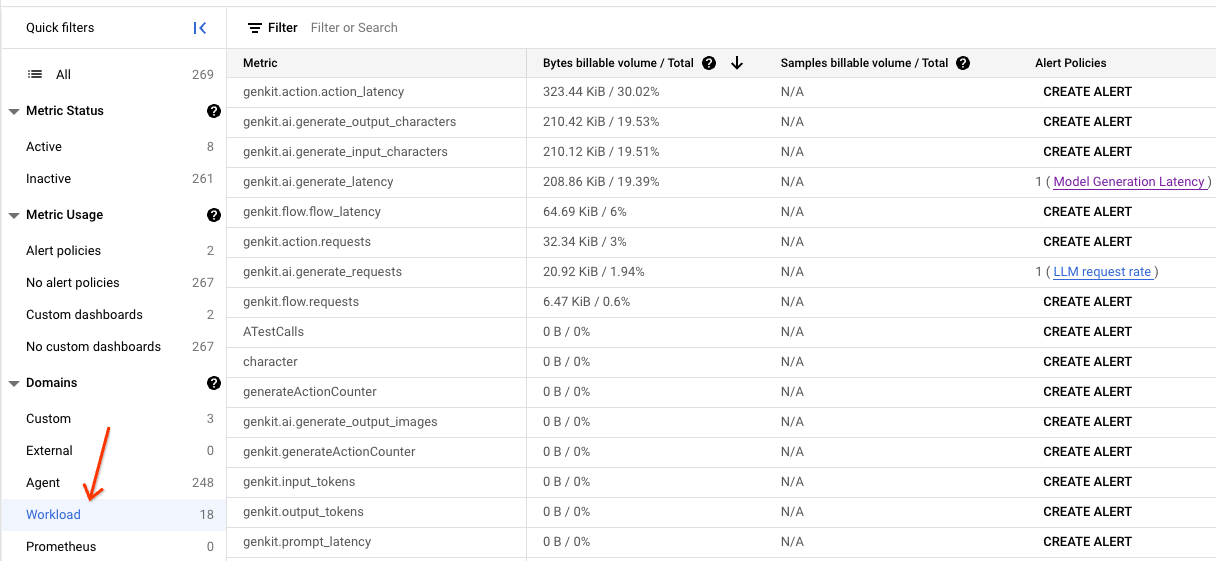
Genkit 会收集多种类别的指标,包括:功能、操作和生成。每个指标都有几个实用的维度,以便实现强大的过滤和分组功能。
常见的维度包括:
flow_name- flow 的顶级名称。flow_path- span 及其父级 span 链,直到根 span。error_code- 如果出现错误,则为相应的错误代码。error_message- 如果出现错误,则为相应的错误消息。model- 模型的名称。
地图项指标
功能是 Genkit 代码的顶级入口点。在大多数情况下,这将是一个流程。否则,这将是轨迹中的最上层跨度。
| 名称 | 类型 | 说明 |
|---|---|---|
| genkit/feature/requests | 计数器 | 请求数量 |
| genkit/feature/latency | 直方图 | 执行延迟时间(毫秒) |
每个地图项指标都包含以下维度:
| 名称 | 说明 |
|---|---|
| 名称 | 功能的名称。在大多数情况下,这是顶级 Genkit 流 |
| 状态 | “success”或“failure”,具体取决于功能请求是否成功 |
| error | 仅在 status=failure 时设置。包含导致失败的错误类型 |
| 来源 | Genkit 源语言。例如,'ts' |
| sourceVersion | Genkit 框架版本 |
操作指标
操作代表 Genkit 中的通用执行步骤。系统会跟踪以下每个步骤的指标:
| 名称 | 类型 | 说明 |
|---|---|---|
| genkit/action/requests | 计数器 | 此操作的执行次数 |
| genkit/action/latency | 直方图 | 执行延迟时间(毫秒) |
每项操作指标都包含以下维度:
| 名称 | 说明 |
|---|---|
| 名称 | 操作的名称 |
| featureName | 要执行的父级地图项的名称 |
| 路径 | 从功能根目录到此操作的执行路径。例如,'/myFeature/parentAction/thisAction' |
| 状态 | “success”或“failure”,具体取决于操作是否成功 |
| error | 仅在 status=failure 时设置。包含导致失败的错误类型 |
| 来源 | Genkit 源语言。例如,'ts' |
| sourceVersion | Genkit 框架版本 |
生成指标
这些是与与模型互动的操作相关的特殊操作指标。除了请求和延迟时间之外,系统还会跟踪输入和输出,并提供特定于模型的维度,以便更轻松地进行调试和配置调整。
| 名称 | 类型 | 说明 |
|---|---|---|
| genkit/ai/generate/requests | 计数器 | 此模型的调用次数 |
| genkit/ai/generate/latency | 直方图 | 执行延迟时间(毫秒) |
| genkit/ai/generate/input/tokens | 计数器 | 输入令牌 |
| genkit/ai/generate/output/tokens | 计数器 | 输出令牌 |
| genkit/ai/generate/input/characters | 计数器 | 输入字符 |
| genkit/ai/generate/output/characters | 计数器 | 输出字符 |
| genkit/ai/generate/input/images | 计数器 | 输入图片 |
| genkit/ai/generate/output/images | 计数器 | 输出图片 |
| genkit/ai/generate/input/audio | 计数器 | 输入音频文件 |
| genkit/ai/generate/output/audio | 计数器 | 输出音频文件 |
每个生成指标都包含以下维度:
| 名称 | 说明 |
|---|---|
| modelName | 模型的名称 |
| featureName | 要执行的父级地图项的名称 |
| 路径 | 从功能根目录到此操作的执行路径。例如,'/myFeature/parentAction/thisAction' |
| latencyMs | 模型的响应时间 |
| 状态 | “success”或“failure”,具体取决于功能请求是否成功 |
| error | 仅在 status=failure 时设置。包含导致失败的错误类型 |
| 来源 | Genkit 源语言。例如,'ts' |
| sourceVersion | Genkit 框架版本 |
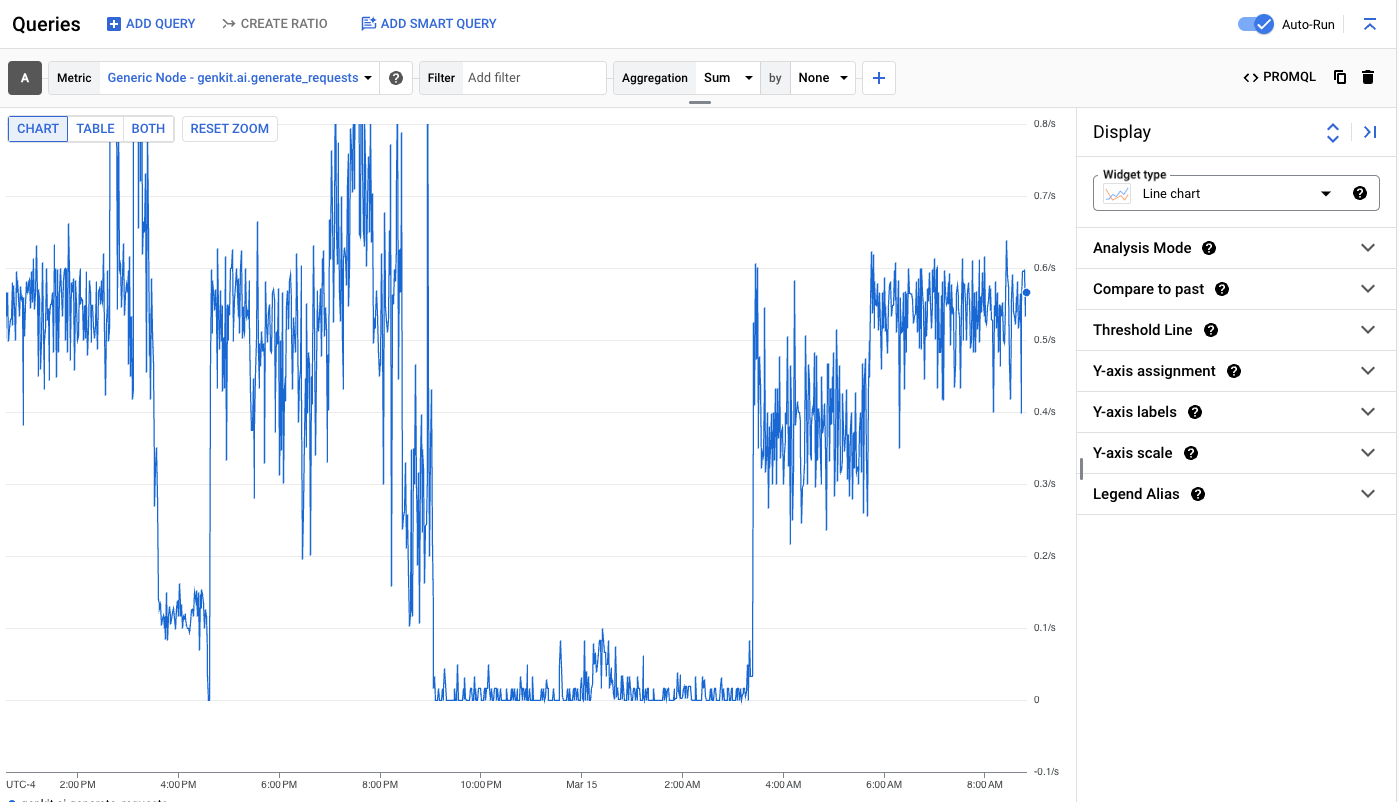
您可以通过 Metrics Explorer 直观呈现指标。在左侧菜单中,点击“探索”标题下的“Metrics Explorer”。

点击“选择指标”下拉菜单,选择“通用节点”“Genkit”和一个指标,以选择指标。

指标的直观呈现取决于其类型(计数器、直方图等)。Metrics Explorer 提供了强大的汇总和查询功能,可帮助您按各种维度绘制指标图表。
遥测延迟
Flow 的特定执行的遥测数据可能略有延迟才会显示在 Cloud 的运维套件中。在大多数情况下,此延迟不到 1 分钟。
配额和限制
请务必注意以下几个配额:
费用
Cloud Logging、Cloud Trace 和 Cloud Monitoring 提供宽裕的免费层级。如需查看具体价格,请访问以下链接:

