应用 AI 功能的核心是生成式模型请求,但很少有应用可以仅接受用户输入、将其传递给模型,然后将模型输出返回给用户。通常,模型调用必须伴随预处理和后处理步骤。例如:
- 检索要与模型调用一起发送的上下文信息
- 检索用户当前会话的历史记录,例如在聊天应用中
- 使用一个模型以适合传递给另一个模型的方式重新格式化用户输入
- 在向用户显示模型输出之前评估其“安全性”
- 组合多个模型的输出
此工作流的每个步骤都必须协同发挥作用,才能成功完成任何与 AI 相关的任务。
在 Genkit 中,您可以使用名为“流程”的构造来表示这种紧密关联的逻辑。流的编写方式与函数一样,使用普通的 TypeScript 代码,但它们添加了一些旨在简化 AI 功能开发的额外功能:
- 类型安全:使用 Zod 定义的输入和输出架构,可提供静态和运行时类型检查
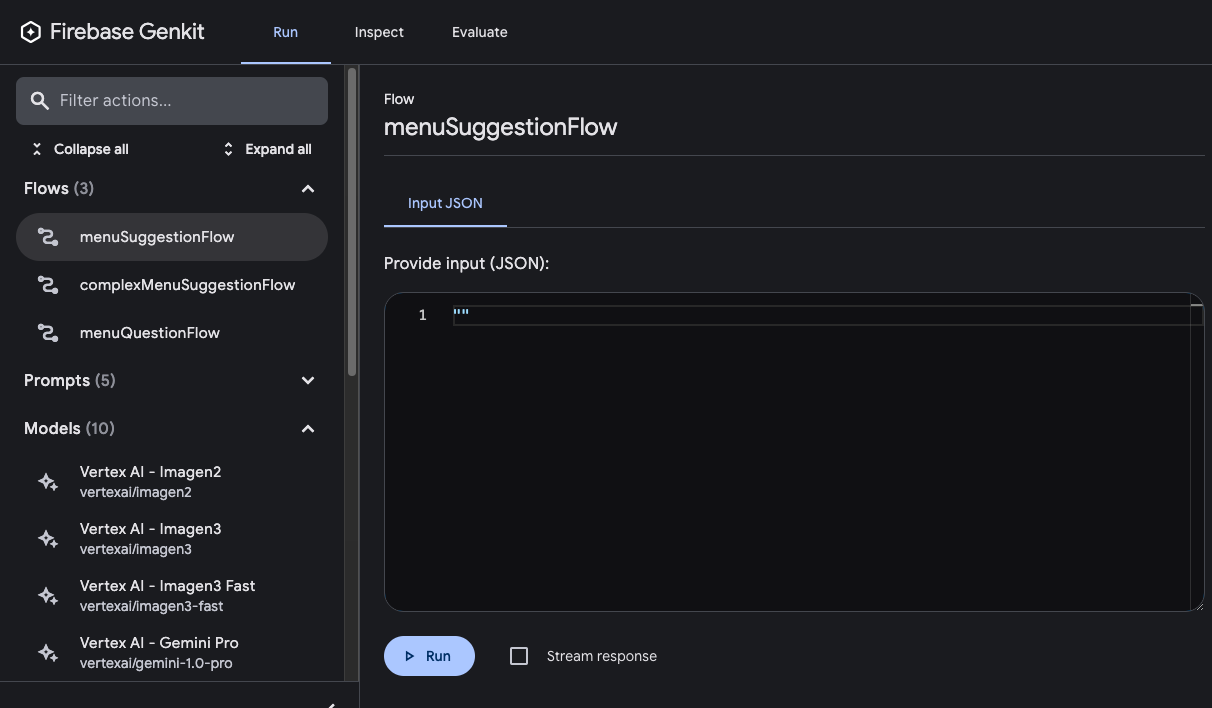
- 与开发者界面集成:使用开发者界面独立于应用代码调试流程。在开发者界面中,您可以运行流程并查看流程的每个步骤的轨迹。
- 简化部署:使用适用于 Firebase 的 Cloud Functions 或任何可托管 Web 应用的平台,直接将流程部署为 Web API 端点。
与其他框架中的类似功能不同,Genkit 的流程轻量且不显眼,不会强制您的应用遵循任何特定的抽象。流程的所有逻辑均采用标准 TypeScript 编写,并且流程内的代码无需具有流程感知能力。
定义和调用流程
形式最简单的 flow 仅封装一个函数。以下示例封装了调用 generate() 的函数:
export const menuSuggestionFlow = ai.defineFlow(
  {
    name: 'menuSuggestionFlow',
  },
  async (restaurantTheme) => {
    const { text } = await ai.generate({
      model: gemini15Flash,
      prompt: `Invent a menu item for a ${restaurantTheme} themed restaurant.`,
    });
    return text;
  }
);
只需像这样封装 generate() 调用,您就可以添加一些功能:这样一来,您就可以从 Genkit CLI 和开发者界面运行流程,并且这是 Genkit 的多项功能(包括部署和可观测性)的要求(后续部分将介绍这些主题)。
输入和输出架构
与直接调用模型 API 相比,Genkit 流的一个最重要的优势是输入和输出均具有类型安全性。定义流程时,您可以使用 Zod 为其定义架构,方法与定义 generate() 调用的输出架构非常相似;不过,与 generate() 不同,您还可以指定输入架构。
下面是对上一个示例的优化,它定义了一个以字符串作为输入并输出对象的流程:
const MenuItemSchema = z.object({
  dishname: z.string(),
  description: z.string(),
});

export const menuSuggestionFlowWithSchema = ai.defineFlow(
  {
    name: 'menuSuggestionFlow',
    inputSchema: z.string(),
    outputSchema: MenuItemSchema,
  },
  async (restaurantTheme) => {
    const { output } = await ai.generate({
      model: gemini15Flash,
      prompt: `Invent a menu item for a ${restaurantTheme} themed restaurant.`,
      output: { schema: MenuItemSchema },
    });
    if (output == null) {
      throw new Error("Response doesn't satisfy schema.");
    }
    return output;
  }
);
请注意,流的架构不一定与流中 generate() 调用的架构一致(事实上,流可能甚至不包含 generate() 调用)。下面是该示例的变体,它会将架构传递给 generate(),但使用结构化输出来设置流返回的简单字符串的格式。
export const menuSuggestionFlowMarkdown = ai.defineFlow(
  {
    name: 'menuSuggestionFlow',
    inputSchema: z.string(),
    outputSchema: z.string(),
  },
  async (restaurantTheme) => {
    const { output } = await ai.generate({
      model: gemini15Flash,
      prompt: `Invent a menu item for a ${restaurantTheme} themed restaurant.`,
      output: { schema: MenuItemSchema },
    });
    if (output == null) {
      throw new Error("Response doesn't satisfy schema.");
    }
    return `**${output.dishname}**: ${output.description}`;
  }
);
调用流程
定义流程后,您可以从 Node.js 代码调用该流程:
const { text } = await menuSuggestionFlow('bistro');
流的参数必须符合输入架构(如果您定义了输入架构)。
如果您定义了输出架构,流程响应将符合该架构。例如,如果您将输出架构设置为 MenuItemSchema,流输出将包含其属性:
const { dishname, description } =
  await menuSuggestionFlowWithSchema('bistro');
流式传输
Flow 使用与 generate() 的流式接口类似的接口支持流式传输。当流程生成大量输出时,流式传输非常有用,因为您可以将输出在生成时呈现给用户,从而提高应用的响应速度。举个熟悉的例子,基于聊天的 LLM 界面通常会在生成响应时将其流式传输给用户。
下面是一个支持流式传输的流程示例:
export const menuSuggestionStreamingFlow = ai.defineFlow(
  {
    name: 'menuSuggestionFlow',
    inputSchema: z.string(),
    streamSchema: z.string(),
    outputSchema: z.object({ theme: z.string(), menuItem: z.string() }),
  },
  async (restaurantTheme, streamingCallback) => {
    const response = await ai.generateStream({
      model: gemini15Flash,
      prompt: `Invent a menu item for a ${restaurantTheme} themed restaurant.`,
    });

    if (streamingCallback) {
      for await (const chunk of response.stream) {
        // Here, you could process the chunk in some way before sending it to
        // the output stream via streamingCallback(). In this example, we output
        // the text of the chunk, unmodified.
        streamingCallback(chunk.text);
      }
    }

    return {
      theme: restaurantTheme,
      menuItem: (await response.response).text,
    };
  }
);
streamSchema选项用于指定流式传输的值的类型。此类型不一定与outputSchema相同,后者是流程的完整输出的类型。streamingCallback是一个回调函数,它接受一个由streamSchema指定的类型的参数。每当数据在您的数据流中可用时,请通过调用此函数将数据发送到输出流。请注意,只有在流的调用方请求流式输出时,才会定义streamingCallback,因此您需要先检查是否已定义streamingCallback,然后再调用它。
在上面的示例中,流式传输的值直接与流式传输的值耦合。generate()虽然通常是这种情况,但不一定如此:您可以根据流程的需要,使用回调尽可能频繁地向流输出值。
调用流式传输流
流式传输流也可以调用,但它们会立即返回响应对象,而不是 promise:
const response = menuSuggestionStreamingFlow.stream('Danube');
响应对象具有 stream 属性,您可以使用该属性在流生成时迭代流的流式输出:
for await (const chunk of response.stream) {
  console.log('chunk', chunk);
}
您还可以获取流的完整输出,就像非流式传输流一样:
const output = await response.output;
请注意,流的流式输出可能与完整输出的类型不同;流式输出符合 streamSchema,而完整输出符合 outputSchema。
从命令行运行流程
您可以使用 Genkit CLI 工具从命令行运行流程:
genkit flow:run menuSuggestionFlow '"French"'对于流式传输流,您可以通过添加 -s 标志将流式传输输出输出到控制台:
genkit flow:run menuSuggestionFlow '"French"' -s从命令行运行流程对测试流程或运行即时执行所需任务的流程非常有用,例如,运行将文档提取到矢量数据库中的流程。
调试流
将 AI 逻辑封装在流程内的一个优势是,您可以使用 Genkit 开发者界面独立于应用来测试和调试流程。
如需启动开发者界面,请在项目目录中运行以下命令:
genkit start -- tsx --watch src/your-code.ts在开发者界面的运行标签页中,您可以运行项目中定义的任何流程:

运行流程后,您可以点击查看轨迹或查看检查标签页,以检查流程调用的轨迹。
在轨迹查看器中,您可以查看整个流程的执行详情,以及流程中各个步骤的详细信息。例如,请考虑以下流程,其中包含多个生成请求:
const PrixFixeMenuSchema = z.object({
  starter: z.string(),
  soup: z.string(),
  main: z.string(),
  dessert: z.string(),
});

export const complexMenuSuggestionFlow = ai.defineFlow(
  {
    name: 'complexMenuSuggestionFlow',
    inputSchema: z.string(),
    outputSchema: PrixFixeMenuSchema,
  },
  async (theme: string): Promise<z.infer<typeof PrixFixeMenuSchema>> => {
    const chat = ai.chat({ model: gemini15Flash });
    await chat.send('What makes a good prix fixe menu?');
    await chat.send(
      'What are some ingredients, seasonings, and cooking techniques that ' +
        `would work for a ${theme} themed menu?`
    );
    const { output } = await chat.send({
      prompt:
        `Based on our discussion, invent a prix fixe menu for a ${theme} ` +
        'themed restaurant.',
      output: {
        schema: PrixFixeMenuSchema,
      },
    });
    if (!output) {
      throw new Error('No data generated.');
    }
    return output;
  }
);
运行此流程时,轨迹查看器会显示有关每个生成请求的详细信息,包括其输出:

流程步骤
在前面的示例中,您看到每个 generate() 调用都会在轨迹查看器中显示为单独的步骤。Genkit 的每项基本操作都会显示为流程的单独步骤:
generate()Chat.send()embed()index()retrieve()
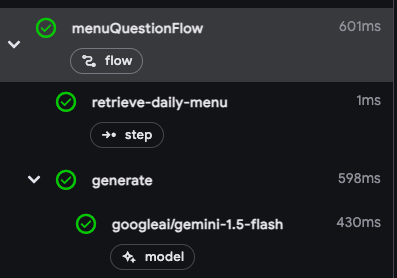
如果您想在轨迹中添加上述代码以外的代码,可以将代码封装在 run() 调用中。您可以对不支持 Genkit 的第三方库的调用或代码的任何关键部分执行此操作。
例如,下面是一个包含两个步骤的流程:第一步使用某种未指定的方法检索菜单,第二步将菜单作为 generate() 调用的上下文包含在内。
import { run } from 'genkit';
export const menuQuestionFlow = ai.defineFlow(
  {
    name: 'menuQuestionFlow',
    inputSchema: z.string(),
    outputSchema: z.string(),
  },
  async (input: string): Promise<string> => {
    const menu = await ai.run(
      'retrieve-daily-menu',
      async (): Promise<string> => {
        // Retrieve today's menu. (This could be a database access or simply
        // fetching the menu from your website.)

        // ...

        return menu;
      }
    );
    const { text } = await ai.generate({
      model: gemini15Flash,
      system: "Help the user answer questions about today's menu.",
      prompt: input,
      docs: [{ content: [{ text: menu }] }],
    });
    return text;
  }
);
由于检索步骤封装在 run() 调用中,因此它会作为一个步骤包含在轨迹查看器中:

部署 flow
您可以直接将流程部署为 Web API 端点,以便从应用客户端进行调用。其他几个页面详细介绍了部署,但本部分将简要概述您的部署选项。
Cloud Functions for Firebase
如需使用 Cloud Functions for Firebase 部署流程,请使用 firebase 插件。在流程定义中,将 defineFlow 替换为 onFlow,并添加 authPolicy。
import { firebaseAuth } from '@genkit-ai/firebase/auth';
import { onFlow } from '@genkit-ai/firebase/functions';

export const menuSuggestion = onFlow(
  ai,
  {
    name: 'menuSuggestionFlow',
    authPolicy: firebaseAuth((user) => {
      if (!user.email_verified) {
        throw new Error('Verified email required to run flow');
      }
    }),
  },
  async (restaurantTheme) => {
    // ...
  }
);
如需了解详情,请参阅以下页面:
Express.js
如需使用任何 Node.js 托管平台(例如 Cloud Run)部署流程,请使用 defineFlow() 定义流程,然后调用 startFlowServer():
export const menuSuggestionFlow = ai.defineFlow(
  {
    name: 'menuSuggestionFlow',
  },
  async (restaurantTheme) => {
    // ...
  }
);

startFlowServer({
  flows: [menuSuggestionFlow],
});
默认情况下,startFlowServer 会将代码库中定义的所有流程作为 HTTP 端点(例如 http://localhost:3400/menuSuggestionFlow)提供。您可以使用 POST 请求调用流程,如下所示:
curl -X POST "http://localhost:3400/menuSuggestionFlow" \
  -H "Content-Type: application/json"  -d '{"data": "banana"}'
如果需要,您可以自定义流服务器以提供特定的流列表,如下所示。您还可以指定自定义端口(如果设置了 PORT 环境变量,则会使用该变量)或指定 CORS 设置。
export const flowA = ai.defineFlow({ name: 'flowA' }, async (subject) => {
  // ...
});

export const flowB = ai.defineFlow({ name: 'flowB' }, async (subject) => {
  // ...
});

startFlowServer({
  flows: [flowB],
  port: 4567,
  cors: {
    origin: '*',
  },
});
如需了解如何部署到特定平台,请参阅使用 Cloud Run 进行部署和将流程部署到任何 Node.js 平台。

