
1. 總覽
在本程式碼研究室中,您將瞭解 Firebase 的一些基本概念,並建立互動式網頁應用程式。您將使用多項 Firebase 產品,建構活動回覆和留言簿即時通訊應用程式。
課程內容
- 使用 Firebase 驗證和 FirebaseUI 驗證使用者。
- 使用 Cloud Firestore 同步處理資料。
- 編寫 Firebase 安全性規則,保護資料庫安全。
軟硬體需求
- 你選擇的瀏覽器,例如 Chrome。
- 存取 stackblitz.com (不必建立帳戶或登入)。
- Google 帳戶,例如 Gmail 帳戶。建議使用您目前 GitHub 帳戶的電子郵件地址。這樣就能在 StackBlitz 中使用進階功能。
- 程式碼研究室的範例程式碼。請參閱下一個步驟,瞭解如何取得驗證碼。
2. 取得範例程式碼
在本程式碼研究室中,您將使用 StackBlitz 建構應用程式。這款線上編輯器整合了多個 Firebase 工作流程。Stackblitz 不需要安裝軟體或使用特殊的 StackBlitz 帳戶。
StackBlitz 可讓您與他人共用專案。其他擁有 StackBlitz 專案網址的使用者可以查看您的程式碼並複製專案,但無法編輯您的 StackBlitz 專案。
- 前往這個網址取得起始程式碼:https://stackblitz.com/edit/firebase-gtk-web-start
- 按一下 StackBlitz 頁面頂端的「Fork」:
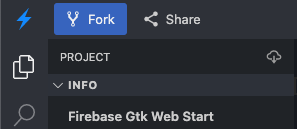
您現在擁有起始程式碼的副本,也就是您自己的 StackBlitz 專案,該專案具有專屬名稱和網址。所有檔案和變更都會儲存在這個 StackBlitz 專案中。
3. 編輯活動資訊
本程式碼研究室的入門教材提供網頁應用程式的結構,包括一些樣式表和應用程式的幾個 HTML 容器。在本程式碼研究室的後續步驟中,您會將這些容器連結至 Firebase。
首先,請先熟悉 StackBlitz 介面。
- 在 StackBlitz 中開啟
index.html檔案。 - 找出
event-details-container和description-container,然後嘗試編輯一些活動詳細資料。
編輯文字時,StackBlitz 中的自動頁面重新載入功能會顯示新的活動詳細資料。很酷吧?
<!-- ... -->

<div id="app">
  <img src="..." />

  <section id="event-details-container">
     <h1>Firebase Meetup</h1>

     <p><i class="material-icons">calendar_today</i> October 30</p>
     <p><i class="material-icons">location_city</i> San Francisco</p>

  </section>

  <hr>

  <section id="firebaseui-auth-container"></section>

  <section id="description-container">
     <h2>What we'll be doing</h2>
     <p>Join us for a day full of Firebase Workshops and Pizza!</p>
  </section>
</div>

<!-- ... -->
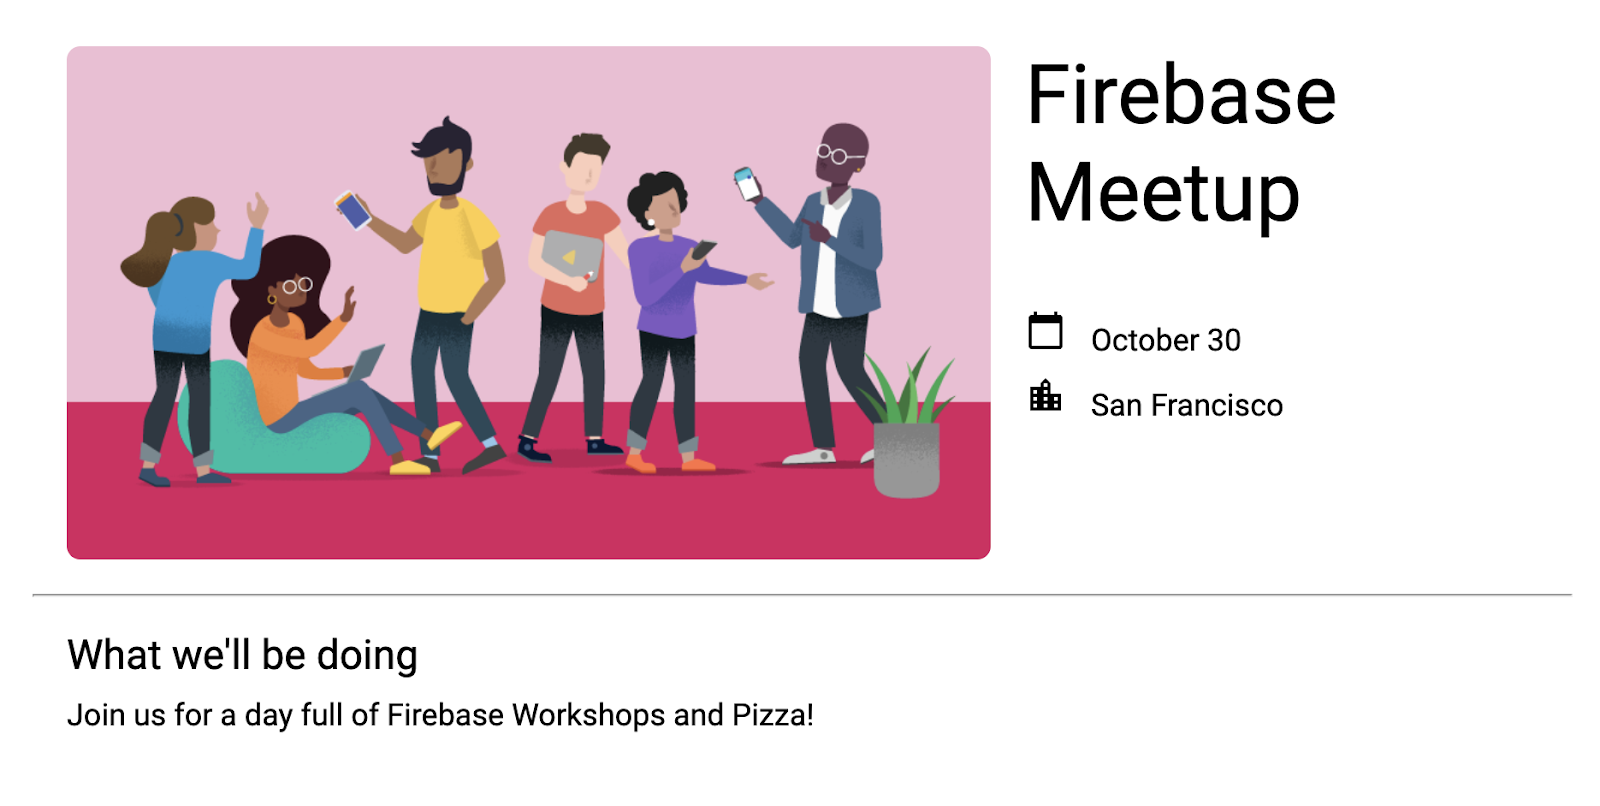
應用程式預覽畫面應如下所示:
應用程式預覽
4. 建立及設定 Firebase 專案
顯示活動資訊對邀請對象來說很方便,但只顯示活動對任何人來說都不太實用。現在要為這個應用程式新增一些動態功能,因此需要將 Firebase 連結至應用程式。如要開始使用 Firebase,請建立及設定 Firebase 專案。
建立 Firebase 專案
- 使用 Google 帳戶登入 Firebase 控制台。
- 按一下按鈕建立新專案,然後輸入專案名稱 (例如
Firebase-Web-Codelab)。 - 按一下「繼續」。
- 如果系統提示,請詳閱並接受 Firebase 條款,然後按一下「繼續」。
- (選用) 在 Firebase 控制台中啟用 AI 輔助功能 (稱為「Gemini in Firebase」)。
- 本程式碼研究室不需要 Google Analytics,因此請關閉 Google Analytics 選項。
- 按一下「建立專案」,等待專案佈建完成,然後按一下「繼續」。
如要進一步瞭解 Firebase 專案,請參閱「瞭解 Firebase 專案」一文。
在控制台中啟用及設定 Firebase 產品
您建構的應用程式會使用幾項 Firebase 產品,這些產品都可用於網頁應用程式:
- Firebase 驗證和 Firebase UI:可讓使用者輕鬆登入您的應用程式。
- Cloud Firestore:在雲端儲存結構化資料,並在資料變更時收到即時通知。
- Firebase 安全性規則:可保護資料庫的安全。
部分產品需要特殊設定或透過 Firebase 控制台啟用。
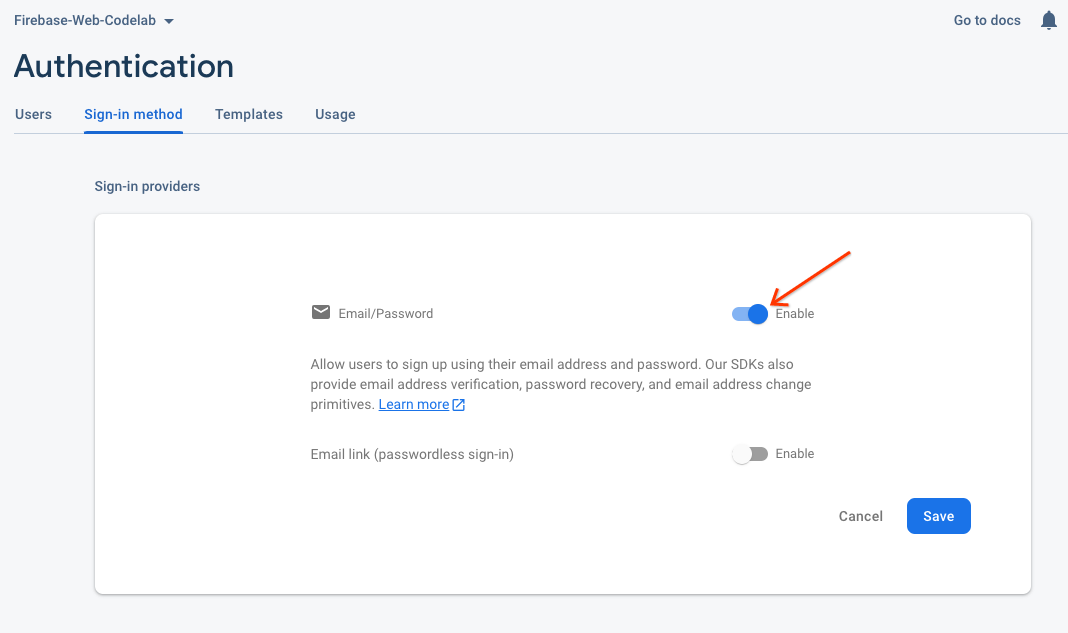
為 Firebase 驗證啟用電子郵件登入
為了讓使用者登入網頁應用程式,請在本程式碼研究室中使用「電子郵件/密碼」登入方式:
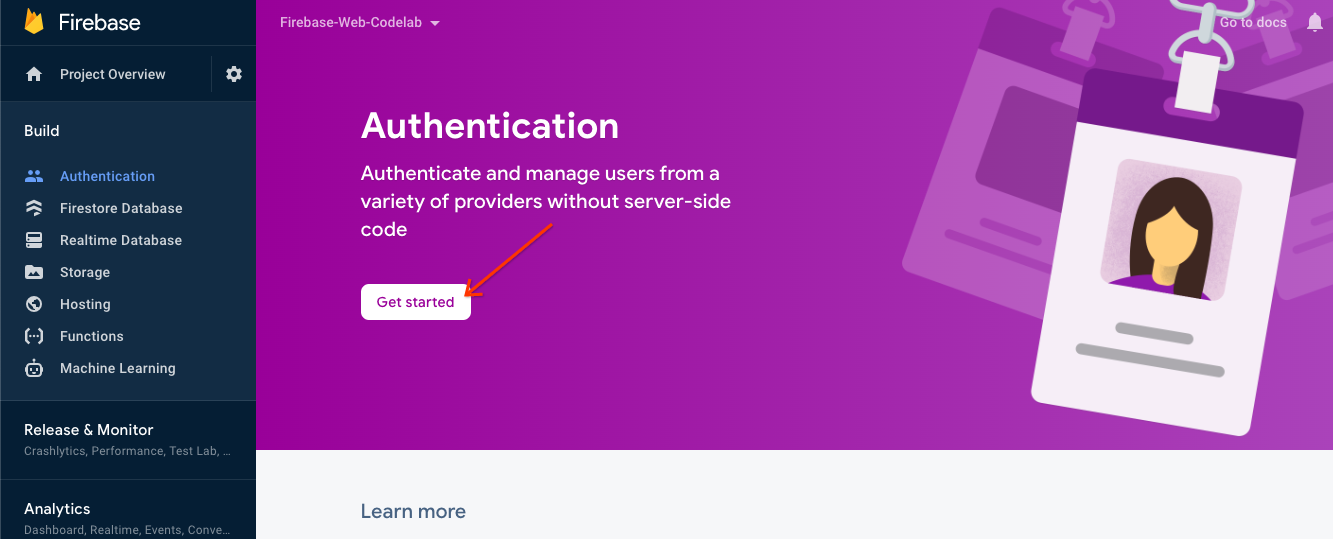
- 在 Firebase 控制台的左側面板中,依序點選「Build」 >「Authentication」。然後按一下「開始使用」。您現在位於「驗證」資訊主頁,可以查看已註冊的使用者、設定登入供應商,以及管理設定。
- 選取「登入方式」分頁標籤 (或按這裡直接前往該分頁)。

- 在供應商選項中點選「電子郵件/密碼」,將切換鈕切換到「啟用」,然後點選「儲存」。
設定 Cloud Firestore
這個網路應用程式使用 Cloud Firestore 儲存及接收即時通訊訊息。
如要在 Firebase 專案中設定 Cloud Firestore,請按照下列步驟操作:
5. 新增及設定 Firebase
建立 Firebase 專案並啟用部分服務後,您必須告知程式碼要使用 Firebase,以及要使用哪個 Firebase 專案。
新增 Firebase 程式庫
如要讓應用程式使用 Firebase,您必須將 Firebase 程式庫新增至應用程式。如 Firebase 說明文件所述,有多種方法可以達成這個目的。舉例來說,您可以從 Google 的 CDN 新增程式庫,也可以使用 npm 在本機安裝程式庫,然後在應用程式中封裝程式庫 (如果您使用 Browserify)。
StackBlitz 提供自動套裝組合,因此您可以使用匯入陳述式新增 Firebase 程式庫。您將使用程式庫的模組化 (v9) 版本,透過「樹狀結構修剪」程序縮減網頁整體大小。如要進一步瞭解模組化 SDK,請參閱說明文件。
如要建構這個應用程式,您可以使用 Firebase 驗證、FirebaseUI 和 Cloud Firestore 程式庫。在本程式碼研究室中,index.js 檔案頂端已包含下列匯入陳述式,我們也會在過程中從各個 Firebase 程式庫匯入更多方法:
// Import stylesheets
import './style.css';

// Firebase App (the core Firebase SDK) is always required
import { initializeApp } from 'firebase/app';

// Add the Firebase products and methods that you want to use
import {} from 'firebase/auth';
import {} from 'firebase/firestore';

import * as firebaseui from 'firebaseui';
將 Firebase 網頁應用程式新增至 Firebase 專案
- 返回 Firebase 控制台,然後按一下左上方的「專案總覽」,前往專案總覽頁面。
- 在專案總覽頁面中央,按一下網頁圖示
 建立新的 Firebase 網頁應用程式。
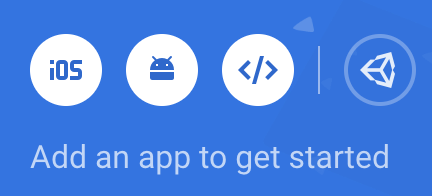
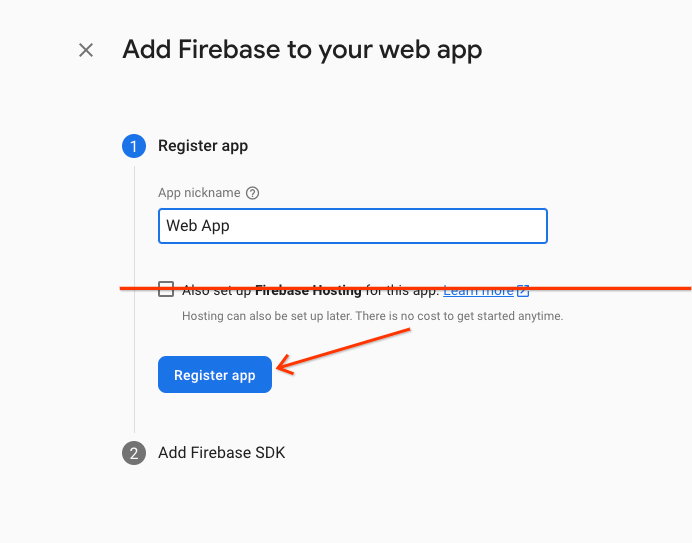
- 以「網頁應用程式」這個暱稱註冊應用程式。
- 在本程式碼研究室中,請勿勾選「Also set up Firebase Hosting for this app」旁的方塊。您目前會使用 StackBlitz 的預覽窗格。
- 按一下「註冊應用程式」。
- 將 Firebase 設定物件複製到剪貼簿。
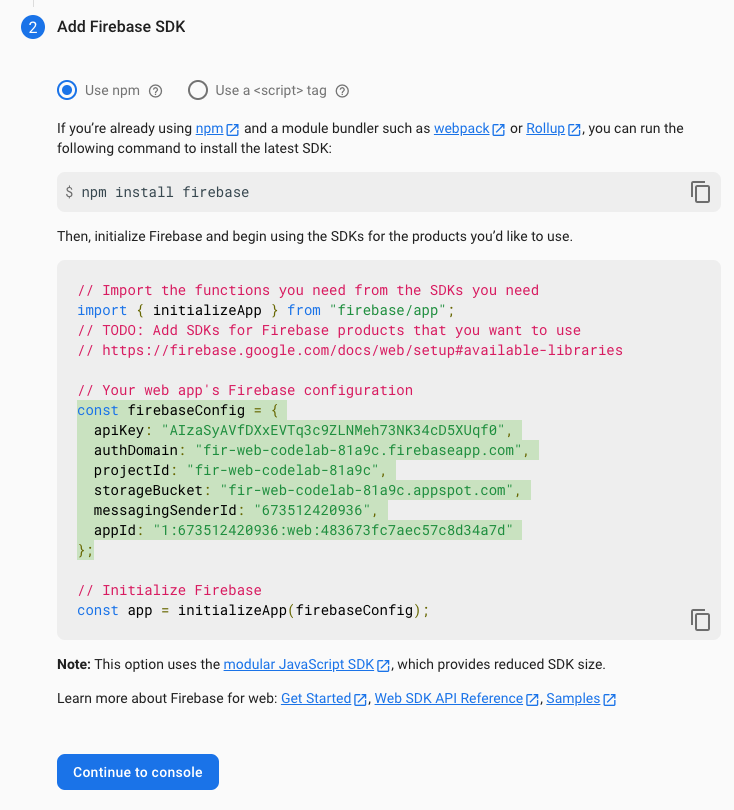
- 按一下「繼續前往控制台」。將 Firebase 設定物件新增至應用程式:
- 返回 StackBlitz,然後前往
index.js檔案。 - 找出
Add Firebase project configuration object here註解行,然後將設定程式碼片段貼到註解下方。 - 新增
initializeApp函式呼叫,使用專屬 Firebase 專案設定來設定 Firebase。// ... // Add Firebase project configuration object here const firebaseConfig = { apiKey: "random-unique-string", authDomain: "your-projectId.firebaseapp.com", databaseURL: "https://your-projectId.firebaseio.com", projectId: "your-projectId", storageBucket: "your-projectId.firebasestorage.app", messagingSenderId: "random-unique-string", appId: "random-unique-string", }; // Initialize Firebase initializeApp(firebaseConfig);
6. 新增使用者登入 (RSVP)
您已將 Firebase 新增至應用程式,現在可以設定 RSVP 按鈕,透過 Firebase Authentication 註冊使用者。
使用電子郵件登入和 FirebaseUI 驗證使用者
您需要回覆按鈕,提示使用者登入電子郵件地址。方法是將 FirebaseUI 連結至 RSVP 按鈕。FirebaseUI 是一個程式庫,可提供 Firebase Auth 預先建構的 UI。
FirebaseUI 需要設定 (請參閱說明文件中的選項),才能執行下列兩項操作:
- 告知 FirebaseUI 您要使用「電子郵件地址/密碼」登入方式。
- 處理登入成功的回呼,並傳回 false,避免重新導向。您正在建構單頁式網頁應用程式,因此不希望頁面重新整理。
新增程式碼來初始化 FirebaseUI Auth
- 在 StackBlitz 中,前往
index.js檔案。 - 在頂端找出
firebase/auth匯入陳述式,然後新增getAuth和EmailAuthProvider,如下所示:// ... // Add the Firebase products and methods that you want to use import { getAuth, EmailAuthProvider } from 'firebase/auth'; import {} from 'firebase/firestore'; - 在
initializeApp之後立即儲存對驗證物件的參照,如下所示:initializeApp(firebaseConfig); auth = getAuth(); - 請注意,起始程式碼中已提供 FirebaseUI 設定。系統已設定使用電子郵件驗證供應商。
- 在
index.js的main()函式底部,新增 FirebaseUI 初始化陳述式,如下所示:async function main() { // ... // Initialize the FirebaseUI widget using Firebase const ui = new firebaseui.auth.AuthUI(auth); } main();
在 HTML 中新增回覆按鈕
- 在 StackBlitz 中,前往
index.html檔案。 - 在
event-details-container內新增 RSVP 按鈕的 HTML,如下方範例所示。
請務必使用與下方相同的id值,因為在本程式碼研究室中,index.js檔案中已有這些特定 ID 的掛鉤。
請注意,在index.html檔案中,有一個 ID 為firebaseui-auth-container的容器。這是您傳遞至 FirebaseUI 的 ID,用於保留登入資訊。<!-- ... --> <section id="event-details-container"> <!-- ... --> <!-- ADD THE RSVP BUTTON HERE --> <button id="startRsvp">RSVP</button> </section> <hr> <section id="firebaseui-auth-container"></section> <!-- ... -->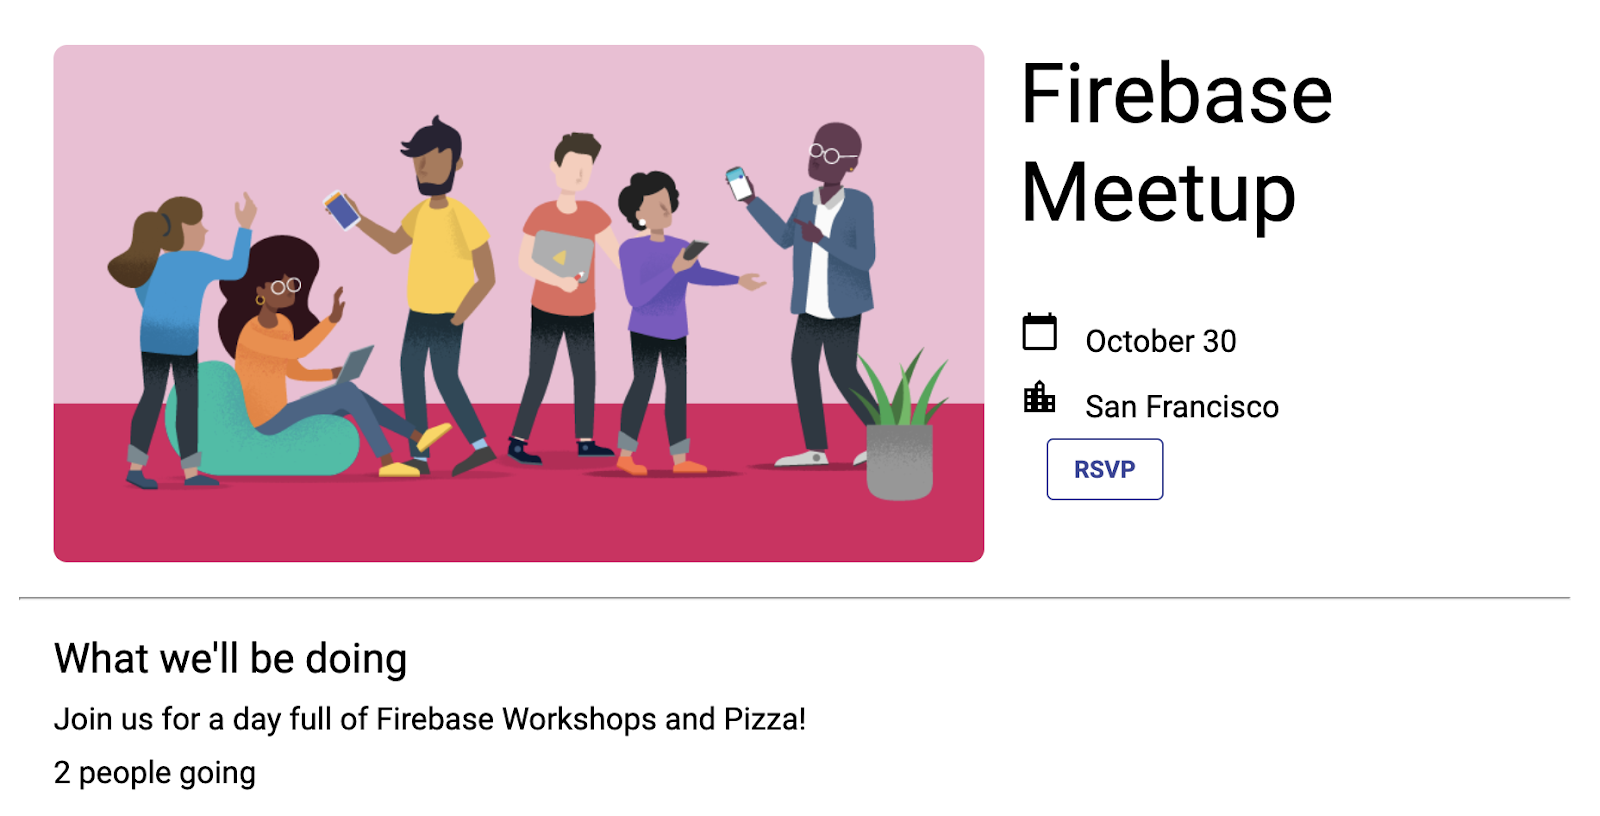
- 在 RSVP 按鈕上設定監聽器,並呼叫 FirebaseUI 啟動函式。這會告知 FirebaseUI 您要顯示登入視窗。
在index.js中,將下列程式碼新增至main()函式的底部:async function main() { // ... // Listen to RSVP button clicks startRsvpButton.addEventListener("click", () => { ui.start("#firebaseui-auth-container", uiConfig); }); } main();
測試登入應用程式
- 在 StackBlitz 的預覽視窗中,按一下「RSVP」按鈕登入應用程式。
- 在本程式碼研究室中,您可以使用任何電子郵件地址,甚至是假的電子郵件地址,因為您不會為本程式碼研究室設定電子郵件驗證步驟。
- 如果看到
auth/operation-not-allowed或The given sign-in provider is disabled for this Firebase project錯誤訊息,請確認您已在 Firebase 控制台中啟用「電子郵件/密碼」做為登入供應商。

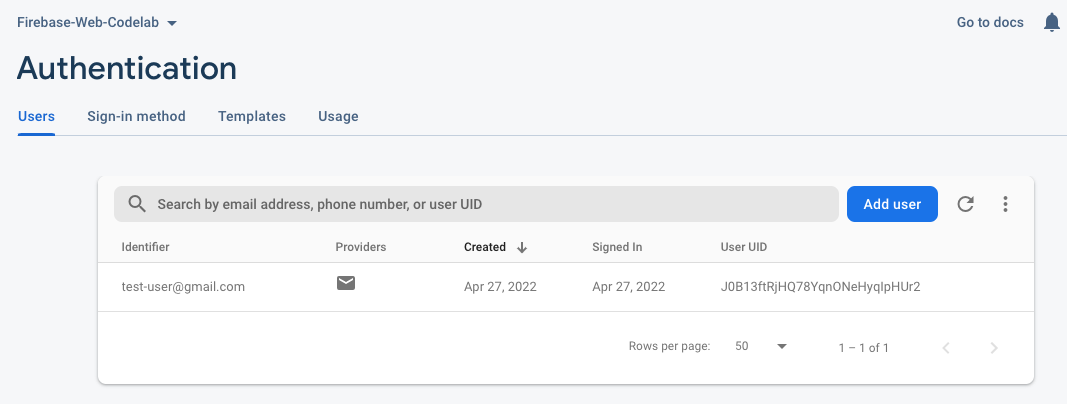
- 前往 Firebase 控制台的「Authentication」(驗證) 資訊主頁。在「使用者」分頁中,您應該會看到登入應用程式時輸入的帳戶資訊。
在 UI 中新增驗證狀態
接著,請確認 UI 能反映出您已登入帳戶。
您將使用 Firebase 驗證狀態監聽器回呼,每當使用者登入狀態變更時,系統就會通知您。如果目前有登入的使用者,應用程式會將「RSVP」按鈕切換為「登出」按鈕。
- 在 StackBlitz 中,前往
index.js檔案。 - 在頂端找出
firebase/auth匯入陳述式,然後新增signOut和onAuthStateChanged,如下所示:// ... // Add the Firebase products and methods that you want to use import { getAuth, EmailAuthProvider, signOut, onAuthStateChanged } from 'firebase/auth'; import {} from 'firebase/firestore'; - 在
main()函式的底部新增下列程式碼:async function main() { // ... // Listen to the current Auth state onAuthStateChanged(auth, user => { if (user) { startRsvpButton.textContent = 'LOGOUT'; } else { startRsvpButton.textContent = 'RSVP'; } }); } main(); - 在按鈕監聽器中,檢查是否有目前使用者並登出。如要這麼做,請將目前的
startRsvpButton.addEventListener替換為下列內容:// ... // Called when the user clicks the RSVP button startRsvpButton.addEventListener('click', () => { if (auth.currentUser) { // User is signed in; allows user to sign out signOut(auth); } else { // No user is signed in; allows user to sign in ui.start('#firebaseui-auth-container', uiConfig); } });
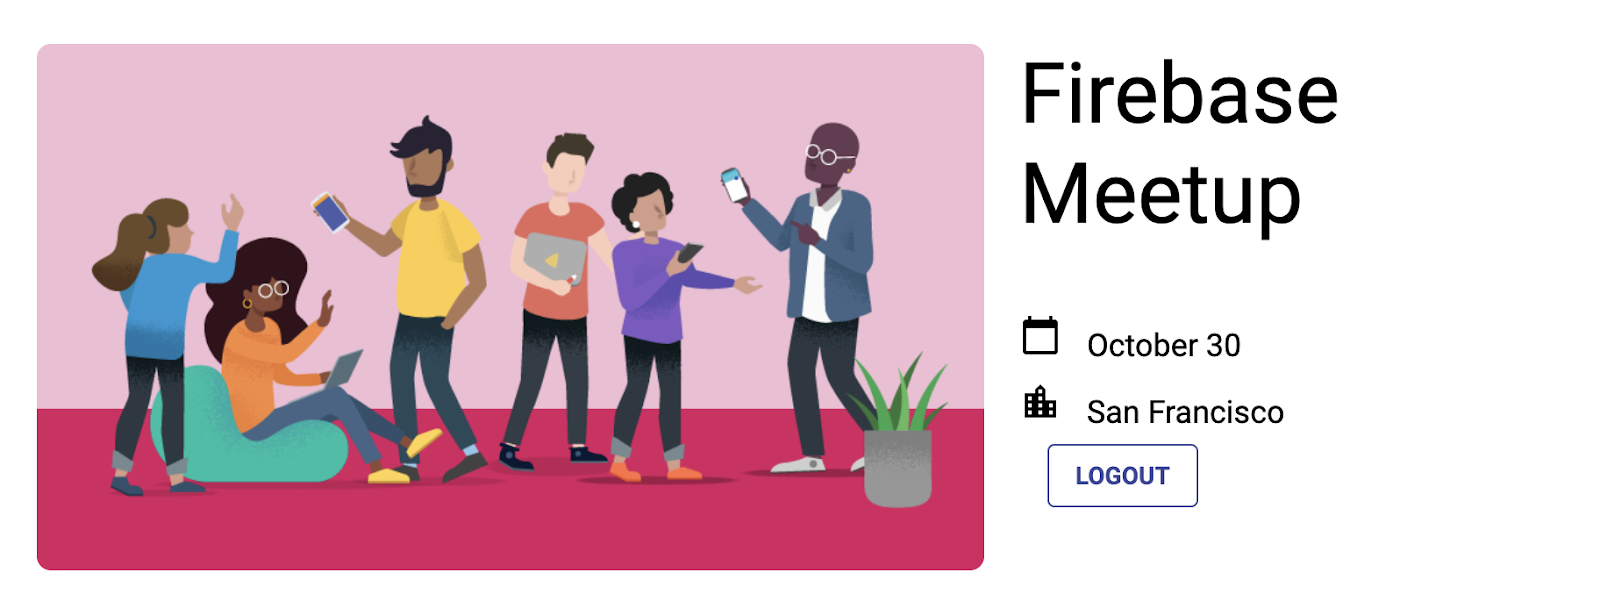
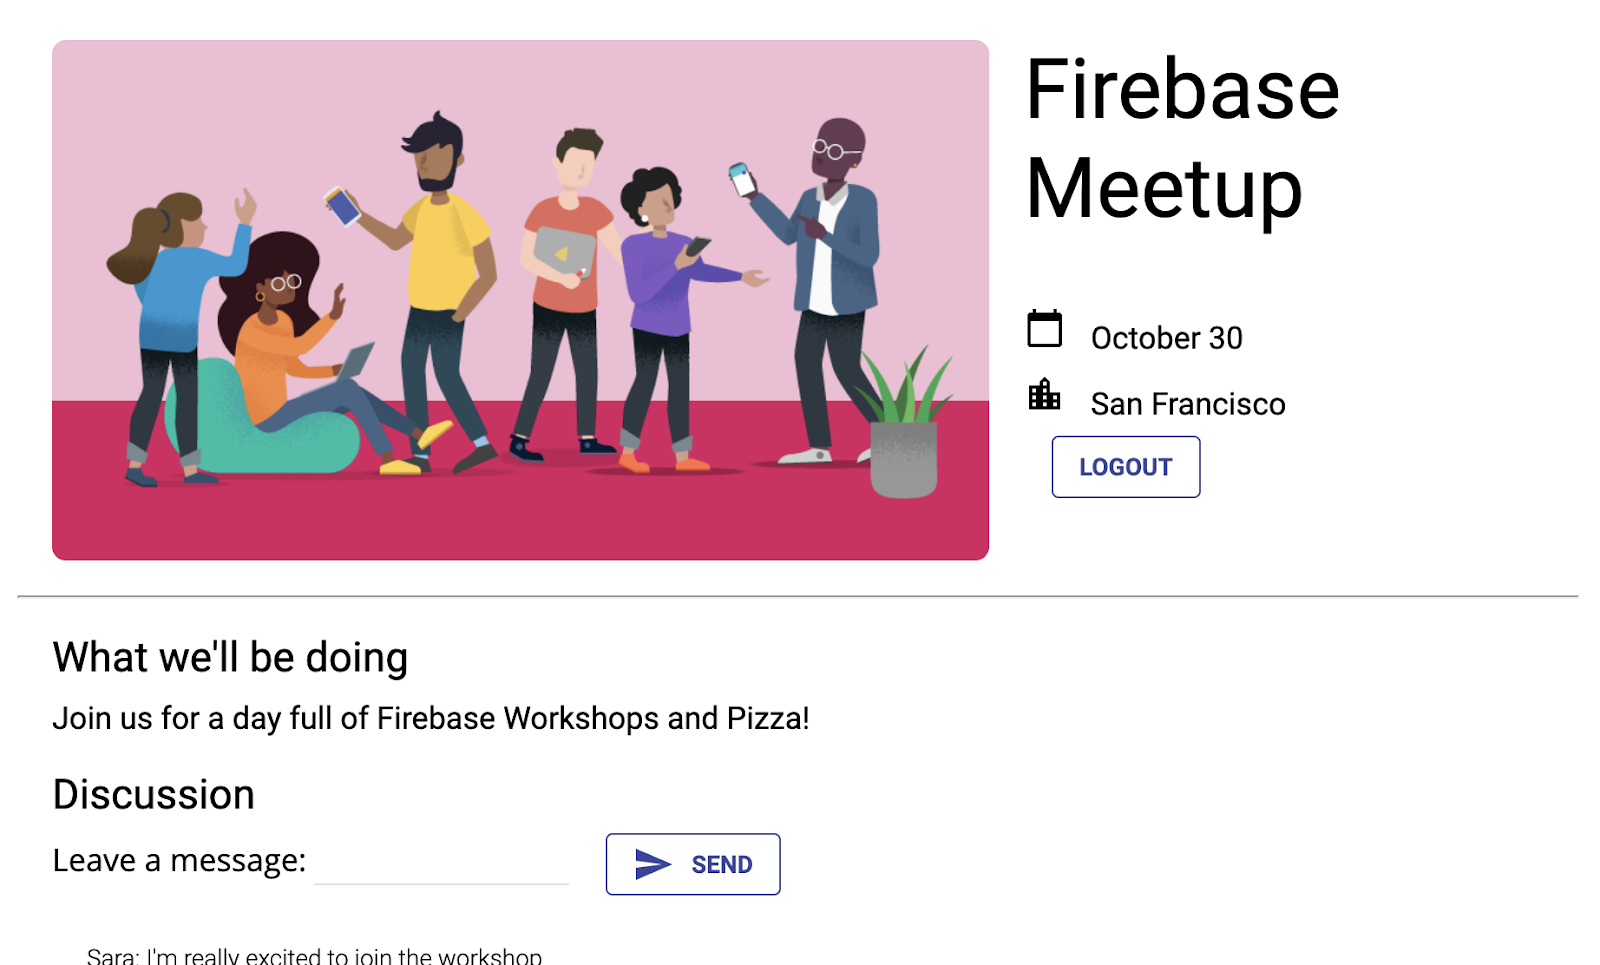
現在,應用程式中的按鈕應會顯示「登出」,點選後則會切換回「回覆」。
應用程式預覽
7. 將訊息寫入 Cloud Firestore
知道使用者會來很棒,但我們來為訪客提供其他可在應用程式中執行的操作。如果他們可以在留言簿中留言呢?他們可以分享自己為何期待參加活動,或是希望與誰見面。
如要儲存使用者在應用程式中撰寫的即時通訊訊息,請使用 Cloud Firestore。
資料模型
Cloud Firestore 是 NoSQL 資料庫,儲存在資料庫中的資料會分成集合、文件、欄位和子集合。您會將對話中的每則訊息儲存為文件,並放在名為 guestbook 的頂層集合中。

將訊息新增至 Firestore
在本節中,您將新增功能,讓使用者將新訊息寫入資料庫。首先,您要新增 UI 元素 (訊息欄位和傳送按鈕) 的 HTML。接著,您會新增將這些元素連結至資料庫的程式碼。
如要新增訊息欄位和傳送按鈕的 UI 元素,請按照下列步驟操作:
- 在 StackBlitz 中,前往
index.html檔案。 - 找出
guestbook-container,然後新增下列 HTML,建立包含訊息輸入欄位和傳送按鈕的表單。<!-- ... --> <section id="guestbook-container"> <h2>Discussion</h2> <form id="leave-message"> <label>Leave a message: </label> <input type="text" id="message"> <button type="submit"> <i class="material-icons">send</i> <span>SEND</span> </button> </form> </section> <!-- ... -->
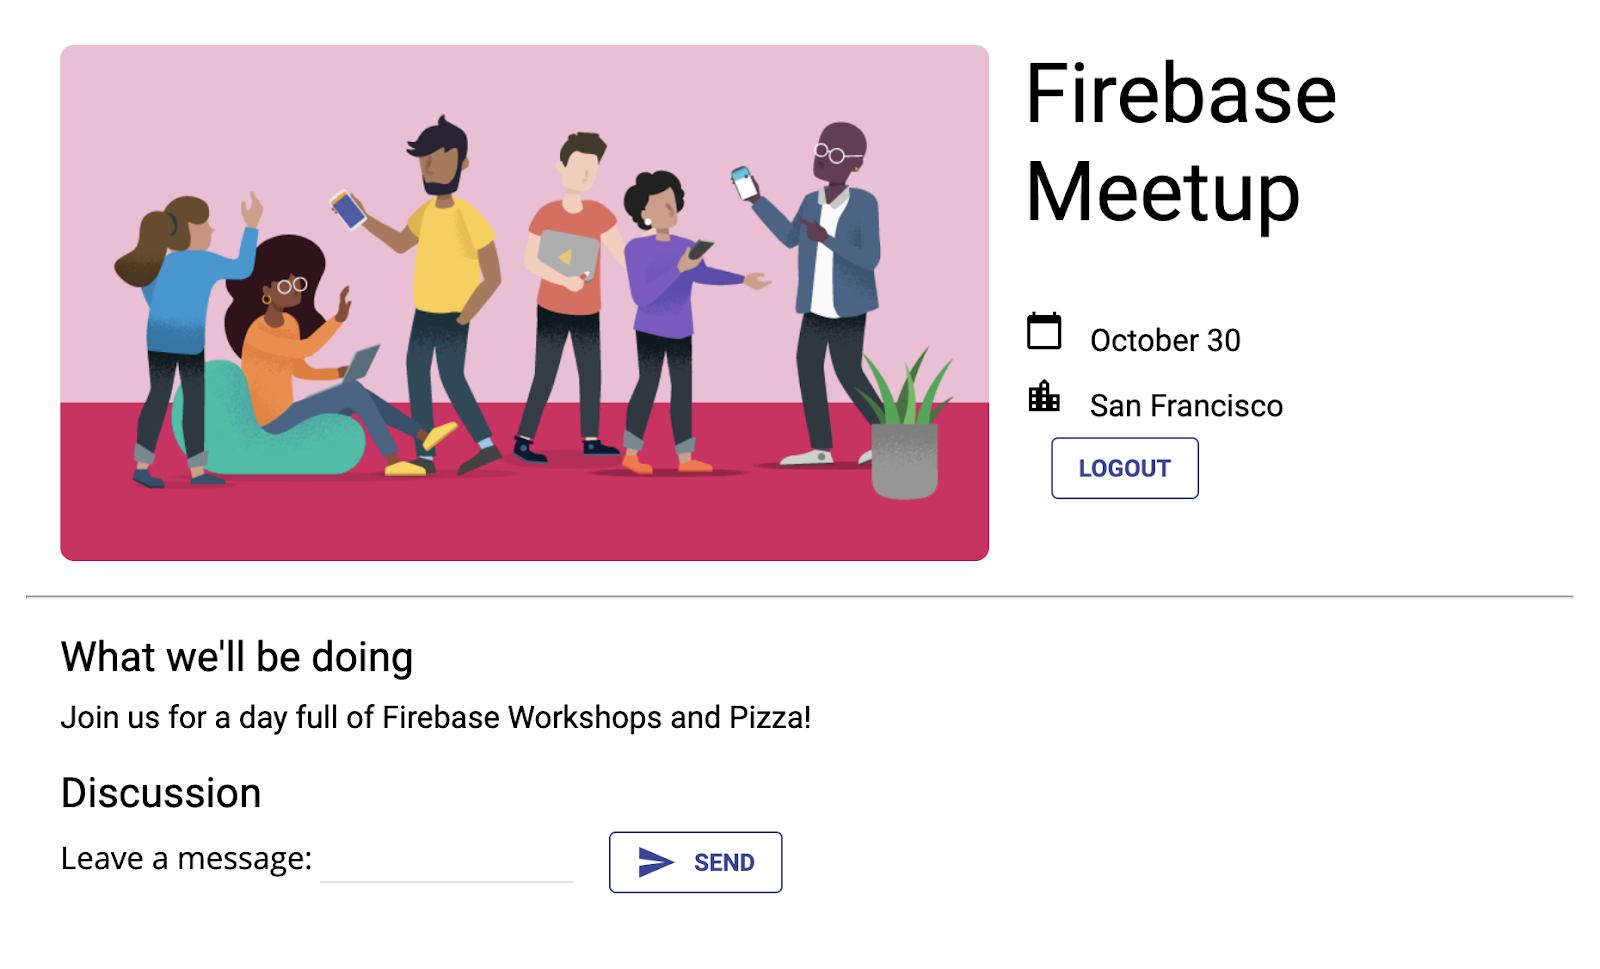
應用程式預覽
使用者點選「傳送」按鈕時,系統會觸發下列程式碼片段。這會將訊息輸入欄位的內容新增至資料庫的 guestbook 集合。具體來說,addDoc 方法會將訊息內容新增至 guestbook 集合的新文件中 (ID 會自動產生)。
- 在 StackBlitz 中,前往
index.js檔案。 - 在頂端找出
firebase/firestore匯入陳述式,然後新增getFirestore、addDoc和collection,如下所示:// ... // Add the Firebase products and methods that you want to use import { getAuth, EmailAuthProvider, signOut, onAuthStateChanged } from 'firebase/auth'; import { getFirestore, addDoc, collection } from 'firebase/firestore'; - 現在,我們會在
initializeApp之後儲存對 Firestoredb物件的參照:initializeApp(firebaseConfig); auth = getAuth(); db = getFirestore(); - 在
main()函式的最下方加入下列程式碼。
請注意,auth.currentUser.uid是指 Firebase 驗證為所有登入使用者自動產生的專屬 ID。async function main() { // ... // Listen to the form submission form.addEventListener('submit', async e => { // Prevent the default form redirect e.preventDefault(); // Write a new message to the database collection "guestbook" addDoc(collection(db, 'guestbook'), { text: input.value, timestamp: Date.now(), name: auth.currentUser.displayName, userId: auth.currentUser.uid }); // clear message input field input.value = ''; // Return false to avoid redirect return false; }); } main();
只向已登入的使用者顯示留言簿
您不希望任何人都能看到訪客的訊息。為確保聊天室安全,您可以只允許登入使用者查看留言簿。不過,如果是您自己的應用程式,也請使用 Firebase 安全性規則保護資料庫。(程式碼研究室稍後會提供安全性規則的相關資訊)。
- 在 StackBlitz 中,前往
index.js檔案。 - 編輯
onAuthStateChanged監聽器,隱藏及顯示留言簿。// ... // Listen to the current Auth state onAuthStateChanged(auth, user => { if (user) { startRsvpButton.textContent = 'LOGOUT'; // Show guestbook to logged-in users guestbookContainer.style.display = 'block'; } else { startRsvpButton.textContent = 'RSVP'; // Hide guestbook for non-logged-in users guestbookContainer.style.display = 'none'; } });
測試傳送訊息
- 確認你已登入應用程式。
- 輸入訊息,例如「你好!」,然後按一下「傳送」。
這項動作會將訊息寫入 Cloud Firestore 資料庫。不過,您還需要實作資料擷取作業,因此實際的網路應用程式中不會顯示該訊息。您會在下一個步驟中執行這項操作。
但您可以在 Firebase 控制台中看到新加入的訊息。
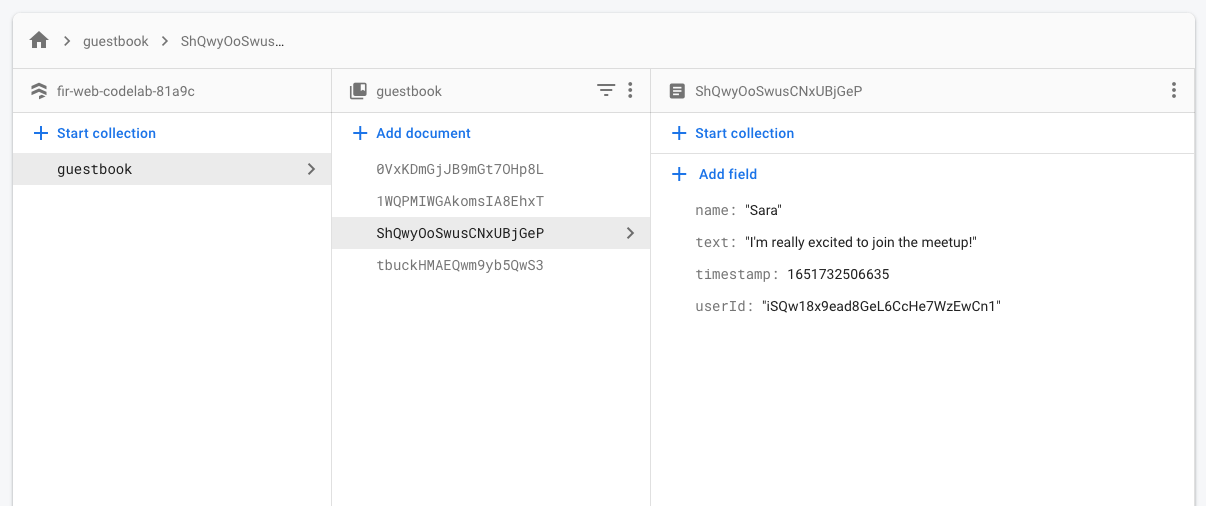
在 Firebase 控制台的 Firestore 資料庫資訊主頁中,您應該會看到 guestbook 集合和新增的訊息。如果持續傳送訊息,留言簿集合就會包含許多文件,如下所示:
Firebase 控制台
8. 朗讀訊息
同步處理訊息
很棒的是,訪客可以將訊息寫入資料庫,但他們還無法在應用程式中看到這些訊息。
如要顯示訊息,您需要新增在資料變更時觸發的監聽器,然後建立顯示新訊息的 UI 元素。
您將新增程式碼,監聽應用程式中新加入的訊息。首先,請在 HTML 中新增一個區段,用來顯示訊息:
- 在 StackBlitz 中,前往
index.html檔案。 - 在
guestbook-container中,新增 ID 為guestbook的區段。<!-- ... --> <section id="guestbook-container"> <h2>Discussion</h2> <form><!-- ... --></form> <section id="guestbook"></section> </section> <!-- ... -->
接著,註冊監聽器來監聽資料變更:
- 在 StackBlitz 中,前往
index.js檔案。 - 在頂端找出
firebase/firestore匯入陳述式,然後新增query、orderBy和onSnapshot,如下所示:// ... import { getFirestore, addDoc, collection, query, orderBy, onSnapshot } from 'firebase/firestore'; - 在
main()函式的底部,新增下列程式碼,在資料庫中逐一查看所有文件 (留言簿訊息)。如要進一步瞭解這段程式碼的內容,請參閱程式碼片段下方的資訊。async function main() { // ... // Create query for messages const q = query(collection(db, 'guestbook'), orderBy('timestamp', 'desc')); onSnapshot(q, snaps => { // Reset page guestbook.innerHTML = ''; // Loop through documents in database snaps.forEach(doc => { // Create an HTML entry for each document and add it to the chat const entry = document.createElement('p'); entry.textContent = doc.data().name + ': ' + doc.data().text; guestbook.appendChild(entry); }); }); } main();
如要監聽資料庫中的訊息,您已使用 collection 函式,對特定集合建立查詢。上述程式碼會監聽 guestbook 集合的變更,這個集合會儲存即時通訊訊息。訊息也會依日期排序,orderBy('timestamp', 'desc') 會將最新訊息顯示在最上方。
onSnapshot 函式會採用兩個參數:要使用的查詢和回呼函式。如果與查詢相符的文件有任何變更,系統就會觸發回呼函式。例如訊息遭到刪除、修改或新增。詳情請參閱 Cloud Firestore 說明文件。
測試訊息同步功能
Cloud Firestore 會自動且即時地與訂閱資料庫的用戶端同步處理資料。
- 您先前在資料庫中建立的訊息應該會顯示在應用程式中。歡迎撰寫新訊息,這些訊息應會立即顯示。
- 如果您在多個視窗或分頁中開啟工作區,系統會即時同步處理分頁中的訊息。
- (選用) 你可以嘗試直接在 Firebase 主控台的「資料庫」部分手動刪除、修改或新增訊息,任何變更都應會顯示在 UI 中。
恭喜!您正在應用程式中讀取 Cloud Firestore 文件!
應用程式預覽
9. 設定基本安全性規則
您一開始將 Cloud Firestore 設為使用測試模式,這表示資料庫可供讀取和寫入。不過,您只應在開發初期使用測試模式。最佳做法是在開發應用程式時,為資料庫設定安全性規則。安全性應是應用程式結構和行為不可或缺的一環。
您可以使用安全性規則控管資料庫中文件和集合的存取權。彈性規則語法可讓您建立規則,比對所有寫入作業、整個資料庫,或特定文件的作業。
您可以在 Firebase 控制台中撰寫 Cloud Firestore 的安全規則:
- 在 Firebase 控制台的「Build」專區中,按一下「Firestore Database」,然後選取「Rules」分頁標籤 (或按這裡直接前往「Rules」分頁標籤)。
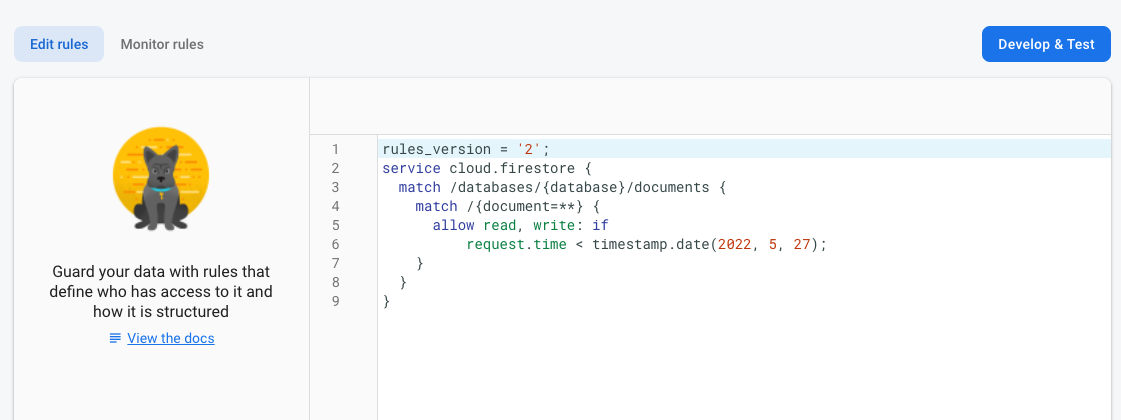
- 您應該會看到下列預設安全性規則,其中公開存取時間限制為自今天起幾週內。
找出集合
首先,找出應用程式寫入資料的集合。
- 刪除現有的
match /{document=**}子句,讓規則如下所示:rules_version = '2'; service cloud.firestore { match /databases/{database}/documents { } } - 在
match /databases/{database}/documents中,找出要保護的集合:rules_version = '2'; service cloud.firestore { match /databases/{database}/documents { match /guestbook/{entry} { // You'll add rules here in the next step. } }
新增安全防護規則
由於您在每個留言簿文件中都使用驗證 UID 做為欄位,因此可以取得驗證 UID,並確認嘗試寫入文件的使用者是否具有相符的驗證 UID。
- 將讀取和寫入規則新增至規則集,如下所示:
rules_version = '2'; service cloud.firestore { match /databases/{database}/documents { match /guestbook/{entry} { allow read: if request.auth.uid != null; allow create: if request.auth.uid == request.resource.data.userId; } } } - 按一下「發布」即可部署新規則。現在,只有登入的使用者可以讀取留言簿中的訊息 (任何訊息!),但您只能使用使用者 ID 建立訊息。此外,訊息也無法編輯或刪除。
新增驗證規則
- 新增資料驗證,確保文件中包含所有預期欄位:
rules_version = '2'; service cloud.firestore { match /databases/{database}/documents { match /guestbook/{entry} { allow read: if request.auth.uid != null; allow create: if request.auth.uid == request.resource.data.userId && "name" in request.resource.data && "text" in request.resource.data && "timestamp" in request.resource.data; } } } - 按一下「發布」,即可部署新規則。
重設監聽器
由於應用程式現在只允許通過身分驗證的使用者登入,因此您應將 guestbook firestore 查詢移至 Authentication 監聽器內。否則,使用者登出時會發生權限錯誤,應用程式也會中斷連線。
- 在 StackBlitz 中,前往
index.js檔案。 - 將留言簿集合
onSnapshot監聽器拉到名為subscribeGuestbook的新函式中。此外,請將onSnapshot函式的結果指派給guestbookListener變數。
FirestoreonSnapshot監聽器會傳回取消訂閱函式,您可以使用該函式稍後取消快照監聽器。// ... // Listen to guestbook updates function subscribeGuestbook() { const q = query(collection(db, 'guestbook'), orderBy('timestamp', 'desc')); guestbookListener = onSnapshot(q, snaps => { // Reset page guestbook.innerHTML = ''; // Loop through documents in database snaps.forEach(doc => { // Create an HTML entry for each document and add it to the chat const entry = document.createElement('p'); entry.textContent = doc.data().name + ': ' + doc.data().text; guestbook.appendChild(entry); }); }); } - 在下方新增名為
unsubscribeGuestbook的函式。檢查guestbookListener變數是否不為空值,然後呼叫函式來取消接聽程式。// ... // Unsubscribe from guestbook updates function unsubscribeGuestbook() { if (guestbookListener != null) { guestbookListener(); guestbookListener = null; } }
最後,將新函式新增至 onAuthStateChanged 回呼。
- 在
if (user)底部新增subscribeGuestbook()。 - 在
else陳述式底部新增unsubscribeGuestbook()。// ... // Listen to the current Auth state onAuthStateChanged(auth, user => { if (user) { startRsvpButton.textContent = 'LOGOUT'; // Show guestbook to logged-in users guestbookContainer.style.display = 'block'; // Subscribe to the guestbook collection subscribeGuestbook(); } else { startRsvpButton.textContent = 'RSVP'; // Hide guestbook for non-logged-in users guestbookContainer.style.display = 'none'; // Unsubscribe from the guestbook collection unsubscribeGuestbook(); } });
10. 加分步驟:練習所學內容
記錄出席者的出席回覆狀態
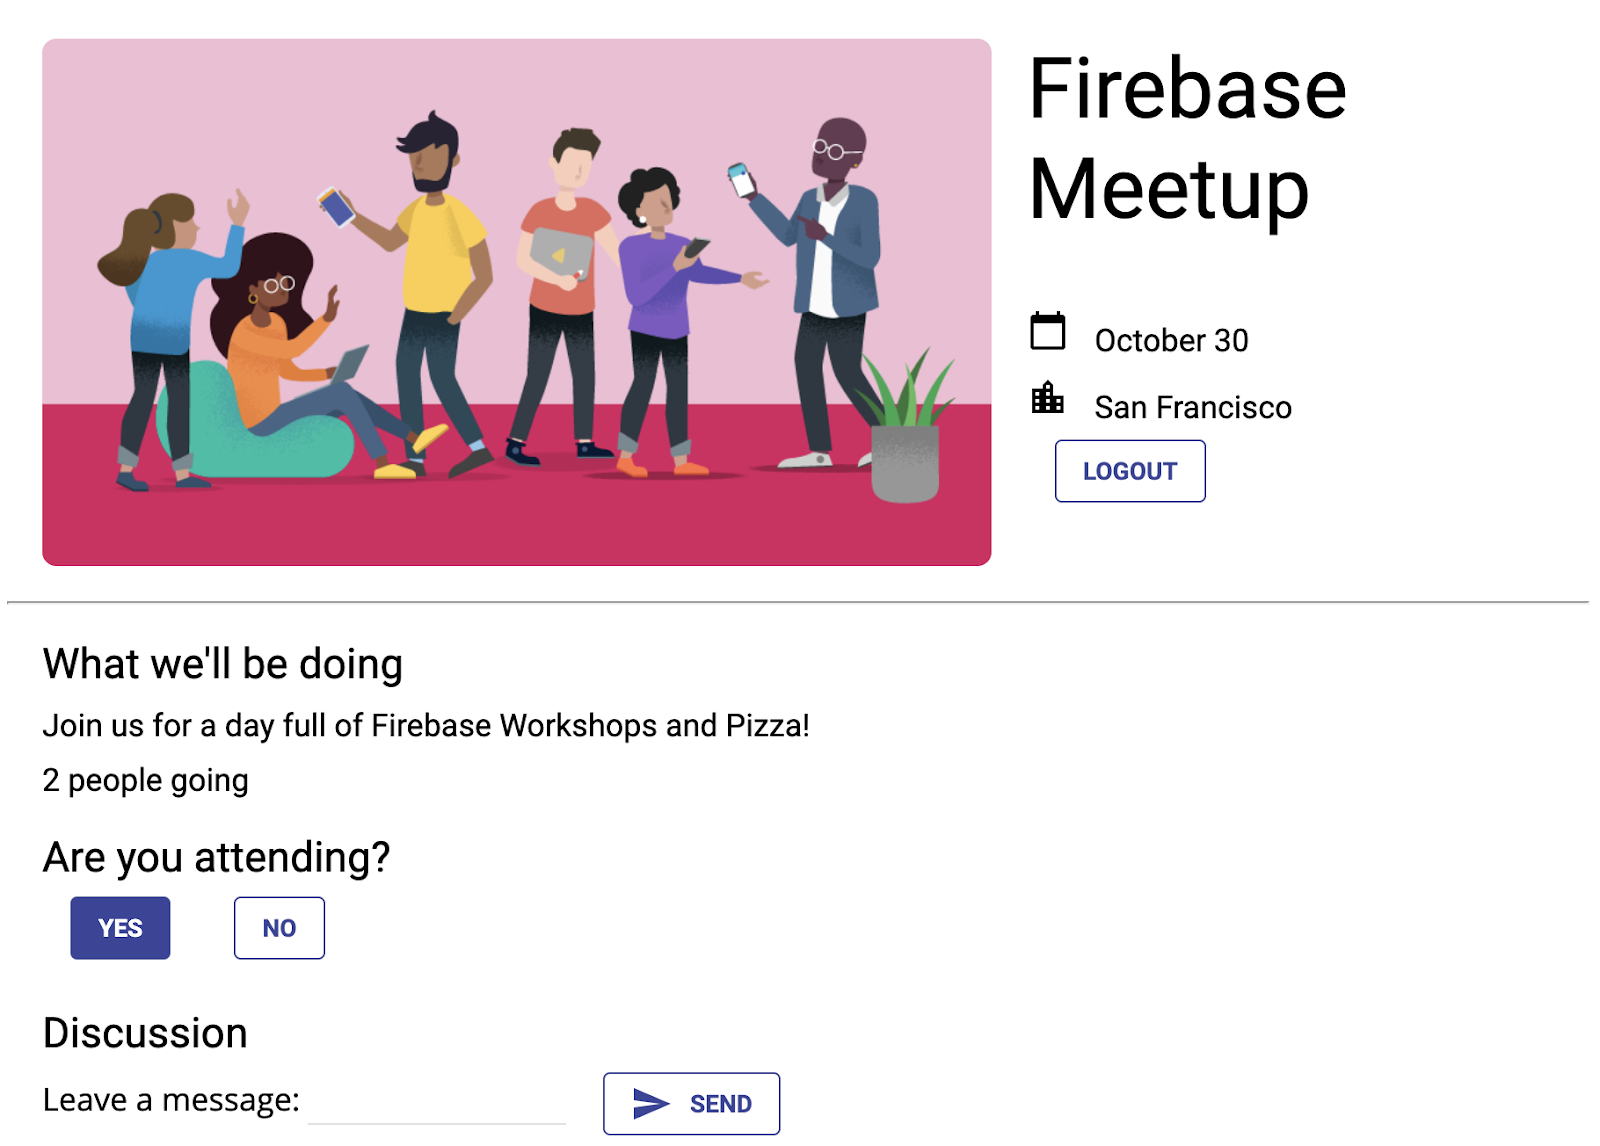
目前,使用者只要對活動感興趣,就能透過應用程式開始即時通訊。此外,你只能透過對方在即時通訊中發布的訊息,得知對方即將抵達。現在就來整理一下,讓大家知道有多少人會出席。
新增切換按鈕,讓想參加活動的使用者註冊,然後收集出席人數。
- 在 StackBlitz 中,前往
index.html檔案。 - 在
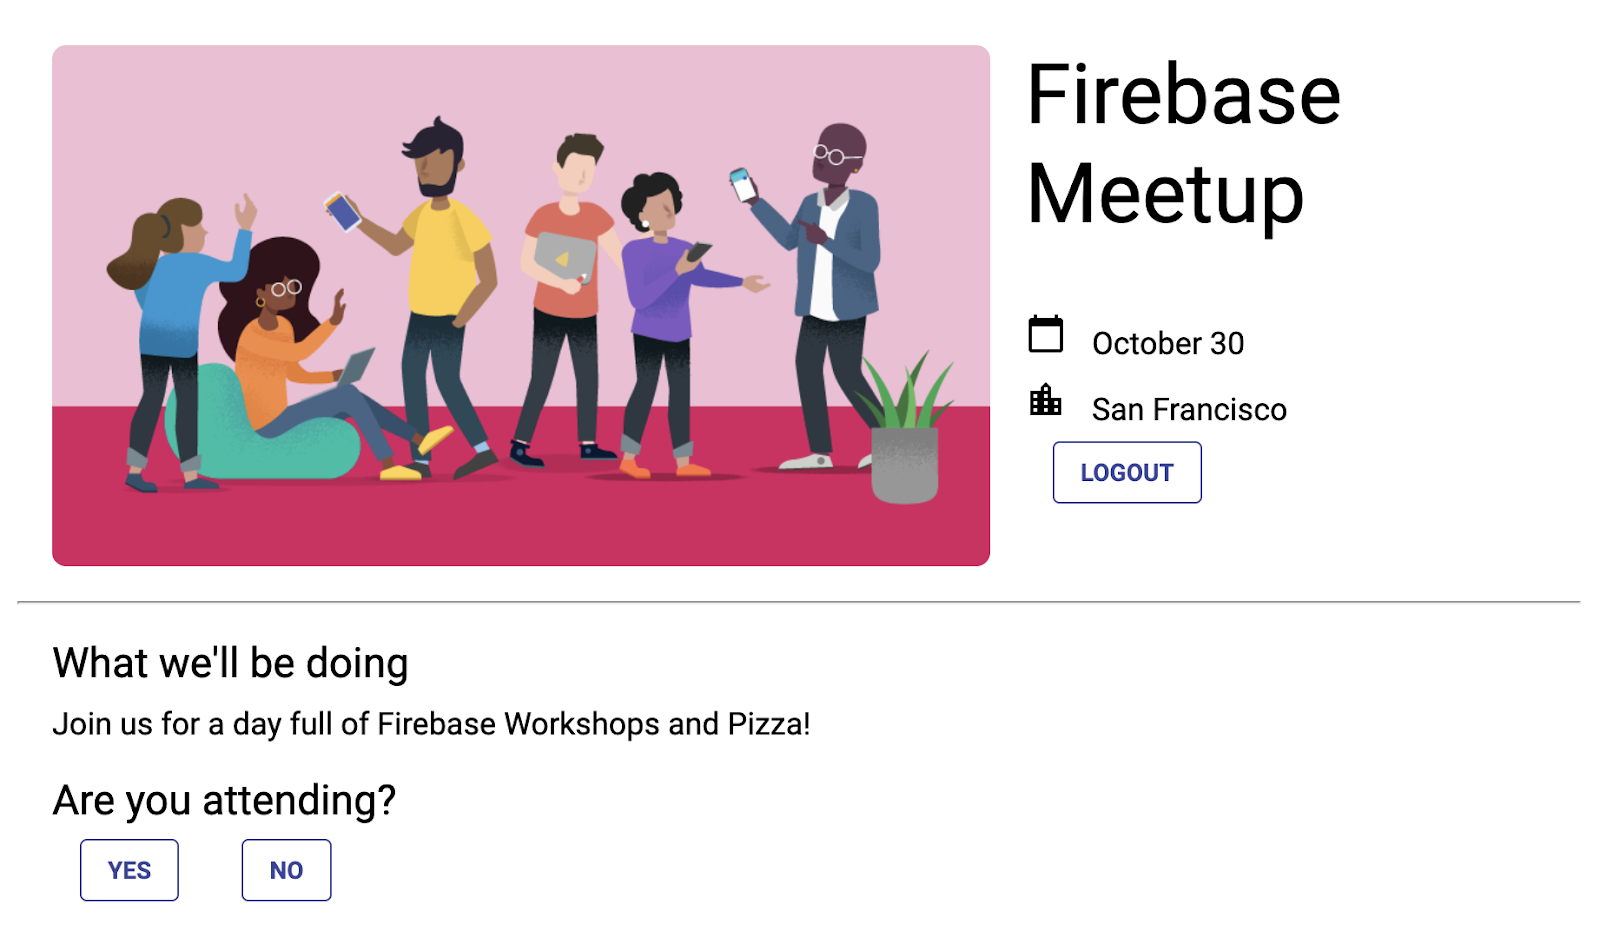
guestbook-container中,新增一組「YES」和「NO」按鈕,如下所示:<!-- ... --> <section id="guestbook-container"> <h2>Are you attending?</h2> <button id="rsvp-yes">YES</button> <button id="rsvp-no">NO</button> <h2>Discussion</h2> <!-- ... --> </section> <!-- ... -->
應用程式預覽
接著,註冊按鈕點擊事件的監聽器。如果使用者點選「是」,請使用驗證 UID 將回覆儲存至資料庫。
- 在 StackBlitz 中,前往
index.js檔案。 - 在頂端找出
firebase/firestore匯入陳述式,然後新增doc、setDoc和where,如下所示:// ... // Add the Firebase products and methods that you want to use import { getFirestore, addDoc, collection, query, orderBy, onSnapshot, doc, setDoc, where } from 'firebase/firestore'; - 在
main()函式的底部,新增下列程式碼來監聽回覆狀態:async function main() { // ... // Listen to RSVP responses rsvpYes.onclick = async () => { }; rsvpNo.onclick = async () => { }; } main(); - 接著,建立名為
attendees的新集合,然後在點選任一 RSVP 按鈕時註冊文件參照。根據點選的按鈕,將該參照設為true或false。
首先,針對rsvpYes:// ... // Listen to RSVP responses rsvpYes.onclick = async () => { // Get a reference to the user's document in the attendees collection const userRef = doc(db, 'attendees', auth.currentUser.uid); // If they RSVP'd yes, save a document with attendi()ng: true try { await setDoc(userRef, { attending: true }); } catch (e) { console.error(e); } };rsvpNo也是一樣,但值為false:rsvpNo.onclick = async () => { // Get a reference to the user's document in the attendees collection const userRef = doc(db, 'attendees', auth.currentUser.uid); // If they RSVP'd yes, save a document with attending: true try { await setDoc(userRef, { attending: false }); } catch (e) { console.error(e); } };
更新安全性規則
由於您已設定部分規則,因此使用按鈕新增的資料會遭到拒絕。
允許將內容新增至attendees收藏內容
你必須更新規則,才能將內容新增至「attendees」集合。
- 對於
attendees集合,由於您使用驗證 UID 做為文件名稱,因此可以擷取該名稱,並驗證提交者的uid是否與他們撰寫的文件相同。您會允許所有人讀取出席者名單 (因為其中沒有私人資料),但只有建立者可以更新名單。rules_version = '2'; service cloud.firestore { match /databases/{database}/documents { // ... // match /attendees/{userId} { allow read: if true; allow write: if request.auth.uid == userId; } } } - 按一下「發布」,即可部署新規則。
新增驗證規則
- 新增一些資料驗證規則,確保文件中包含所有預期欄位:
rules_version = '2'; service cloud.firestore { match /databases/{database}/documents { // ... // match /attendees/{userId} { allow read: if true; allow write: if request.auth.uid == userId && "attending" in request.resource.data; } } } - 別忘了點選「發布」,部署規則!
(選用) 現在可以查看點選按鈕的結果。前往 Firebase 控制台的 Cloud Firestore 資訊主頁。
查看回覆狀態
現在您已記錄回應,接下來看看是誰來電,並在 UI 中反映。
- 在 StackBlitz 中,前往
index.html檔案。 - 在
description-container中,新增 ID 為number-attending的元素。<!-- ... --> <section id="description-container"> <!-- ... --> <p id="number-attending"></p> </section> <!-- ... -->
接著,為 attendees 集合註冊事件監聽器,並計算「YES」回應的數量:
- 在 StackBlitz 中,前往
index.js檔案。 - 在
main()函式的底部,新增下列程式碼,監聽回覆狀態並計算 YES 點擊次數。async function main() { // ... // Listen for attendee list const attendingQuery = query( collection(db, 'attendees'), where('attending', '==', true) ); const unsubscribe = onSnapshot(attendingQuery, snap => { const newAttendeeCount = snap.docs.length; numberAttending.innerHTML = newAttendeeCount + ' people going'; }); } main();
最後,醒目顯示與目前狀態對應的按鈕。
- 建立函式,檢查目前的驗證 UID 在
attendees集合中是否有項目,然後將按鈕類別設為clicked。// ... // Listen for attendee list function subscribeCurrentRSVP(user) { const ref = doc(db, 'attendees', user.uid); rsvpListener = onSnapshot(ref, doc => { if (doc && doc.data()) { const attendingResponse = doc.data().attending; // Update css classes for buttons if (attendingResponse) { rsvpYes.className = 'clicked'; rsvpNo.className = ''; } else { rsvpYes.className = ''; rsvpNo.className = 'clicked'; } } }); } - 此外,我們也來建立取消訂閱的函式。使用者登出時會用到這個值。
// ... function unsubscribeCurrentRSVP() { if (rsvpListener != null) { rsvpListener(); rsvpListener = null; } rsvpYes.className = ''; rsvpNo.className = ''; } - 從 Authentication 監聽器呼叫函式。
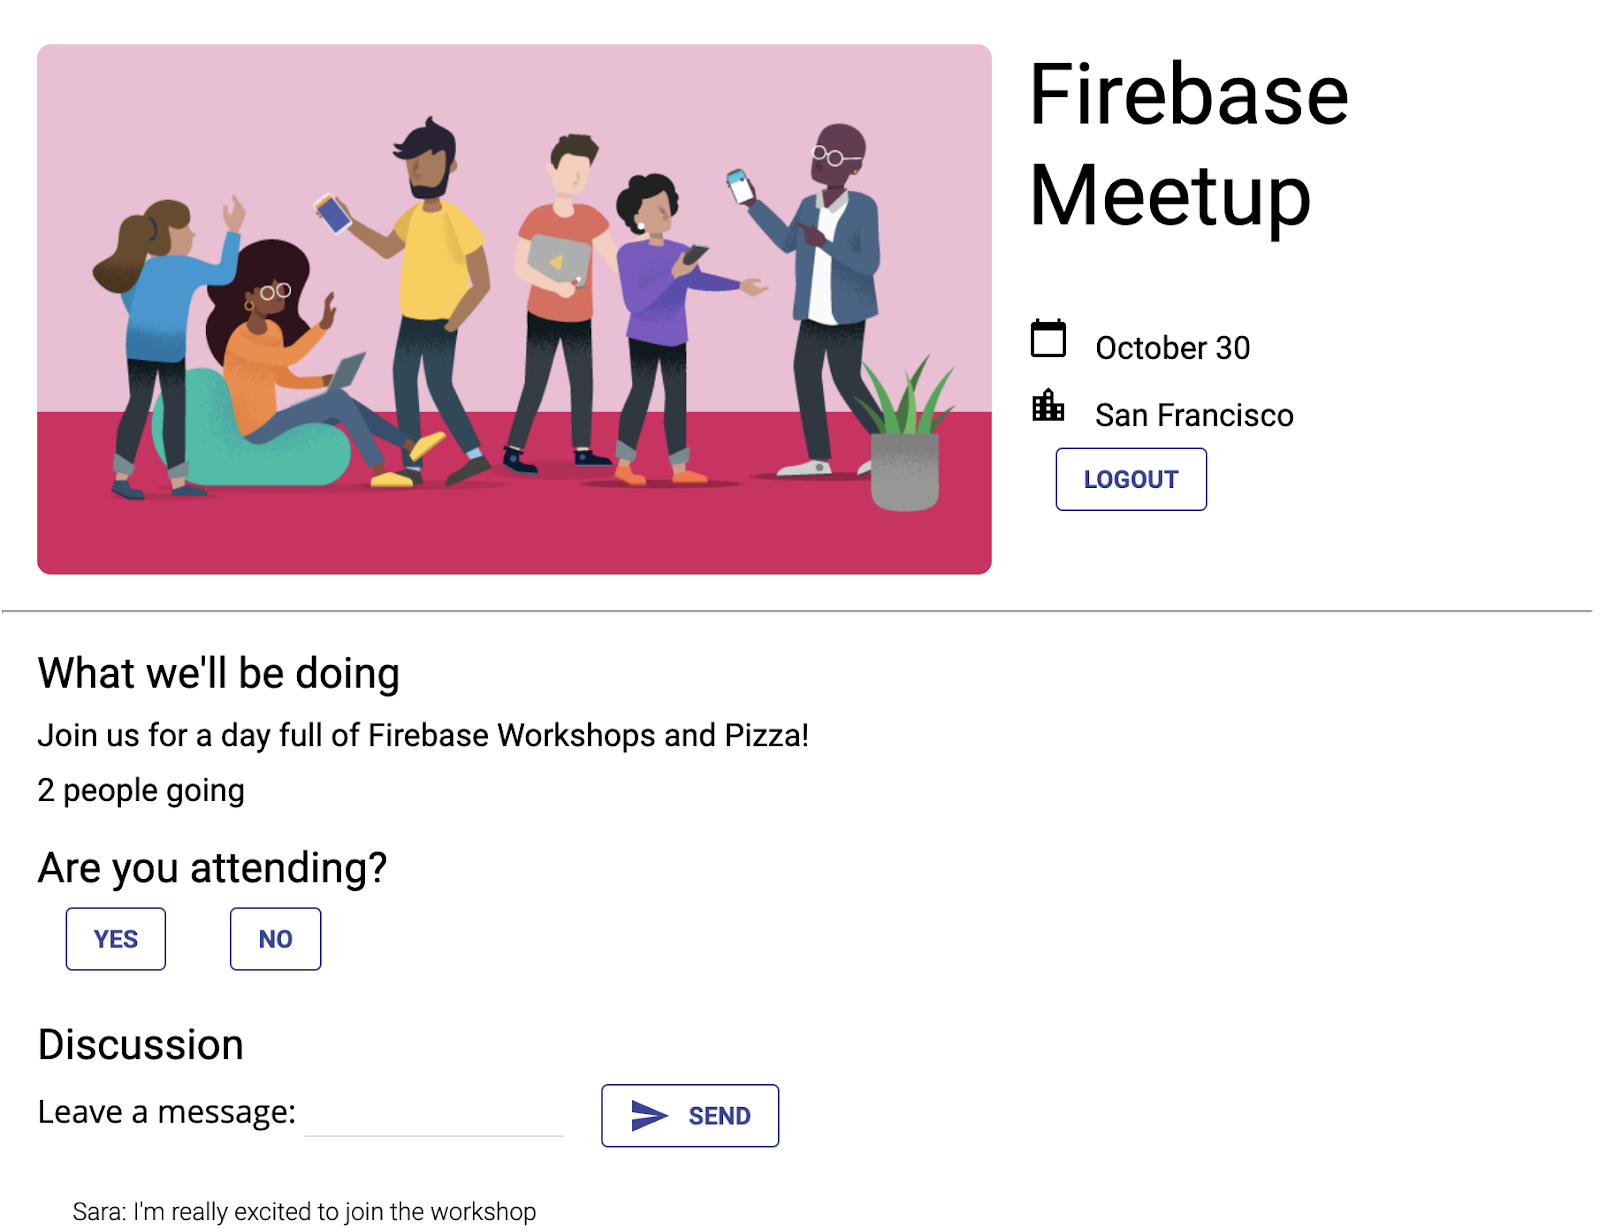
// ... // Listen to the current Auth state // Listen to the current Auth state onAuthStateChanged(auth, user => { if (user) { startRsvpButton.textContent = 'LOGOUT'; // Show guestbook to logged-in users guestbookContainer.style.display = 'block'; // Subscribe to the guestbook collection subscribeGuestbook(); // Subscribe to the user's RSVP subscribeCurrentRSVP(user); } else { startRsvpButton.textContent = 'RSVP'; // Hide guestbook for non-logged-in users guestbookContainer.style.display = 'none' ; // Unsubscribe from the guestbook collection unsubscribeGuestbook(); // Unsubscribe from the guestbook collection unsubscribeCurrentRSVP(); } }); - 嘗試以多位使用者的身分登入,每次點選「是」按鈕時,計數都會增加。
應用程式預覽
11. 恭喜!
您已使用 Firebase 建構互動式即時網頁應用程式!
涵蓋內容
- Firebase 驗證
- FirebaseUI
- Cloud Firestore
- Firebase 安全性規則
後續步驟
- 想進一步瞭解 Firebase 開發人員工作流程嗎?請參閱 Firebase 模擬器程式碼研究室,瞭解如何完全在本機測試及執行應用程式。
- 想進一步瞭解其他 Firebase 產品嗎?您可能想儲存使用者上傳的圖片檔案,還是要傳送通知給使用者?如要深入瞭解更多適用於網頁的 Firebase 產品,請參閱 Firebase 網頁程式碼研究室。
- 想進一步瞭解 Cloud Firestore 嗎?或許您想瞭解子集合和交易?如要進一步瞭解 Cloud Firestore,請前往 Cloud Firestore 網頁程式碼研究室。或者,您也可以觀看這個 YouTube 系列影片,瞭解 Cloud Firestore!
瞭解詳情
- Firebase 網站:firebase.google.com
- Firebase YouTube 頻道
如何?
歡迎提供意見回饋!請填寫這份簡短表單。