1. 始める前に
Cloud Firestore や Cloud Functions などのサーバーレス バックエンド ツールは非常に使いやすいですが、テストが難しい場合があります。Firebase Local Emulator Suite を使用すると、これらのサービスのローカル バージョンを開発マシンで実行できるため、アプリを迅速かつ安全に開発できます。
前提条件
- Visual Studio Code、Atom、Sublime Text などのシンプルなエディタ
- Node.js 10.0.0 以降(Node.js をインストールするには nvm を使用します。バージョンを確認するには
node --versionを実行します) - Java 7 以降(Java をインストールするにはこちらの手順に沿って操作します。バージョンを確認するには
java -versionを実行します)
演習内容
この Codelab では、複数の Firebase サービスを利用したシンプルなオンライン ショッピング アプリを実行してデバッグします。
- Cloud Firestore: リアルタイム機能を備えた、グローバルにスケーラブルなサーバーレスの NoSQL データベース。
- Cloud Functions: イベントまたは HTTP リクエストに応答して実行されるサーバーレス バックエンド コード。
- Firebase Authentication: 他の Firebase プロダクトと統合されたマネージド認証サービス。
- Firebase Hosting: ウェブアプリ向けの高速で安全なホスティング。
アプリを Emulator Suite に接続して、ローカル開発を有効にします。
また、次の方法も学習します。
- アプリを Emulator Suite に接続する方法と、さまざまなエミュレータがどのように接続されているか。
- Firebase セキュリティ ルールの仕組みと、ローカル エミュレータに対して Firestore セキュリティ ルールをテストする方法。
- Firestore イベントによってトリガーされる Firebase 関数を作成する方法と、Emulator Suite に対して実行される統合テストを作成する方法。
2. セットアップ
ソースコードを取得する
この Codelab では、ほぼ完成したバージョンの The Fire Store サンプルから始めます。まず、ソースコードのクローンを作成します。
$ git clone https://github.com/firebase/emulators-codelab.git
次に、Codelab ディレクトリに移動します。この Codelab の残りの作業は、このディレクトリで行います。
$ cd emulators-codelab/codelab-initial-state
次に、コードを実行できるように依存関係をインストールします。インターネット接続が遅い場合は、1 ~ 2 分ほどかかることがあります。
# Move into the functions directory
$ cd functions

# Install dependencies
$ npm install

# Move back into the previous directory
$ cd ../
Firebase CLI を取得する
Emulator Suite は Firebase CLI(コマンドライン インターフェース)の一部であり、次のコマンドを使用してマシンにインストールできます。
$ npm install -g firebase-tools
次に、CLI の最新バージョンを使用していることを確認します。この Codelab はバージョン 9.0.0 以降で動作しますが、新しいバージョンにはバグの修正が多数含まれています。
$ firebase --version
9.6.0
Firebase プロジェクトに接続する
Firebase プロジェクトを作成する
- Google アカウントを使用して Firebase コンソールにログインします。
- ボタンをクリックして新しいプロジェクトを作成し、プロジェクト名(例:
Emulators Codelab)を入力します。
- [続行] をクリックします。
- Firebase の利用規約が表示されたら、内容を読み、同意して [続行] をクリックします。
- (省略可)Firebase コンソールで AI アシスタンス(「Gemini in Firebase」)を有効にします。
- この Codelab では Google アナリティクスは必要ないため、Google アナリティクスのオプションをオフに切り替えます。
- [プロジェクトを作成] をクリックし、プロジェクトのプロビジョニングが完了するまで待ってから、[続行] をクリックします。
コードを Firebase プロジェクトに接続する
次に、このコードを Firebase プロジェクトに接続する必要があります。まず、次のコマンドを実行して Firebase CLI にログインします。
$ firebase login
次に、次のコマンドを実行してプロジェクト エイリアスを作成します。$YOUR_PROJECT_ID は、Firebase プロジェクトの ID に置き換えます。
$ firebase use $YOUR_PROJECT_ID
これで、アプリを実行する準備が整いました。
3. エミュレータを実行する
このセクションでは、アプリをローカルで実行します。Emulator Suite を起動するタイミングです。
エミュレータを起動する
コードラボのソース ディレクトリ内で、次のコマンドを実行してエミュレータを起動します。
$ firebase emulators:start --import=./seed
次のような出力が表示されます。
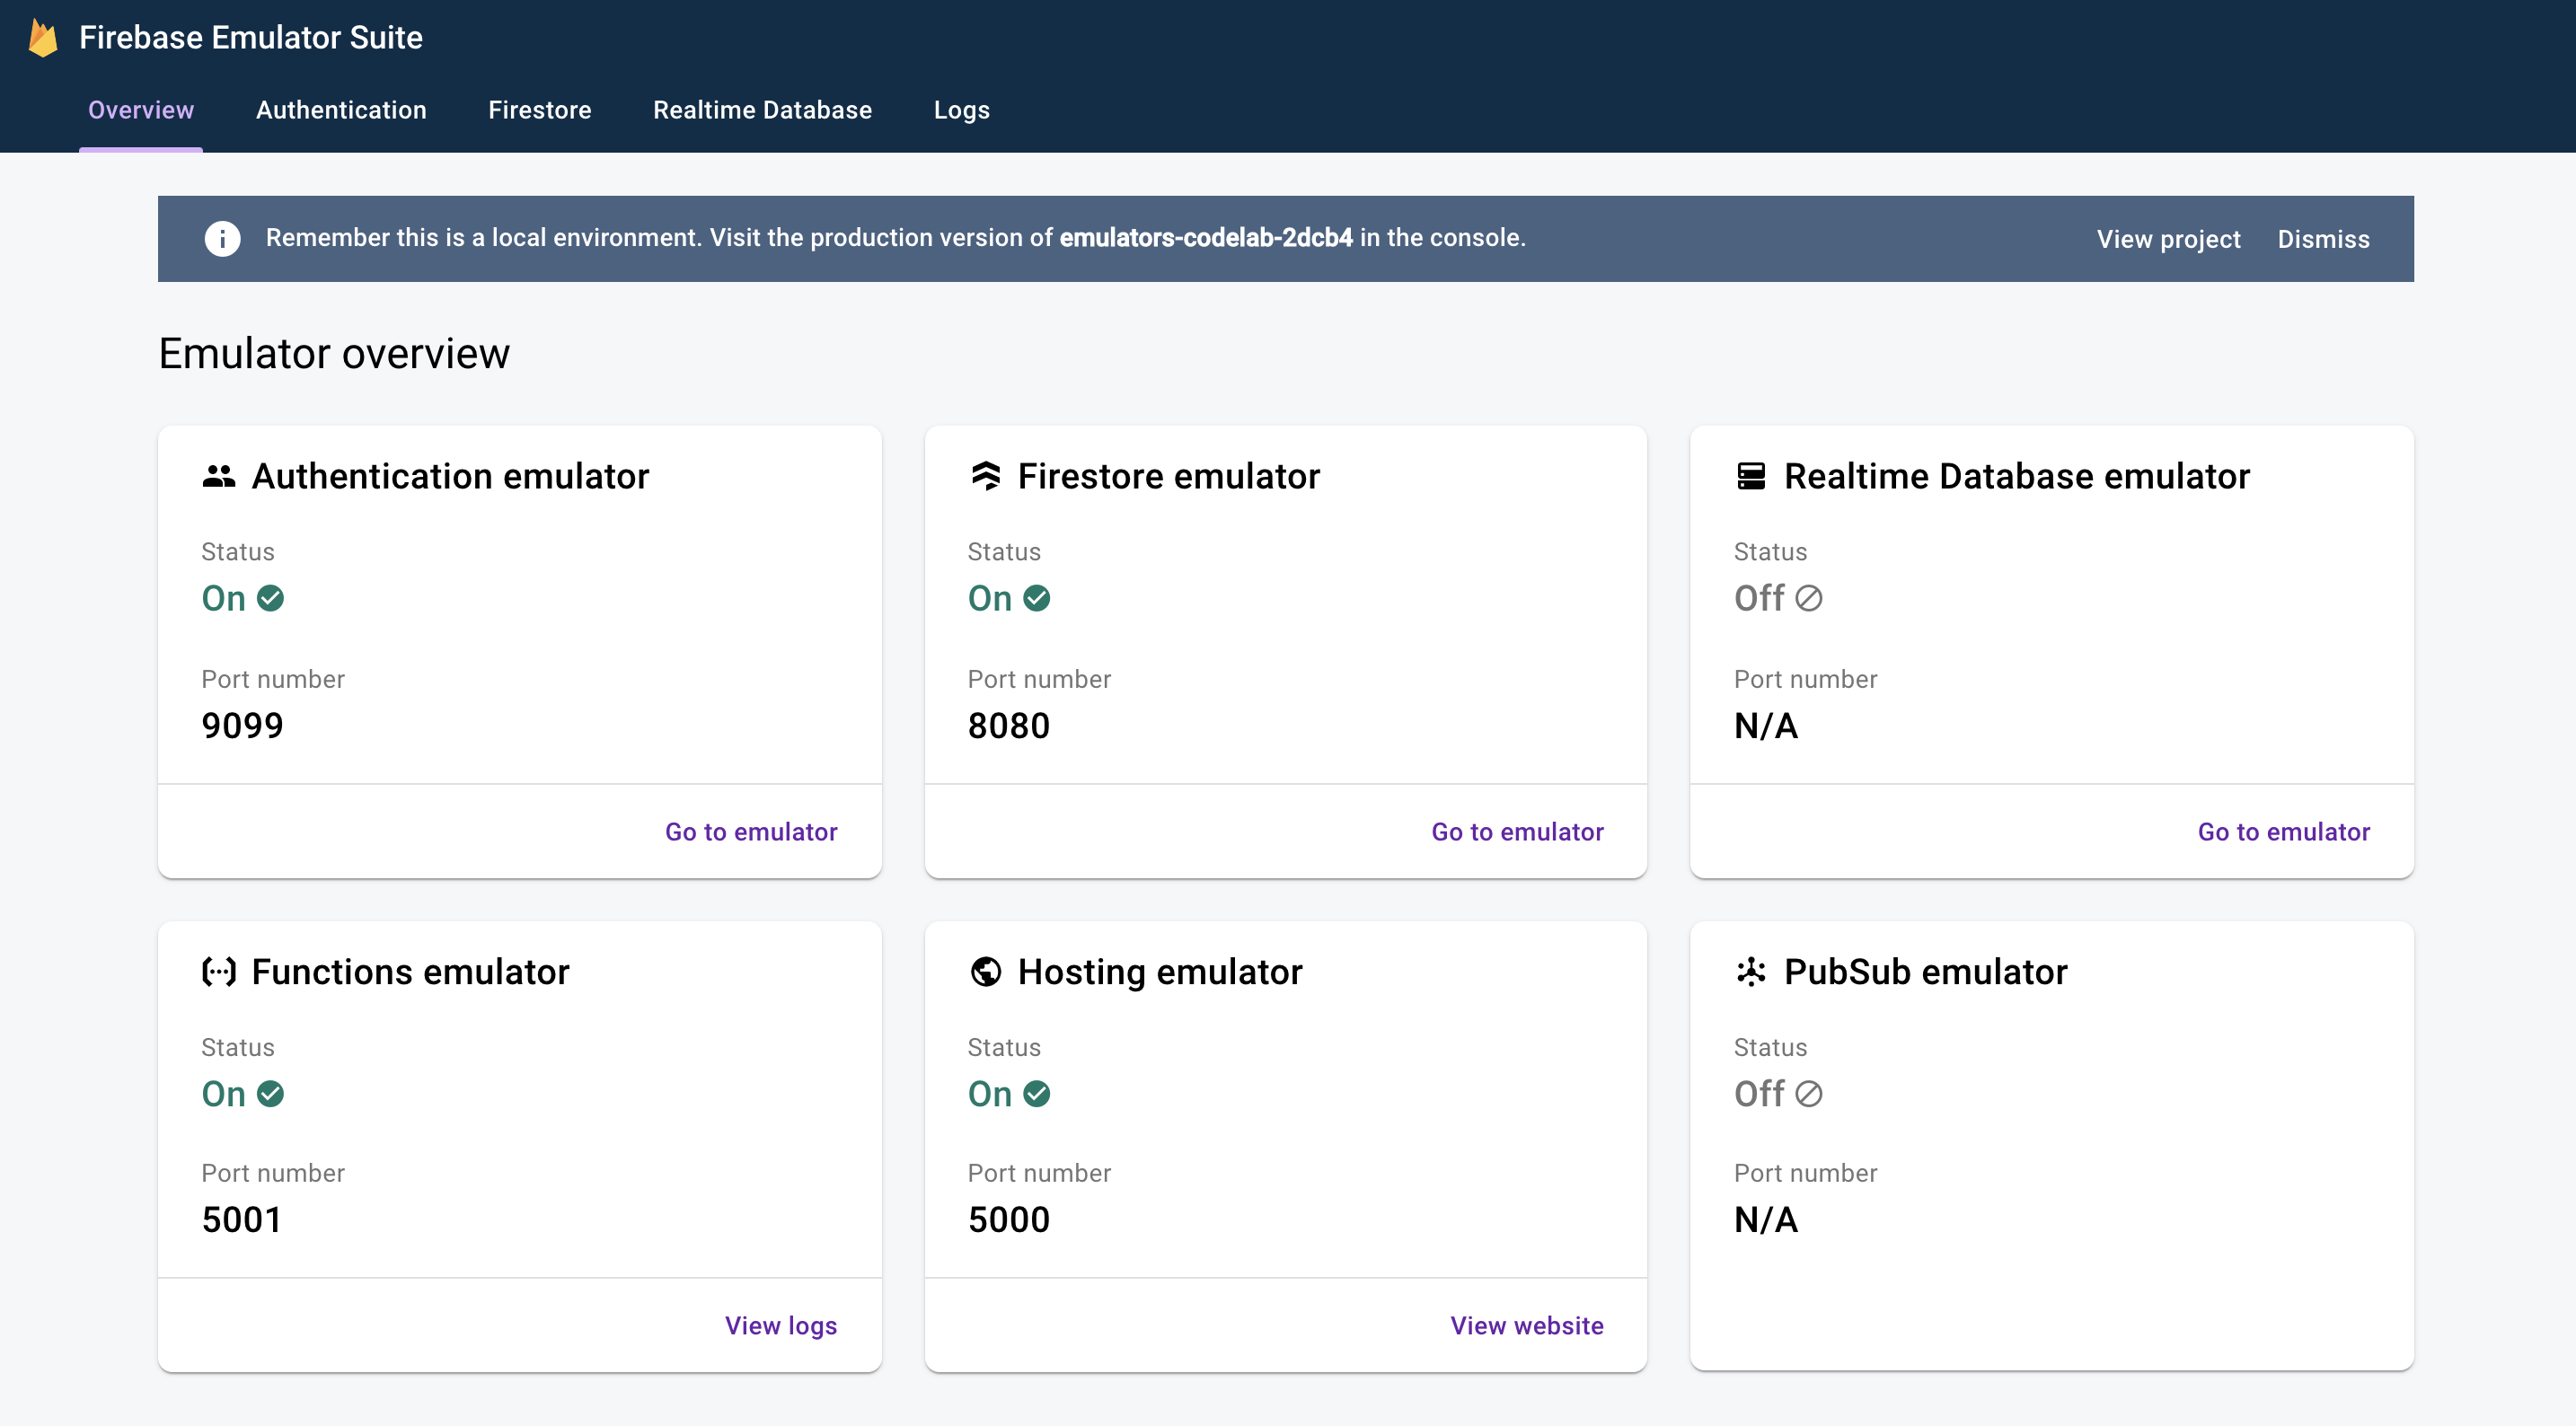
$ firebase emulators:start --import=./seed
i  emulators: Starting emulators: auth, functions, firestore, hosting
⚠  functions: The following emulators are not running, calls to these services from the Functions emulator will affect production: database, pubsub
i  firestore: Importing data from /Users/samstern/Projects/emulators-codelab/codelab-initial-state/seed/firestore_export/firestore_export.overall_export_metadata
i  firestore: Firestore Emulator logging to firestore-debug.log
i  hosting: Serving hosting files from: public
✔  hosting: Local server: http://127.0.0.1:5000
i  ui: Emulator UI logging to ui-debug.log
i  functions: Watching "/Users/samstern/Projects/emulators-codelab/codelab-initial-state/functions" for Cloud Functions...
✔  functions[calculateCart]: firestore function initialized.

┌─────────────────────────────────────────────────────────────┐
│ ✔  All emulators ready! It is now safe to connect your app. │
│ i  View Emulator UI at http://127.0.0.1:4000                │
└─────────────────────────────────────────────────────────────┘

┌────────────────┬────────────────┬─────────────────────────────────┐
│ Emulator       │ Host:Port      │ View in Emulator UI             │
├────────────────┼────────────────┼─────────────────────────────────┤
│ Authentication │ 127.0.0.1:9099 │ http://127.0.0.1:4000/auth      │
├────────────────┼────────────────┼─────────────────────────────────┤
│ Functions      │ 127.0.0.1:5001 │ http://127.0.0.1:4000/functions │
├────────────────┼────────────────┼─────────────────────────────────┤
│ Firestore      │ 127.0.0.1:8080 │ http://127.0.0.1:4000/firestore │
├────────────────┼────────────────┼─────────────────────────────────┤
│ Hosting        │ 127.0.0.1:5000 │ n/a                             │
└────────────────┴────────────────┴─────────────────────────────────┘
  Emulator Hub running at 127.0.0.1:4400
  Other reserved ports: 4500

Issues? Report them at https://github.com/firebase/firebase-tools/issues and attach the *-debug.log files.
[All emulators started](すべてのエミュレータが起動しました)というメッセージが表示されたら、アプリを使用する準備が整っています。
ウェブアプリをエミュレータに接続する
ログの表から、Cloud Firestore エミュレータがポート 8080 でリッスンし、Authentication エミュレータがポート 9099 でリッスンしていることがわかります。
┌────────────────┬────────────────┬─────────────────────────────────┐
│ Emulator       │ Host:Port      │ View in Emulator UI             │
├────────────────┼────────────────┼─────────────────────────────────┤
│ Authentication │ 127.0.0.1:9099 │ http://127.0.0.1:4000/auth      │
├────────────────┼────────────────┼─────────────────────────────────┤
│ Functions      │ 127.0.0.1:5001 │ http://127.0.0.1:4000/functions │
├────────────────┼────────────────┼─────────────────────────────────┤
│ Firestore      │ 127.0.0.1:8080 │ http://127.0.0.1:4000/firestore │
├────────────────┼────────────────┼─────────────────────────────────┤
│ Hosting        │ 127.0.0.1:5000 │ n/a                             │
└────────────────┴────────────────┴─────────────────────────────────┘
フロントエンド コードを本番環境ではなくエミュレータに接続しましょう。public/js/homepage.js ファイルを開き、onDocumentReady 関数を見つけます。コードが標準の Firestore インスタンスと Auth インスタンスにアクセスしていることがわかります。
public/js/homepage.js
  const auth = firebaseApp.auth();
  const db = firebaseApp.firestore();
db オブジェクトと auth オブジェクトを更新して、ローカル エミュレータを指すようにしましょう。
public/js/homepage.js
  const auth = firebaseApp.auth();
  const db = firebaseApp.firestore();

  // ADD THESE LINES
  if (location.hostname === "127.0.0.1") {
    console.log("127.0.0.1 detected!");
    auth.useEmulator("http://127.0.0.1:9099");
    db.useEmulator("127.0.0.1", 8080);
  }
これで、アプリがローカルマシンで実行されている場合(Hosting エミュレータによって提供されている場合)、Firestore クライアントは本番環境データベースではなくローカル エミュレータを指すようになります。
EmulatorUI を開く
ウェブブラウザで http://127.0.0.1:4000/ に移動します。Emulator Suite UI が表示されます。
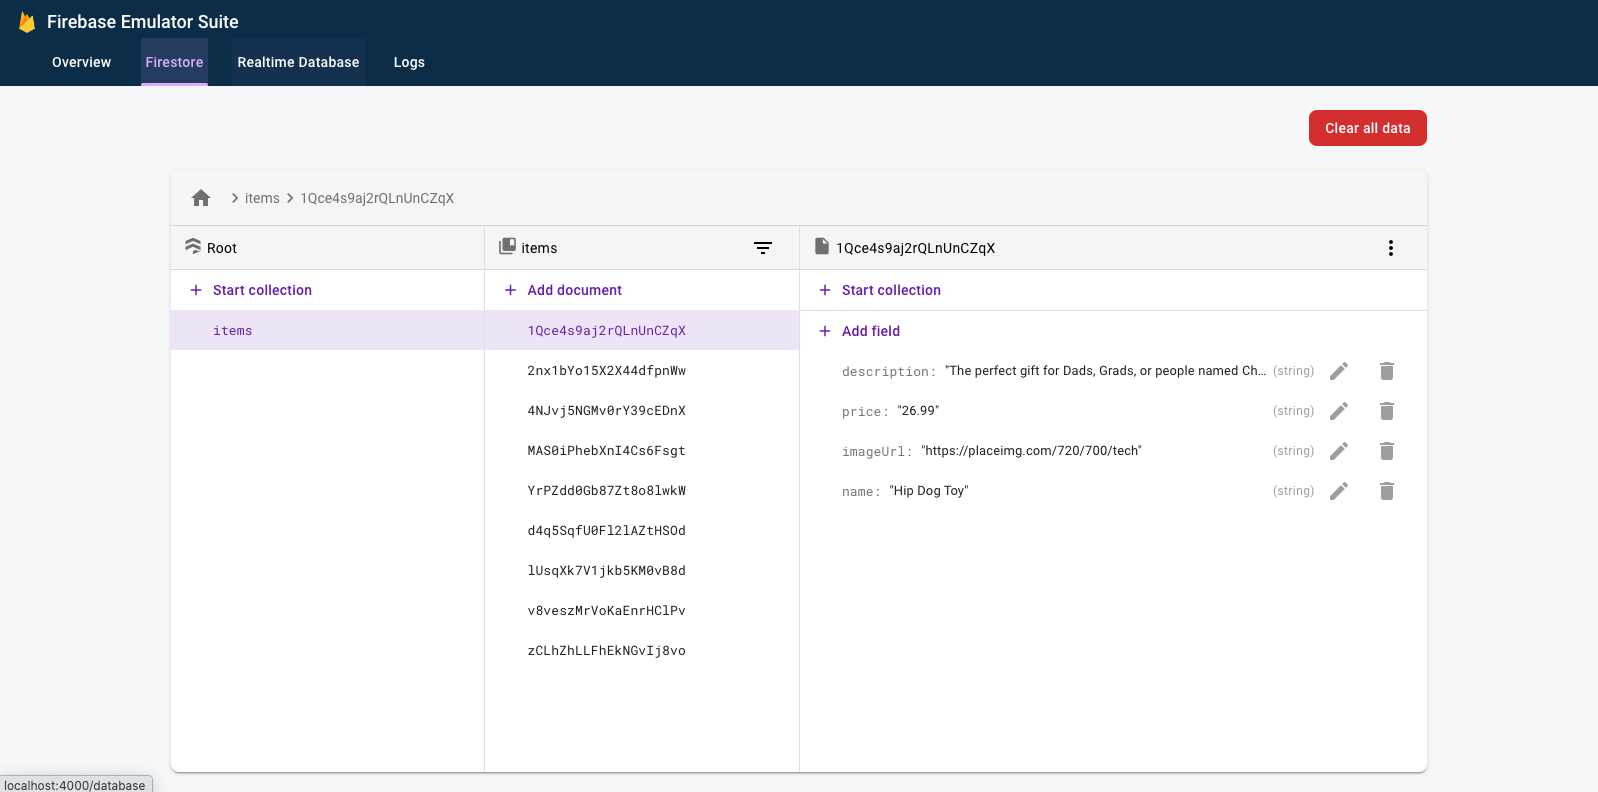
クリックすると、Firestore エミュレータの UI が表示されます。--import フラグでインポートされたデータにより、items コレクションにはすでにデータが含まれています。
4. アプリを実行する
アプリを開く
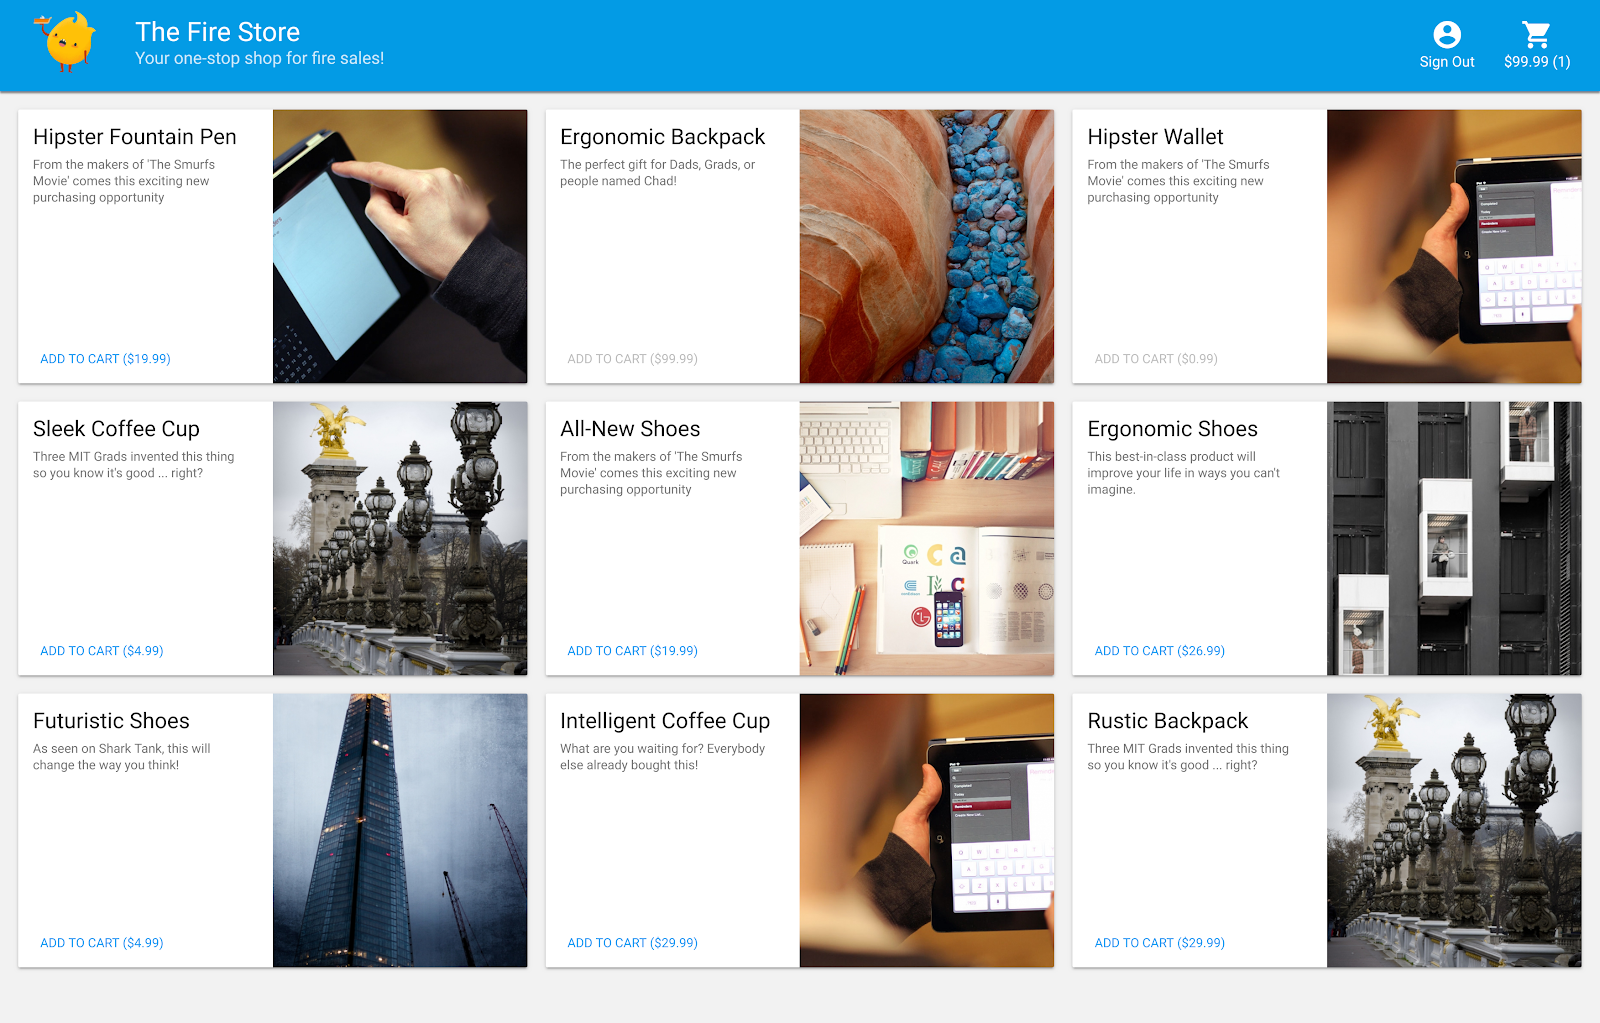
ウェブブラウザで http://127.0.0.1:5000 に移動すると、The Fire Store がローカルマシンで実行されていることがわかります。
アプリを使用する
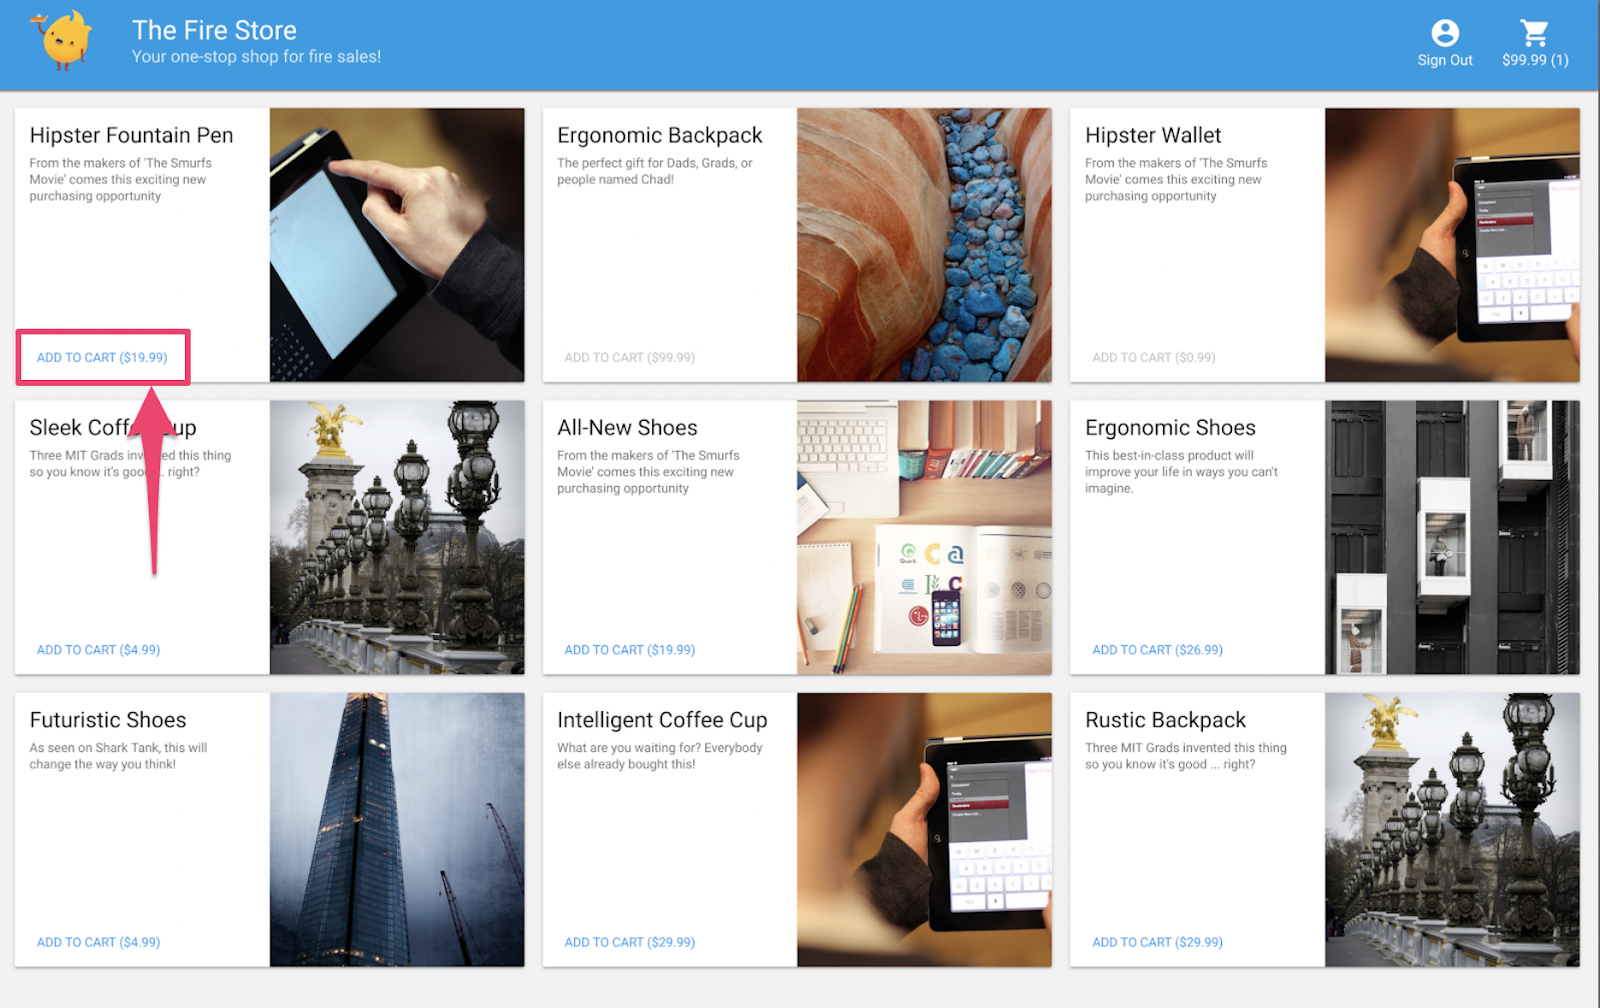
ホームページで商品を選択し、[カートに追加] をクリックします。残念ながら、次のエラーが発生します。
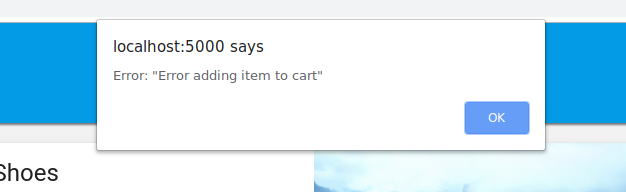
このバグを修正しましょう。すべてがエミュレータで実行されるため、実際のデータに影響を与えることを心配せずにテストできます。
5. アプリをデバッグする
バグを見つける
Chrome デベロッパー コンソールを見てみましょう。Control+Shift+J(Windows、Linux、Chrome OS)または Command+Option+J(Mac)を押して、コンソールでエラーを確認します。

addToCart メソッドでエラーが発生したようです。確認してみましょう。このメソッドで uid というものにアクセスしようとしているのはどこですか?また、なぜ null になるのでしょうか?現時点では、public/js/homepage.js のメソッドは次のようになっています。
public/js/homepage.js
  addToCart(id, itemData) {
    console.log("addToCart", id, JSON.stringify(itemData));
    return this.db
      .collection("carts")
      .doc(this.auth.currentUser.uid)
      .collection("items")
      .doc(id)
      .set(itemData);
  }
なるほど。アプリにログインしていません。Firebase Authentication のドキュメントによると、ログインしていない場合、auth.currentUser は null になります。チェックを追加しましょう。
public/js/homepage.js
  addToCart(id, itemData) {
    // ADD THESE LINES
    if (this.auth.currentUser === null) {
      this.showError("You must be signed in!");
      return;
    }

    // ...
  }
アプリをテストする
次に、ページを更新して、[カートに追加] をクリックします。今回は、よりわかりやすいエラーが表示されます。
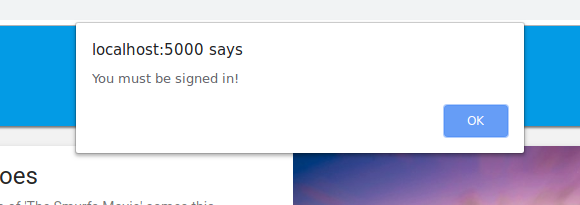
ただし、上部のツールバーで [Sign In] をクリックしてから、もう一度 [Add to Cart] をクリックすると、カートが更新されます。
しかし、数値がまったく正しくないようです。

このバグはまもなく修正されますので、ご安心ください。まず、商品をカートに追加したときに実際に何が起こったのかを詳しく見ていきましょう。
6. ローカル関数のトリガー
[カートに追加] をクリックすると、複数のエミュレータが関与する一連のイベントが開始されます。Firebase CLI ログには、カートに商品を追加した後、次のようなメッセージが表示されます。
i  functions: Beginning execution of "calculateCart"
i  functions: Finished "calculateCart" in ~1s
これらのログと UI の更新が発生した主なイベントは次の 4 つです。
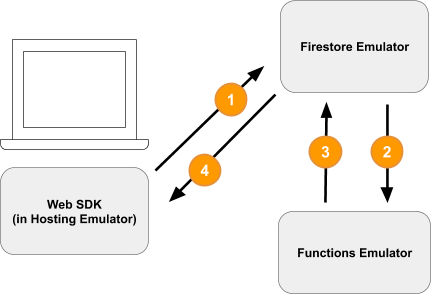
1)Firestore 書き込み - クライアント
新しいドキュメントが Firestore コレクション /carts/{cartId}/items/{itemId}/ に追加されます。このコードは、public/js/homepage.js 内の addToCart 関数で確認できます。
public/js/homepage.js
  addToCart(id, itemData) {
    // ...
    console.log("addToCart", id, JSON.stringify(itemData));
    return this.db
      .collection("carts")
      .doc(this.auth.currentUser.uid)
      .collection("items")
      .doc(id)
      .set(itemData);
  }
2)Cloud Functions がトリガーされた
Cloud Functions calculateCart は、onWrite トリガーを使用して、カートアイテムで発生する書き込みイベント(作成、更新、削除)をリッスンします。これは functions/index.js で確認できます。
functions/index.js
exports.calculateCart = functions.firestore
    .document("carts/{cartId}/items/{itemId}")
    .onWrite(async (change, context) => {
      try {
        let totalPrice = 125.98;
        let itemCount = 8;

        const cartRef = db.collection("carts").doc(context.params.cartId);

        await cartRef.update({
          totalPrice,
          itemCount
        });
      } catch(err) {
      }
    }
);
3)Firestore 書き込み - 管理者
calculateCart 関数は、カート内のすべてのアイテムを読み取り、合計数量と価格を加算してから、新しい合計で「cart」ドキュメントを更新します(上記の cartRef.update(...) を参照)。
4)Firestore Read - Client
ウェブ フロントエンドは、カートの変更に関する更新情報を受け取るように登録されています。Cloud Functions が新しい合計を書き込んで UI を更新すると、public/js/homepage.js に示すように、リアルタイムで更新されます。
public/js/homepage.js
this.cartUnsub = cartRef.onSnapshot(cart => {
   // The cart document was changed, update the UI
   // ...
});
内容のまとめ
お疲れさまでした。これで、3 つの異なる Firebase エミュレータを使用して完全にローカルでテストを行う、完全にローカルなアプリを設定できました。

他にもあります。次のセクションでは、次の内容について説明します。
- Firebase エミュレータを使用する単体テストを作成する方法。
- Firebase エミュレータを使用してセキュリティ ルールをデバッグする方法。
7. アプリに合わせてセキュリティ ルールを作成する
このウェブアプリはデータの読み取りと書き込みを行いますが、これまでセキュリティについてはまったく考慮していませんでした。Cloud Firestore は、「セキュリティ ルール」と呼ばれるシステムを使用して、データの読み取りと書き込みのアクセス権を持つユーザーを宣言します。Emulator Suite は、これらのルールのプロトタイプを作成するのに最適な方法です。
エディタで、emulators-codelab/codelab-initial-state/firestore.rules ファイルを開きます。ルールには 3 つの主要なセクションがあります。
rules_version = '2';
service cloud.firestore {
  match /databases/{database}/documents {
    // User's cart metadata
    match /carts/{cartID} {
      // TODO: Change these! Anyone can read or write.
      allow read, write: if true;
    }

    // Items inside the user's cart
    match /carts/{cartID}/items/{itemID} {
      // TODO: Change these! Anyone can read or write.
      allow read, write: if true;
    }

    // All items available in the store. Users can read
    // items but never write them.
    match /items/{itemID} {
      allow read: if true;
    }
  }
}
現時点では、誰でもデータベースのデータの読み取りと書き込みが可能です。有効なオペレーションのみが通過し、機密情報が漏洩しないようにする必要があります。
この Codelab では、最小権限の原則に従って、すべてのドキュメントをロックダウンし、すべてのユーザーが必要なアクセス権を過不足なく取得するまで、アクセス権を段階的に追加します。最初の 2 つのルールを更新して、条件を false に設定することでアクセスを拒否します。
rules_version = '2';
service cloud.firestore {
  match /databases/{database}/documents {
    // User's cart metadata
    match /carts/{cartID} {
      // UPDATE THIS LINE
      allow read, write: if false;
    }

    // Items inside the user's cart
    match /carts/{cartID}/items/{itemID} {
      // UPDATE THIS LINE
      allow read, write: if false;
    }

    // All items available in the store. Users can read
    // items but never write them.
    match /items/{itemID} {
      allow read: if true;
    }
  }
}
8. エミュレータとテストを実行する
エミュレータを起動する
コマンドラインで、emulators-codelab/codelab-initial-state/ に移動します。前の手順でエミュレータが実行されている可能性があります。そうでない場合は、エミュレータを再度起動します。
$ firebase emulators:start --import=./seed
エミュレータが実行されたら、それに対してローカルでテストを実行できます。
テストを実行する
ディレクトリ emulators-codelab/codelab-initial-state/ から、新しいターミナルタブのコマンドラインで
まず、functions ディレクトリに移動します(この Codelab の残りの部分では、このディレクトリに留まります)。
$ cd functions
関数ディレクトリで mocha テストを実行し、出力の上部までスクロールします。
# Run the tests
$ npm test

> functions@ test .../emulators-codelab/codelab-initial-state/functions
> mocha

  shopping carts
    1) can be created and updated by the cart owner
    2) can be read only by the cart owner

  shopping cart items
    3) can be read only by the cart owner
    4) can be added only by the cart owner

  adding an item to the cart recalculates the cart total.
    - should sum the cost of their items


  0 passing (364ms)
  1 pending
  4 failing
現在、4 件の障害が発生しています。ルールファイルを作成する際は、合格するテストの数を増やすことで進捗状況を測定できます。
9. カートへの安全なアクセス
最初の 2 つの失敗は「ショッピング カート」テストで、次のことをテストします。
- ユーザーは自分のカートの作成と更新のみを行うことができます
- ユーザーは自分のカートのみを読み取ることができる
functions/test.js
  it('can be created and updated by the cart owner', async () => {
    // Alice can create her own cart
    await firebase.assertSucceeds(aliceDb.doc("carts/alicesCart").set({
      ownerUID: "alice",
      total: 0
    }));

    // Bob can't create Alice's cart
    await firebase.assertFails(bobDb.doc("carts/alicesCart").set({
      ownerUID: "alice",
      total: 0
    }));

    // Alice can update her own cart with a new total
    await firebase.assertSucceeds(aliceDb.doc("carts/alicesCart").update({
      total: 1
    }));

    // Bob can't update Alice's cart with a new total
    await firebase.assertFails(bobDb.doc("carts/alicesCart").update({
      total: 1
    }));
  });

  it("can be read only by the cart owner", async () => {
    // Setup: Create Alice's cart as admin
    await admin.doc("carts/alicesCart").set({
      ownerUID: "alice",
      total: 0
    });

    // Alice can read her own cart
    await firebase.assertSucceeds(aliceDb.doc("carts/alicesCart").get());

    // Bob can't read Alice's cart
    await firebase.assertFails(bobDb.doc("carts/alicesCart").get());
  });
これらのテストに合格させましょう。エディタでセキュリティ ルールファイル firestore.rules を開き、match /carts/{cartID} 内のステートメントを更新します。
firestore.rules
rules_version = '2';
service cloud.firestore {
    // UPDATE THESE LINES
    match /carts/{cartID} {
      allow create: if request.auth.uid == request.resource.data.ownerUID;
      allow read, update, delete: if request.auth.uid == resource.data.ownerUID;
    }

    // ...
  }
}
これらのルールにより、カートの所有者のみが読み取りと書き込みアクセスを行えるようになります。
受信データとユーザーの認証を確認するために、すべてのルールのコンテキストで使用可能な 2 つのオブジェクトを使用します。
requestオブジェクトには、試行中のオペレーションに関するデータとメタデータが含まれます。- Firebase プロジェクトで Firebase Authentication を使用している場合、
request.authオブジェクトはリクエストを行うユーザーを表します。
10. カートへのアクセスをテストする
Emulator Suite は、firestore.rules が保存されるたびにルールを自動的に更新します。エミュレータを実行しているタブで Rules updated というメッセージを探すことで、エミュレータのルールが更新されたことを確認できます。
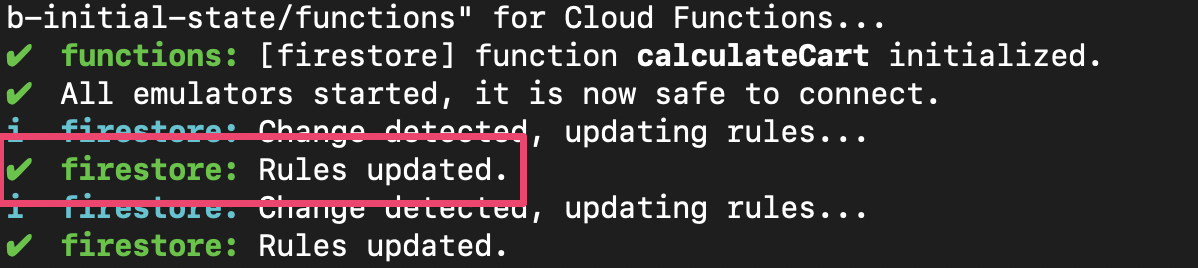
テストを再実行し、最初の 2 つのテストが合格することを確認します。
$ npm test

> functions@ test .../emulators-codelab/codelab-initial-state/functions
> mocha

  shopping carts
    ✓ can be created and updated by the cart owner (195ms)
    ✓ can be read only by the cart owner (136ms)

  shopping cart items
    1) can be read only by the cart owner
    2) can be added only by the cart owner

  adding an item to the cart recalculates the cart total.
    - should sum the cost of their items

  2 passing (482ms)
  1 pending
  2 failing
よくできました!これで、ショッピング カートへのアクセスが保護されました。次の失敗したテストに進みましょう。
11. UI で [カートに追加] フローを確認します。
現在、カートの所有者はカートの読み取りと書き込みを行えますが、カート内の個々のアイテムの読み取りと書き込みは行えません。これは、オーナーはカート ドキュメントにはアクセスできますが、カートのアイテム サブコレクションにはアクセスできないためです。
これはユーザーにとって破損した状態です。
http://127.0.0.1:5000, で実行されているウェブ UI に戻り、カートに何かを追加してみます。items サブコレクションで作成されたドキュメントへのアクセス権をユーザーにまだ付与していないため、デバッグ コンソールに Permission Denied エラーが表示されます。
12. カートアイテムへのアクセスを許可する
次の 2 つのテストでは、ユーザーが自分のカートにのみアイテムを追加したり、自分のカートからアイテムを読み取ったりできることを確認します。
  it("can be read only by the cart owner", async () => {
    // Alice can read items in her own cart
    await firebase.assertSucceeds(aliceDb.doc("carts/alicesCart/items/milk").get());

    // Bob can't read items in alice's cart
    await firebase.assertFails(bobDb.doc("carts/alicesCart/items/milk").get())
  });

  it("can be added only by the cart owner",  async () => {
    // Alice can add an item to her own cart
    await firebase.assertSucceeds(aliceDb.doc("carts/alicesCart/items/lemon").set({
      name: "lemon",
      price: 0.99
    }));

    // Bob can't add an item to alice's cart
    await firebase.assertFails(bobDb.doc("carts/alicesCart/items/lemon").set({
      name: "lemon",
      price: 0.99
    }));
  });
したがって、現在のユーザーの UID がカート ドキュメントの ownerUID と同じ場合にアクセスを許可するルールを作成できます。create, update, delete に異なるルールを指定する必要がないため、データを変更するすべてのリクエストに適用される write ルールを使用できます。
items サブコレクション内のドキュメントのルールを更新します。条件内の get は、Firestore から値を読み取っています。この場合、カート ドキュメントの ownerUID です。
rules_version = '2';
service cloud.firestore {
  match /databases/{database}/documents {
    // ...

    // UPDATE THESE LINES
    match /carts/{cartID}/items/{itemID} {
      allow read, write: if get(/databases/$(database)/documents/carts/$(cartID)).data.ownerUID == request.auth.uid;
    }

    // ...
  }
}
13. カートアイテムへのアクセスをテストする
これでテストを再実行できます。出力の一番上までスクロールし、合格したテストが増えていることを確認します。
$ npm test

> functions@ test .../emulators-codelab/codelab-initial-state/functions
> mocha

  shopping carts
    ✓ can be created and updated by the cart owner (195ms)
    ✓ can be read only by the cart owner (136ms)

  shopping cart items
    ✓ can be read only by the cart owner (111ms)
    ✓ can be added only by the cart owner


  adding an item to the cart recalculates the cart total.
    - should sum the cost of their items


  4 passing (401ms)
  1 pending
いいですね。これで、すべてのテストに合格します。保留中のテストが 1 つありますが、それについては後ほど説明します。
14. 「カートに追加」フローを再度確認する
ウェブ フロントエンド(http://127.0.0.1:5000)に戻り、カートにアイテムを追加します。これは、テストとルールがクライアントの要件を満たしていることを確認するうえで重要なステップです。(前回 UI を試したときに、ユーザーがカートに商品を追加できなかったことを思い出してください)。
firestore.rules が保存されると、クライアントはルールを自動的に再読み込みします。カートに商品を追加してみてください。
内容のまとめ
お疲れさまでした。これでアプリのセキュリティが強化されました。これは、アプリを本番環境に移行するための重要なステップです。これが本番環境のアプリであれば、これらのテストを継続的インテグレーション パイプラインに追加できます。これにより、他のユーザーがルールを変更した場合でも、ショッピング カートのデータにアクセス制御が適用されることが保証されます。

さらなる効果 -
このコースでは、次のことを学びます。
- Firestore イベントによってトリガーされる関数を作成する方法
- 複数のエミュレータで動作するテストを作成する方法
15. Cloud Functions のテストを設定する
これまでは、ウェブアプリのフロントエンドと Firestore セキュリティ ルールに焦点を当ててきました。ただし、このアプリは Cloud Functions を使用してユーザーのカートを最新の状態に保つため、そのコードもテストする必要があります。
Emulator Suite を使用すると、Cloud Firestore などのサービスを使用する関数を含め、Cloud Functions を簡単にテストできます。
エディタで emulators-codelab/codelab-initial-state/functions/test.js ファイルを開き、ファイル内の最後のテストまでスクロールします。現在、保留中としてマークされています。
//  REMOVE .skip FROM THIS LINE
describe.skip("adding an item to the cart recalculates the cart total. ", () => {
  // ...

  it("should sum the cost of their items", async () => {
    ...
  });
});
テストを有効にするには、.skip を削除して、次のようにします。
describe("adding an item to the cart recalculates the cart total. ", () => {
  // ...

  it("should sum the cost of their items", async () => {
    ...
  });
});
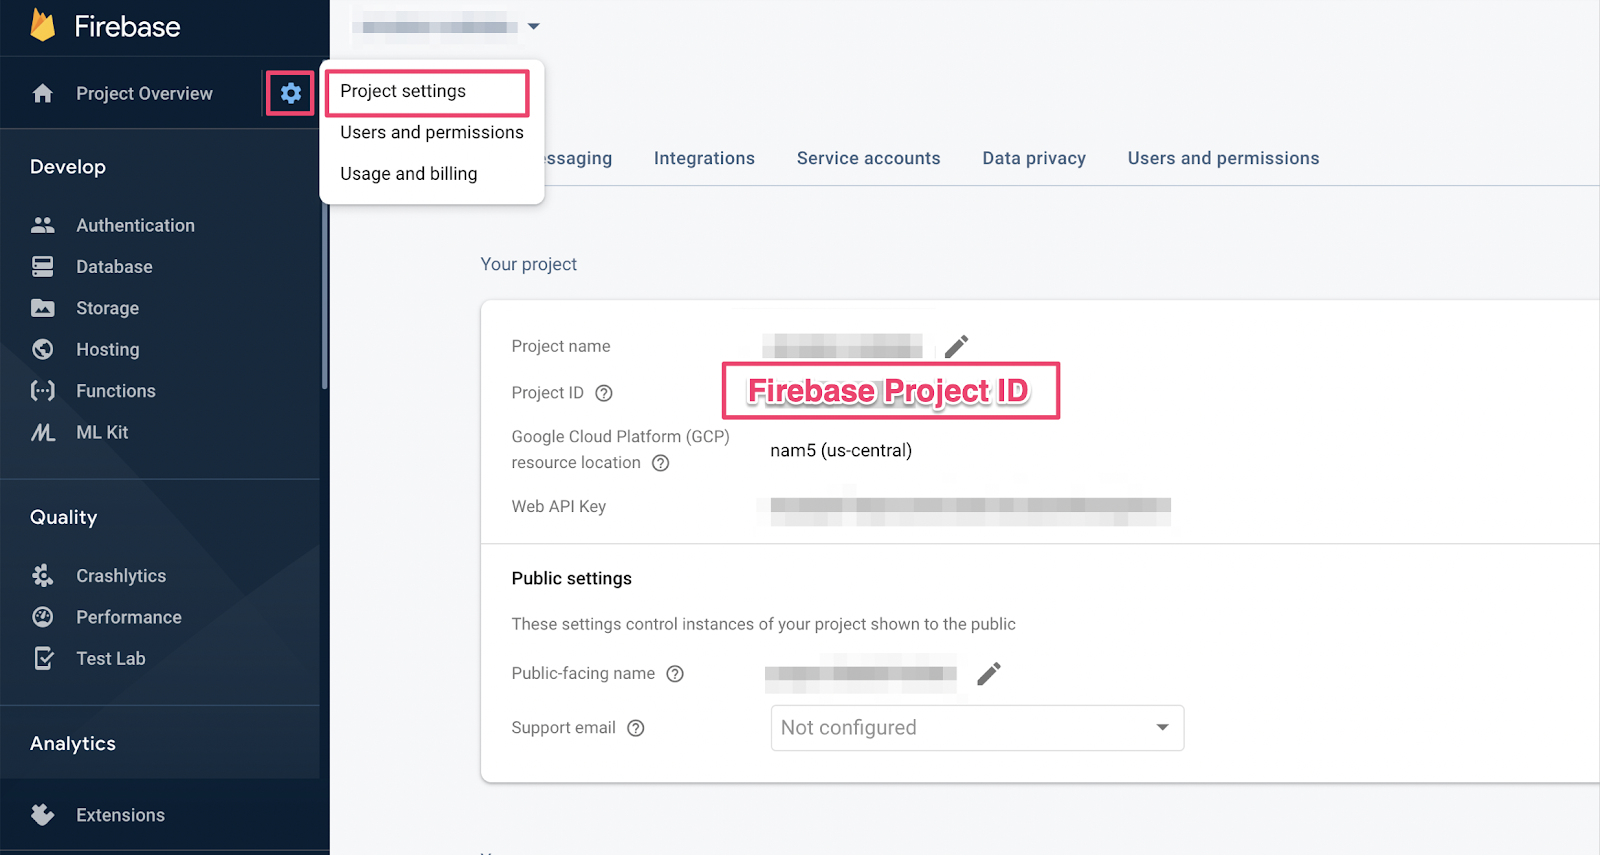
次に、ファイルの先頭にある REAL_FIREBASE_PROJECT_ID 変数を見つけて、実際の Firebase プロジェクト ID に変更します。
// CHANGE THIS LINE
const REAL_FIREBASE_PROJECT_ID = "changeme";
プロジェクト ID を忘れた場合は、Firebase コンソールの [プロジェクトの設定] で Firebase プロジェクト ID を確認できます。
16. Functions テストの概要
このテストでは Cloud Firestore と Cloud Functions の間のインタラクションを検証するため、前の Codelab のテストよりも多くの設定が必要になります。このテストを実行して、テストが何を期待しているのかを把握しましょう。
カートを作成する
Cloud Functions は信頼できるサーバー環境で実行され、Admin SDK で使用されるサービス アカウント認証を使用できます。まず、initializeApp ではなく initializeAdminApp を使用してアプリを初期化します。次に、商品を追加するカートの DocumentReference を作成し、カートを初期化します。
it("should sum the cost of their items", async () => {
    const db = firebase
        .initializeAdminApp({ projectId: REAL_FIREBASE_PROJECT_ID })
        .firestore();

    // Setup: Initialize cart
    const aliceCartRef = db.doc("carts/alice")
    await aliceCartRef.set({ ownerUID: "alice", totalPrice: 0 });

    ...
  });
関数をトリガーする
次に、カート ドキュメントの items サブコレクションにドキュメントを追加して、関数をトリガーします。関数で行われる追加をテストするために、2 つのアイテムを追加します。
it("should sum the cost of their items", async () => {
    const db = firebase
        .initializeAdminApp({ projectId: REAL_FIREBASE_PROJECT_ID })
        .firestore();

    // Setup: Initialize cart
    const aliceCartRef = db.doc("carts/alice")
    await aliceCartRef.set({ ownerUID: "alice", totalPrice: 0 });

    //  Trigger calculateCart by adding items to the cart
    const aliceItemsRef = aliceCartRef.collection("items");
    await aliceItemsRef.doc("doc1").set({name: "nectarine", price: 2.99});
    await aliceItemsRef.doc("doc2").set({ name: "grapefruit", price: 6.99 });

    ...
    });
  });
テストの期待値を設定する
onSnapshot() を使用して、カート ドキュメントの変更のリスナーを登録します。onSnapshot() は、リスナーの登録を解除するために呼び出すことができる関数を返します。
このテストでは、合計で $9.98 の 2 つの商品を追加します。次に、カートに想定どおりの itemCount と totalPrice が含まれているかどうかを確認します。その場合、関数は処理を完了しています。
it("should sum the cost of their items", (done) => {
    const db = firebase
        .initializeAdminApp({ projectId: REAL_FIREBASE_PROJECT_ID })
        .firestore();

    // Setup: Initialize cart
    const aliceCartRef = db.doc("carts/alice")
    aliceCartRef.set({ ownerUID: "alice", totalPrice: 0 });

    //  Trigger calculateCart by adding items to the cart
    const aliceItemsRef = aliceCartRef.collection("items");
    aliceItemsRef.doc("doc1").set({name: "nectarine", price: 2.99});
    aliceItemsRef.doc("doc2").set({ name: "grapefruit", price: 6.99 });

    // Listen for every update to the cart. Every time an item is added to
    // the cart's subcollection of items, the function updates `totalPrice`
    // and `itemCount` attributes on the cart.
    // Returns a function that can be called to unsubscribe the listener.
    await new Promise((resolve) => {
      const unsubscribe = aliceCartRef.onSnapshot(snap => {
        // If the function worked, these will be cart's final attributes.
        const expectedCount = 2;
        const expectedTotal = 9.98;

        // When the `itemCount`and `totalPrice` match the expectations for the
        // two items added, the promise resolves, and the test passes.
        if (snap.data().itemCount === expectedCount && snap.data().totalPrice == expectedTotal) {
          // Call the function returned by `onSnapshot` to unsubscribe from updates
          unsubscribe();
          resolve();
        };
      });
    });
   });
 });
17. テストを実行する
以前のテストで実行したエミュレータがまだ実行されている可能性があります。そうでない場合は、エミュレータを起動します。コマンドラインから実行します。
$ firebase emulators:start --import=./seed
新しいターミナルタブを開き(エミュレータは実行したままにします)、関数ディレクトリに移動します。セキュリティ ルールのテストで開いたままになっている可能性があります。
$ cd functions
単体テストを実行すると、合計 5 つのテストが表示されます。
$ npm test

> functions@ test .../emulators-codelab/codelab-initial-state/functions
> mocha

  shopping cart creation
    ✓ can be created by the cart owner (82ms)

  shopping cart reads, updates, and deletes
    ✓ cart can be read by the cart owner (42ms)

  shopping cart items
    ✓ items can be read by the cart owner (40ms)
    ✓ items can be added by the cart owner

  adding an item to the cart recalculates the cart total.
    1) should sum the cost of their items

  4 passing (2s)
  1 failing
特定の障害を確認すると、タイムアウト エラーが発生しているようです。これは、テストが関数の正しい更新を待っているものの、更新が実行されないためです。これで、テストを満たす関数を作成する準備が整いました。
18. 関数を作成する
このテストを修正するには、functions/index.js の関数を更新する必要があります。この関数の一部は記述されていますが、完全ではありません。現在の関数は次のようになっています。
// Recalculates the total cost of a cart; triggered when there's a change
// to any items in a cart.
exports.calculateCart = functions
    .firestore.document("carts/{cartId}/items/{itemId}")
    .onWrite(async (change, context) => {
      console.log(`onWrite: ${change.after.ref.path}`);
      if (!change.after.exists) {
        // Ignore deletes
        return;
      }

      let totalPrice = 125.98;
      let itemCount = 8;
      try {

        const cartRef = db.collection("carts").doc(context.params.cartId);

        await cartRef.update({
          totalPrice,
          itemCount
        });
      } catch(err) {
      }
    });
関数はカート参照を正しく設定していますが、totalPrice と itemCount の値を計算する代わりに、ハードコードされた値に更新しています。
items サブコレクション
新しい定数 itemsSnap を items サブコレクションに初期化します。次に、コレクション内のすべてのドキュメントを反復処理します。
// Recalculates the total cost of a cart; triggered when there's a change
// to any items in a cart.
exports.calculateCart = functions
    .firestore.document("carts/{cartId}/items/{itemId}")
    .onWrite(async (change, context) => {
      console.log(`onWrite: ${change.after.ref.path}`);
      if (!change.after.exists) {
        // Ignore deletes
        return;
      }


      try {
        let totalPrice = 125.98;
        let itemCount = 8;

        const cartRef = db.collection("carts").doc(context.params.cartId);
        // ADD LINES FROM HERE
        const itemsSnap = await cartRef.collection("items").get();

        itemsSnap.docs.forEach(item => {
          const itemData = item.data();
        })
        // TO HERE

        return cartRef.update({
          totalPrice,
          itemCount
        });
      } catch(err) {
      }
    });
totalPrice と itemCount を計算する
まず、totalPrice と itemCount の値をゼロに初期化します。
次に、反復ブロックにロジックを追加します。まず、アイテムに価格が設定されていることを確認します。アイテムに数量が指定されていない場合は、デフォルトの 1 にします。次に、数量を itemCount の累計に追加します。最後に、アイテムの価格に数量を掛けた値を totalPrice の合計値に加えます。
// Recalculates the total cost of a cart; triggered when there's a change
// to any items in a cart.
exports.calculateCart = functions
    .firestore.document("carts/{cartId}/items/{itemId}")
    .onWrite(async (change, context) => {
      console.log(`onWrite: ${change.after.ref.path}`);
      if (!change.after.exists) {
        // Ignore deletes
        return;
      }

      try {
        // CHANGE THESE LINES
        let totalPrice = 0;
        let itemCount = 0;

        const cartRef = db.collection("carts").doc(context.params.cartId);
        const itemsSnap = await cartRef.collection("items").get();

        itemsSnap.docs.forEach(item => {
          const itemData = item.data();
          // ADD LINES FROM HERE
          if (itemData.price) {
            // If not specified, the quantity is 1
            const quantity = itemData.quantity ? itemData.quantity : 1;
            itemCount += quantity;
            totalPrice += (itemData.price * quantity);
          }
          // TO HERE
        })

        await cartRef.update({
          totalPrice,
          itemCount
        });
      } catch(err) {
      }
    });
ログを追加して、成功状態とエラー状態のデバッグに役立てることもできます。
// Recalculates the total cost of a cart; triggered when there's a change
// to any items in a cart.
exports.calculateCart = functions
    .firestore.document("carts/{cartId}/items/{itemId}")
    .onWrite(async (change, context) => {
      console.log(`onWrite: ${change.after.ref.path}`);
      if (!change.after.exists) {
        // Ignore deletes
        return;
      }

      let totalPrice = 0;
      let itemCount = 0;
      try {
        const cartRef = db.collection("carts").doc(context.params.cartId);
        const itemsSnap = await cartRef.collection("items").get();

        itemsSnap.docs.forEach(item => {
          const itemData = item.data();
          if (itemData.price) {
            // If not specified, the quantity is 1
            const quantity = (itemData.quantity) ? itemData.quantity : 1;
            itemCount += quantity;
            totalPrice += (itemData.price * quantity);
          }
        });

        await cartRef.update({
          totalPrice,
          itemCount
        });

        // OPTIONAL LOGGING HERE
        console.log("Cart total successfully recalculated: ", totalPrice);
      } catch(err) {
        // OPTIONAL LOGGING HERE
        console.warn("update error", err);
      }
    });
19. テストを再実行する
コマンドラインで、エミュレータがまだ実行されていることを確認し、テストを再実行します。エミュレータは関数の変更を自動的に取得するため、再起動する必要はありません。すべてのテストに合格したことがわかります。
$ npm test
> functions@ test .../emulators-codelab/codelab-initial-state/functions
> mocha

  shopping cart creation
    ✓ can be created by the cart owner (306ms)

  shopping cart reads, updates, and deletes
    ✓ cart can be read by the cart owner (59ms)

  shopping cart items
    ✓ items can be read by the cart owner
    ✓ items can be added by the cart owner

  adding an item to the cart recalculates the cart total.
    ✓ should sum the cost of their items (800ms)


  5 passing (1s)
よくできました!
20. Storefront UI を使用して試してみる
最後のテストとして、ウェブアプリ(http://127.0.0.1:5000/)に戻り、商品をカートに追加します。
カートが正しい合計金額で更新されることを確認します。ではさっそく、
内容のまとめ
Cloud Functions for Firebase と Cloud Firestore の間の複雑なテストケースについて説明しました。テストに合格するように Cloud Functions の関数を作成しました。また、新しい機能が UI で動作していることも確認しました。これらはすべてローカルで実行され、エミュレータはユーザーのマシンで実行されます。
また、ローカル エミュレータに対して実行されるウェブ クライアントを作成し、データを保護するためのセキュリティ ルールを調整し、ローカル エミュレータを使用してセキュリティ ルールをテストしました。