1. ก่อนเริ่มต้น
เครื่องมือแบ็กเอนด์แบบไม่ใช้เซิร์ฟเวอร์ เช่น Cloud Firestore และ Cloud Functions ใช้งานง่ายมาก แต่ทดสอบได้ยาก ชุดโปรแกรมจำลองภายในของ Firebase ช่วยให้คุณเรียกใช้บริการเหล่านี้เวอร์ชันภายในในเครื่องที่ใช้พัฒนาได้ คุณจึงพัฒนาแอปได้อย่างรวดเร็วและปลอดภัย
ข้อกำหนดเบื้องต้น
- โปรแกรมแก้ไขอย่างง่าย เช่น Visual Studio Code, Atom หรือ Sublime Text
- Node.js 10.0.0 ขึ้นไป (หากต้องการติดตั้ง Node.js ให้ใช้ nvm หากต้องการตรวจสอบเวอร์ชัน ให้เรียกใช้
node --version) - Java 7 ขึ้นไป (หากต้องการติดตั้ง Java ให้ใช้คำสั่งเหล่านี้ หากต้องการตรวจสอบเวอร์ชัน ให้เรียกใช้
java -version)
สิ่งที่คุณต้องทำ
ในโค้ดแล็บนี้ คุณจะได้เรียกใช้และแก้ไขข้อบกพร่องของแอปช็อปปิ้งออนไลน์อย่างง่ายซึ่งขับเคลื่อนโดยบริการ Firebase หลายอย่าง ได้แก่
- Cloud Firestore: ฐานข้อมูล NoSQL แบบ Serverless ที่ปรับขนาดได้ทั่วโลกพร้อมความสามารถแบบเรียลไทม์
- Cloud Functions: โค้ดแบ็กเอนด์แบบ Serverless ที่ทำงานเพื่อตอบสนองต่อเหตุการณ์หรือคำขอ HTTP
- การตรวจสอบสิทธิ์ Firebase: บริการตรวจสอบสิทธิ์ที่มีการจัดการซึ่งผสานรวมกับผลิตภัณฑ์อื่นๆ ของ Firebase
- โฮสติ้งของ Firebase: โฮสติ้งที่รวดเร็วและปลอดภัยสำหรับเว็บแอป
คุณจะเชื่อมต่อแอปกับ Emulator Suite เพื่อเปิดใช้การพัฒนาในเครื่อง
นอกจากนี้ คุณยังจะได้เรียนรู้วิธีต่อไปนี้ด้วย
- วิธีเชื่อมต่อแอปกับ Emulator Suite และวิธีเชื่อมต่อโปรแกรมจำลองต่างๆ
- วิธีการทำงานของกฎการรักษาความปลอดภัยของ Firebase และวิธีทดสอบกฎการรักษาความปลอดภัยของ Firestore กับโปรแกรมจำลองภายใน
- วิธีเขียนฟังก์ชัน Firebase ที่ทริกเกอร์โดยเหตุการณ์ Firestore และวิธีเขียนการทดสอบการผสานรวมที่ทำงานกับชุดโปรแกรมจำลอง
2. ตั้งค่า
ดูซอร์สโค้ด
ในโค้ดแล็บนี้ คุณจะเริ่มต้นด้วยตัวอย่าง The Fire Store เวอร์ชันที่เกือบเสร็จสมบูรณ์แล้ว ดังนั้นสิ่งแรกที่คุณต้องทำคือโคลนซอร์สโค้ด
$ git clone https://github.com/firebase/emulators-codelab.git
จากนั้นให้ไปที่ไดเรกทอรี Codelab ซึ่งคุณจะใช้ทำงานในส่วนที่เหลือของ Codelab นี้
$ cd emulators-codelab/codelab-initial-state
ตอนนี้ให้ติดตั้งการอ้างอิงเพื่อให้เรียกใช้โค้ดได้ หากคุณใช้การเชื่อมต่ออินเทอร์เน็ตที่ช้า การดำเนินการนี้อาจใช้เวลา 1-2 นาที
# Move into the functions directory
$ cd functions

# Install dependencies
$ npm install

# Move back into the previous directory
$ cd ../
รับ Firebase CLI
ชุดโปรแกรมจำลองเป็นส่วนหนึ่งของ Firebase CLI (อินเทอร์เฟซบรรทัดคำสั่ง) ซึ่งติดตั้งในเครื่องได้ด้วยคำสั่งต่อไปนี้
$ npm install -g firebase-tools
จากนั้นตรวจสอบว่าคุณใช้ CLI เวอร์ชันล่าสุด Codelab นี้ควรใช้ได้กับเวอร์ชัน 9.0.0 ขึ้นไป แต่เวอร์ชันที่ใหม่กว่าจะมีการแก้ไขข้อบกพร่องเพิ่มเติม
$ firebase --version
9.6.0
เชื่อมต่อกับโปรเจ็กต์ Firebase
สร้างโปรเจ็กต์ Firebase
- ลงชื่อเข้าใช้คอนโซล Firebase โดยใช้บัญชี Google
- คลิกปุ่มเพื่อสร้างโปรเจ็กต์ใหม่ แล้วป้อนชื่อโปรเจ็กต์ (เช่น
Emulators Codelab)
- คลิกต่อไป
- หากได้รับแจ้ง ให้อ่านและยอมรับข้อกำหนดของ Firebase แล้วคลิกต่อไป
- (ไม่บังคับ) เปิดใช้ความช่วยเหลือจาก AI ในคอนโซล Firebase (เรียกว่า "Gemini ใน Firebase")
- สำหรับ Codelab นี้ คุณไม่จำเป็นต้องใช้ Google Analytics ดังนั้นให้ปิดตัวเลือก Google Analytics
- คลิกสร้างโปรเจ็กต์ รอให้ระบบจัดสรรโปรเจ็กต์ แล้วคลิกดำเนินการต่อ
เชื่อมต่อโค้ดกับโปรเจ็กต์ Firebase
ตอนนี้เราต้องเชื่อมต่อโค้ดนี้กับโปรเจ็กต์ Firebase ก่อนอื่น ให้เรียกใช้คำสั่งต่อไปนี้เพื่อเข้าสู่ระบบ Firebase CLI
$ firebase login
จากนั้นเรียกใช้คำสั่งต่อไปนี้เพื่อสร้างชื่อแทนของโปรเจ็กต์ แทนที่ $YOUR_PROJECT_ID ด้วยรหัสของโปรเจ็กต์ Firebase
$ firebase use $YOUR_PROJECT_ID
ตอนนี้คุณก็พร้อมที่จะเรียกใช้แอปแล้ว
3. เรียกใช้โปรแกรมจำลอง
ในส่วนนี้ คุณจะเรียกใช้แอปในเครื่อง ซึ่งหมายความว่าถึงเวลาบูตชุดโปรแกรมจำลองแล้ว
เริ่มโปรแกรมจำลอง
จากภายในไดเรกทอรีแหล่งที่มาของ Codelab ให้เรียกใช้คำสั่งต่อไปนี้เพื่อเริ่มโปรแกรมจำลอง
$ firebase emulators:start --import=./seed
คุณควรเห็นเอาต์พุตบางอย่างดังนี้
$ firebase emulators:start --import=./seed
i  emulators: Starting emulators: auth, functions, firestore, hosting
⚠  functions: The following emulators are not running, calls to these services from the Functions emulator will affect production: database, pubsub
i  firestore: Importing data from /Users/samstern/Projects/emulators-codelab/codelab-initial-state/seed/firestore_export/firestore_export.overall_export_metadata
i  firestore: Firestore Emulator logging to firestore-debug.log
i  hosting: Serving hosting files from: public
✔  hosting: Local server: http://127.0.0.1:5000
i  ui: Emulator UI logging to ui-debug.log
i  functions: Watching "/Users/samstern/Projects/emulators-codelab/codelab-initial-state/functions" for Cloud Functions...
✔  functions[calculateCart]: firestore function initialized.

┌─────────────────────────────────────────────────────────────┐
│ ✔  All emulators ready! It is now safe to connect your app. │
│ i  View Emulator UI at http://127.0.0.1:4000                │
└─────────────────────────────────────────────────────────────┘

┌────────────────┬────────────────┬─────────────────────────────────┐
│ Emulator       │ Host:Port      │ View in Emulator UI             │
├────────────────┼────────────────┼─────────────────────────────────┤
│ Authentication │ 127.0.0.1:9099 │ http://127.0.0.1:4000/auth      │
├────────────────┼────────────────┼─────────────────────────────────┤
│ Functions      │ 127.0.0.1:5001 │ http://127.0.0.1:4000/functions │
├────────────────┼────────────────┼─────────────────────────────────┤
│ Firestore      │ 127.0.0.1:8080 │ http://127.0.0.1:4000/firestore │
├────────────────┼────────────────┼─────────────────────────────────┤
│ Hosting        │ 127.0.0.1:5000 │ n/a                             │
└────────────────┴────────────────┴─────────────────────────────────┘
  Emulator Hub running at 127.0.0.1:4400
  Other reserved ports: 4500

Issues? Report them at https://github.com/firebase/firebase-tools/issues and attach the *-debug.log files.
เมื่อเห็นข้อความเริ่มโปรแกรมจำลองทั้งหมดแล้ว แสดงว่าแอปพร้อมใช้งาน
เชื่อมต่อเว็บแอปกับโปรแกรมจำลอง
จากตารางในบันทึก เราจะเห็นว่าโปรแกรมจำลอง Cloud Firestore กำลังฟังอยู่ที่พอร์ต 8080 และโปรแกรมจำลองการตรวจสอบสิทธิ์กำลังฟังอยู่ที่พอร์ต 9099
┌────────────────┬────────────────┬─────────────────────────────────┐
│ Emulator       │ Host:Port      │ View in Emulator UI             │
├────────────────┼────────────────┼─────────────────────────────────┤
│ Authentication │ 127.0.0.1:9099 │ http://127.0.0.1:4000/auth      │
├────────────────┼────────────────┼─────────────────────────────────┤
│ Functions      │ 127.0.0.1:5001 │ http://127.0.0.1:4000/functions │
├────────────────┼────────────────┼─────────────────────────────────┤
│ Firestore      │ 127.0.0.1:8080 │ http://127.0.0.1:4000/firestore │
├────────────────┼────────────────┼─────────────────────────────────┤
│ Hosting        │ 127.0.0.1:5000 │ n/a                             │
└────────────────┴────────────────┴─────────────────────────────────┘
มาเชื่อมต่อโค้ดส่วนหน้ากับโปรแกรมจำลองแทนที่จะเป็นการเชื่อมต่อกับการใช้งานจริงกัน เปิดไฟล์ public/js/homepage.js แล้วค้นหาฟังก์ชัน onDocumentReady เราเห็นว่าโค้ดเข้าถึงอินสแตนซ์ Firestore และ Auth มาตรฐาน
public/js/homepage.js
  const auth = firebaseApp.auth();
  const db = firebaseApp.firestore();
มาอัปเดตออบเจ็กต์ db และ auth ให้ชี้ไปยังโปรแกรมจำลองในเครื่องกัน
public/js/homepage.js
  const auth = firebaseApp.auth();
  const db = firebaseApp.firestore();

  // ADD THESE LINES
  if (location.hostname === "127.0.0.1") {
    console.log("127.0.0.1 detected!");
    auth.useEmulator("http://127.0.0.1:9099");
    db.useEmulator("127.0.0.1", 8080);
  }
ตอนนี้เมื่อแอปทำงานในเครื่องของคุณ (ให้บริการโดยโปรแกรมจำลอง Hosting) ไคลเอ็นต์ Firestore จะชี้ไปยังโปรแกรมจำลองในเครื่องแทนที่จะชี้ไปยังฐานข้อมูลที่ใช้งานจริง
เปิด EmulatorUI
ในเว็บเบราว์เซอร์ ให้ไปที่ http://127.0.0.1:4000/ คุณควรเห็น UI ของชุดโปรแกรมจำลอง
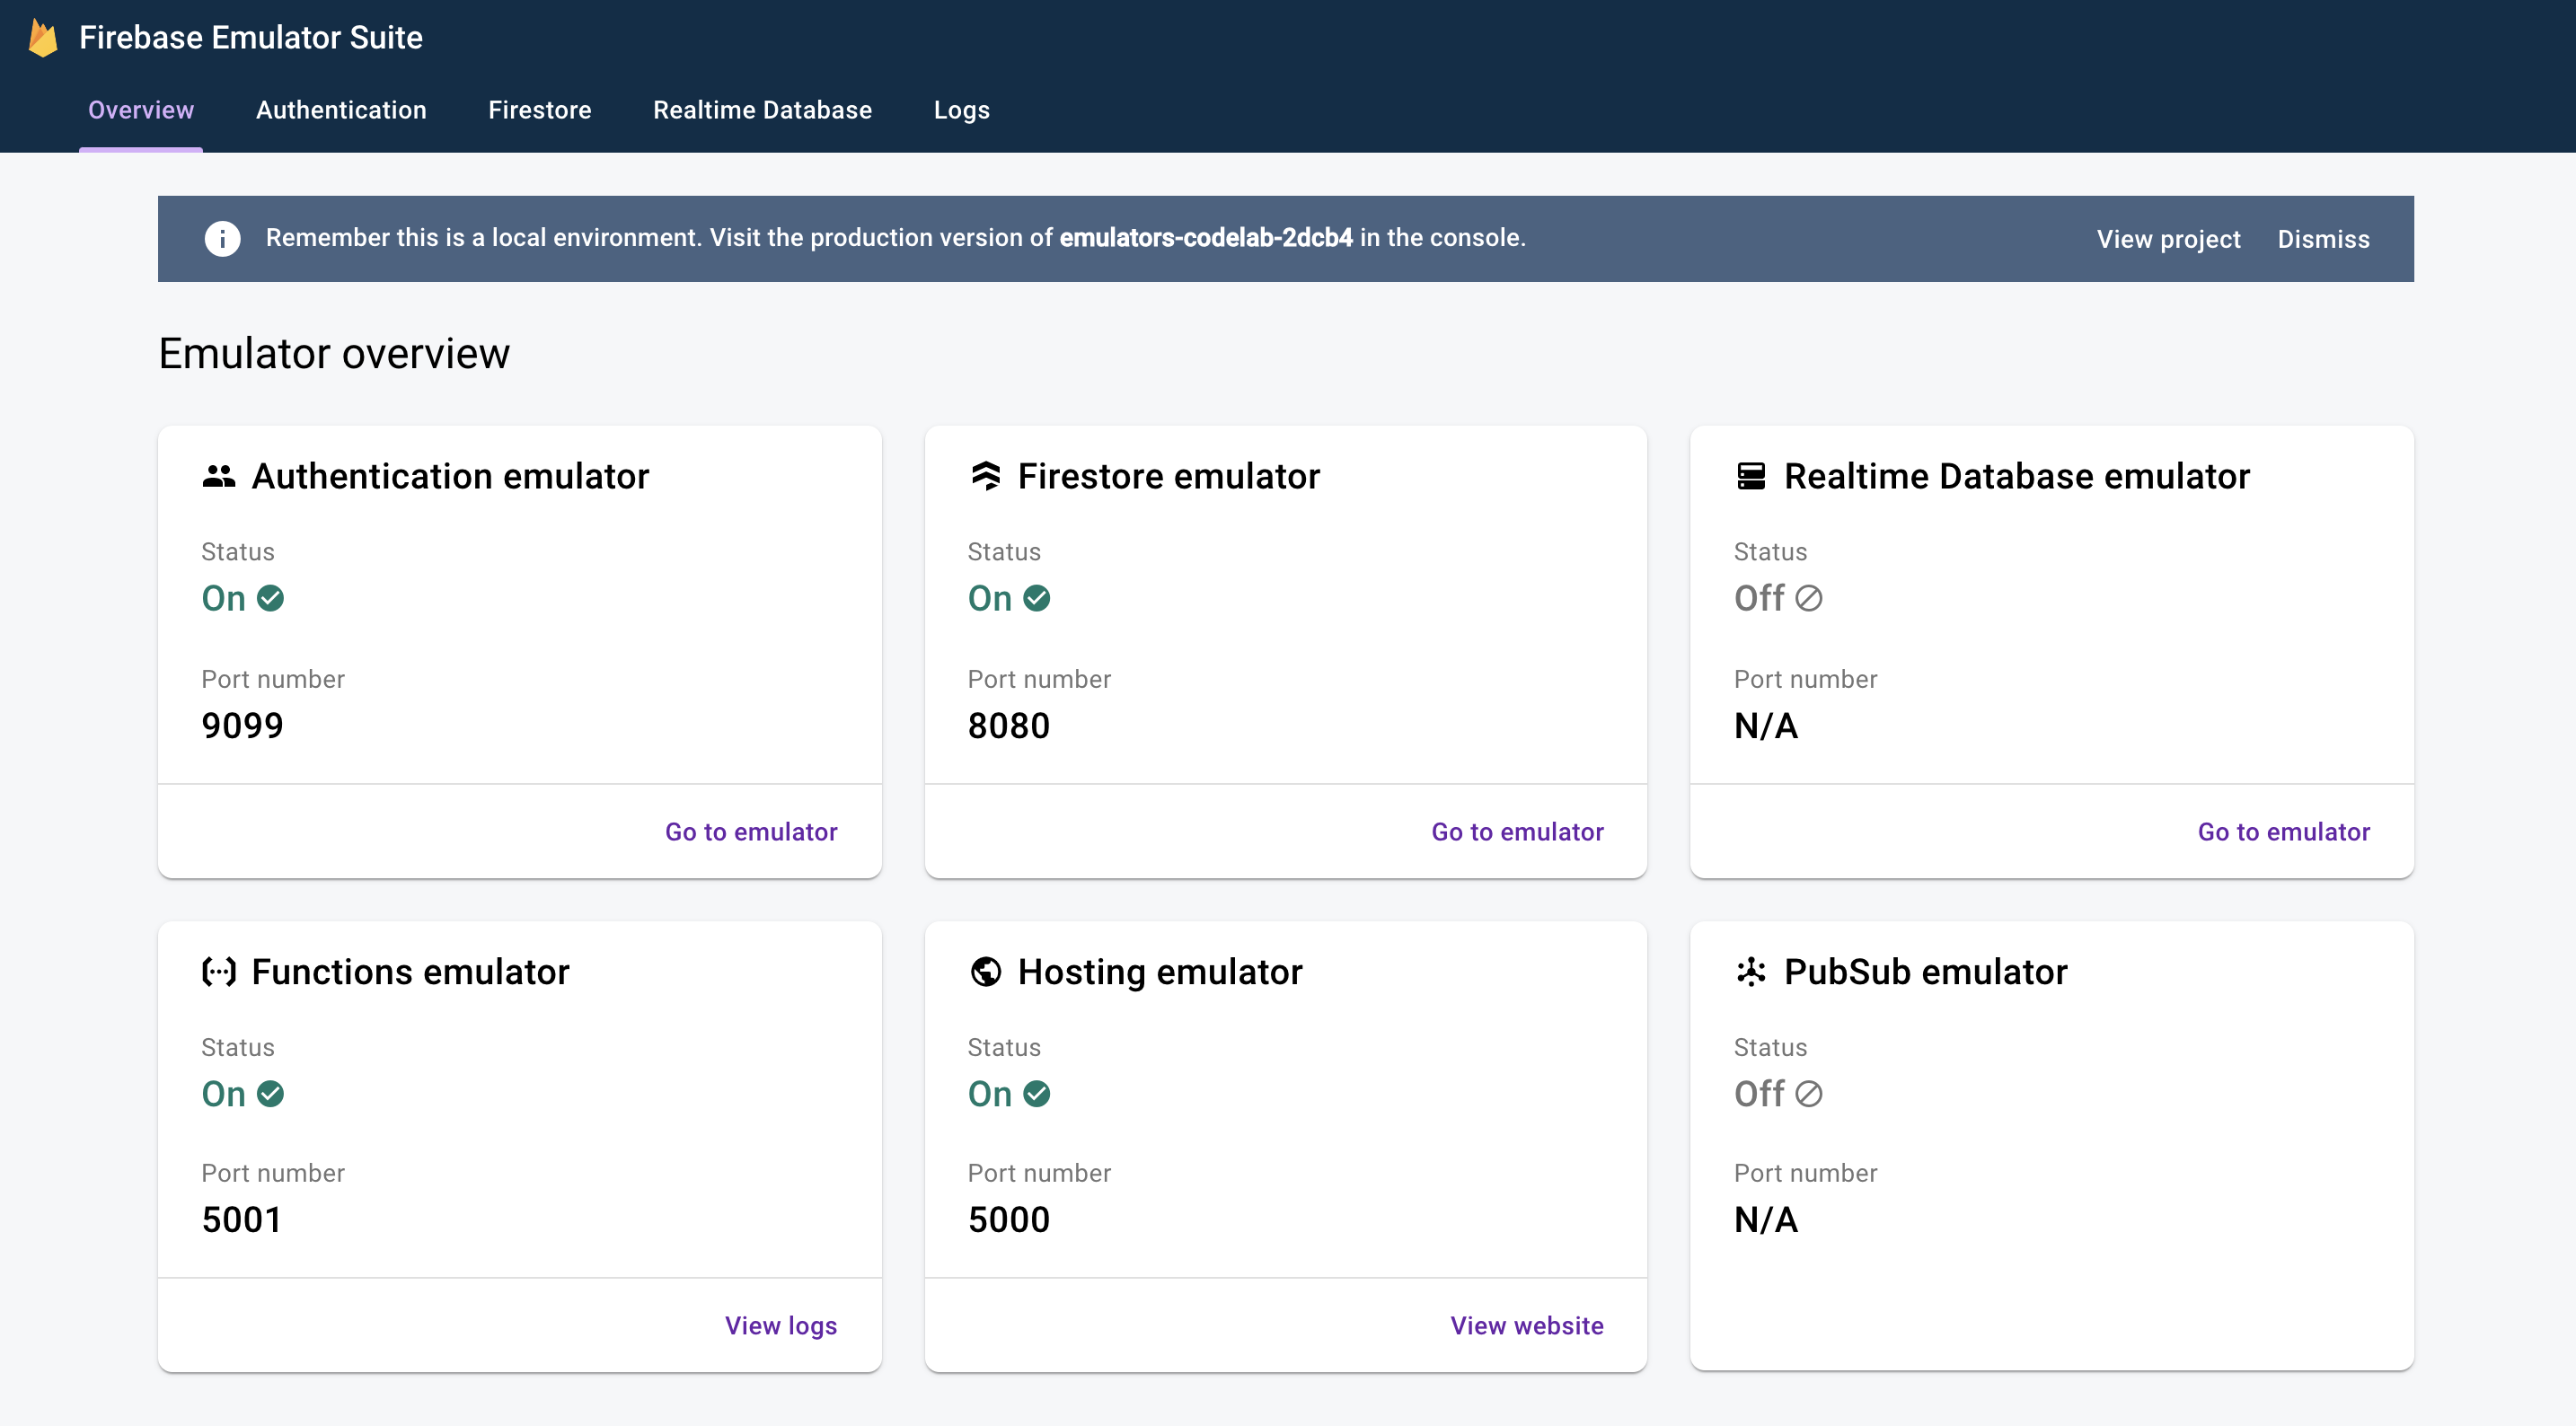
คลิกเพื่อดู UI สำหรับโปรแกรมจำลอง Firestore items คอลเล็กชันมีข้อมูลอยู่แล้วเนื่องจากข้อมูลที่นำเข้าพร้อมกับแฟล็ก --import

4. เรียกใช้แอป
เปิดแอป
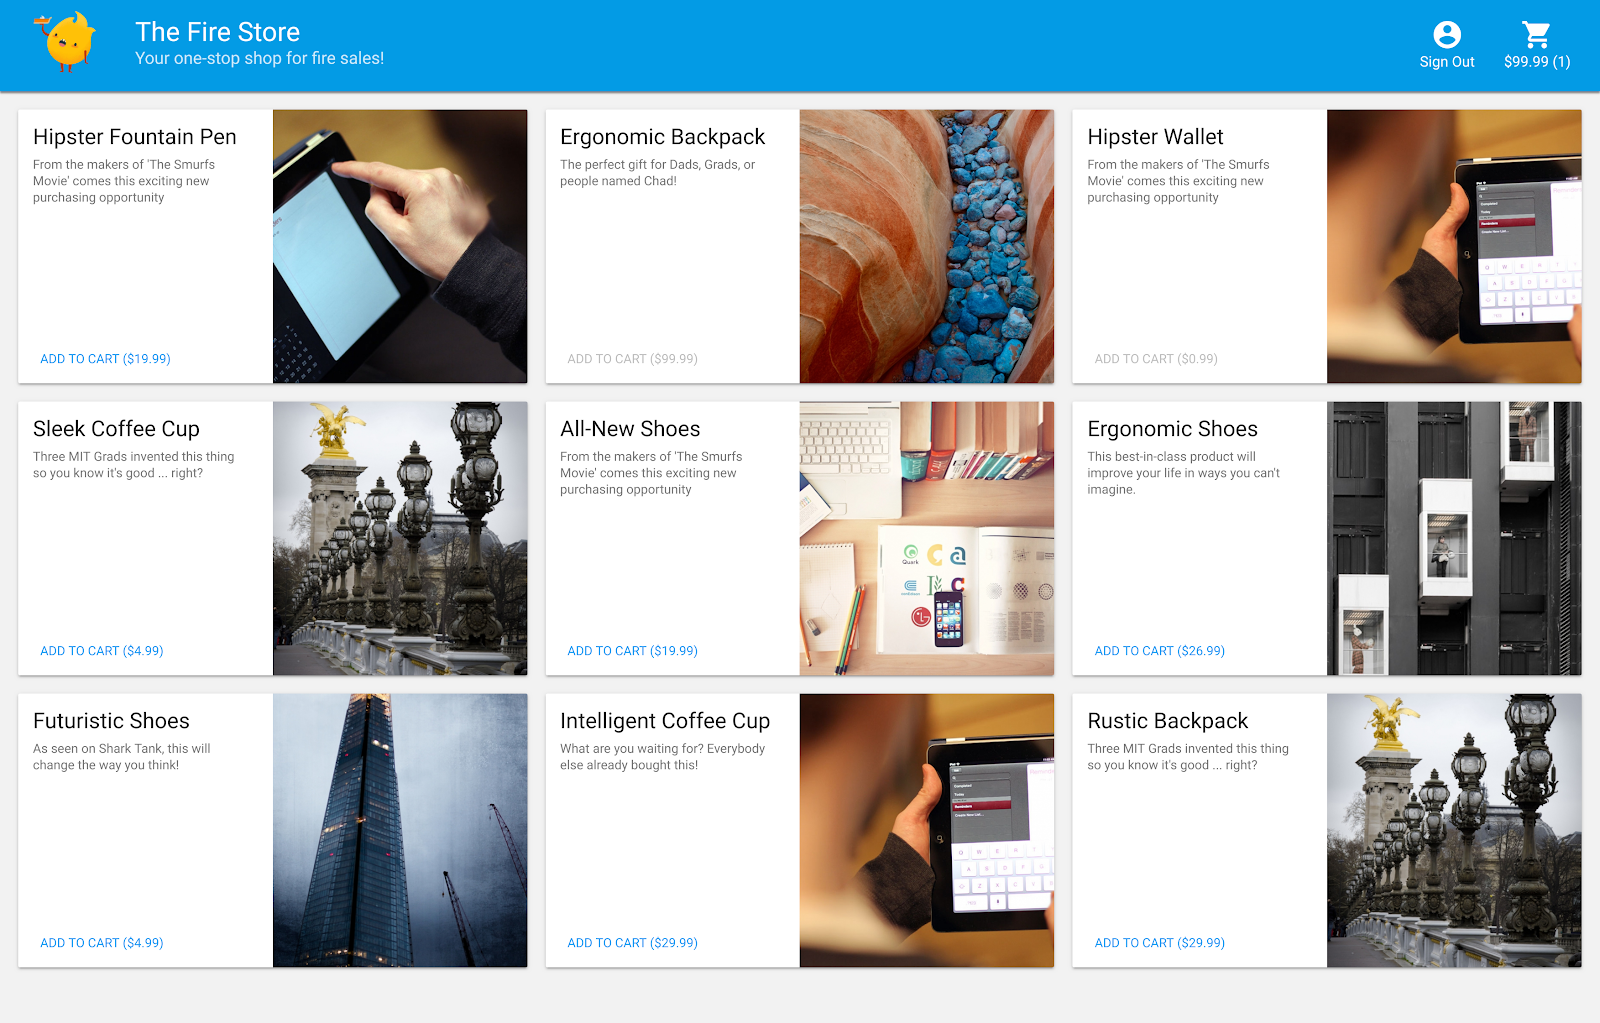
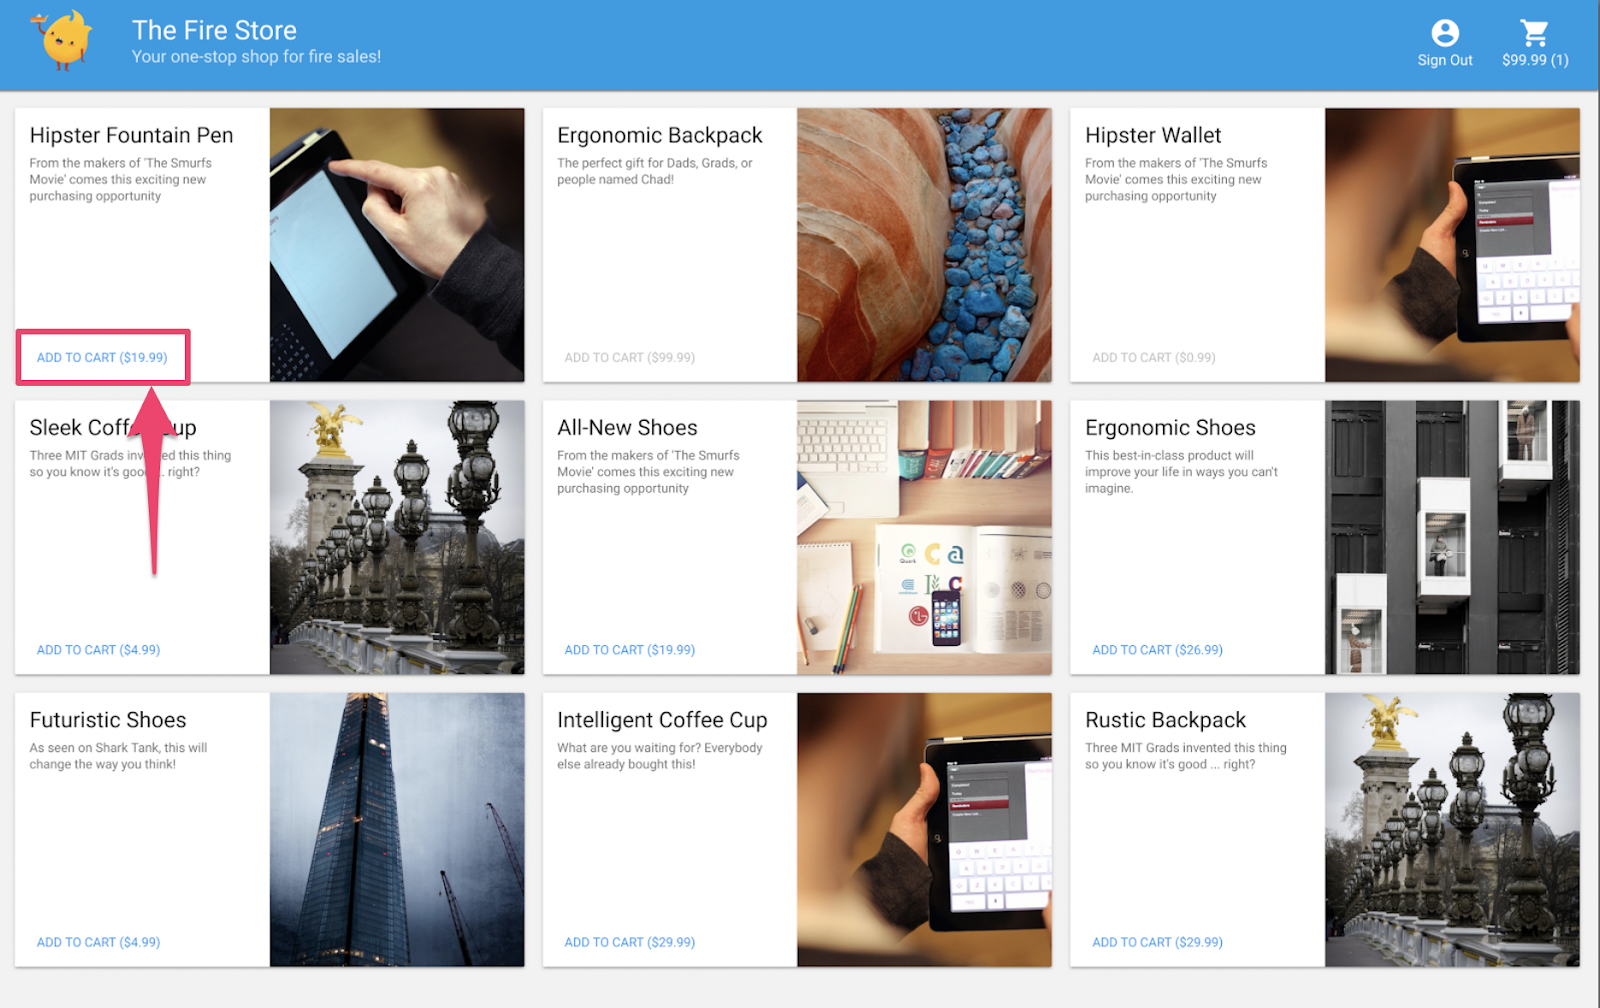
ในเว็บเบราว์เซอร์ ให้ไปที่ http://127.0.0.1:5000 แล้วคุณจะเห็น The Fire Store ทำงานในเครื่องของคุณ
ใช้แอป
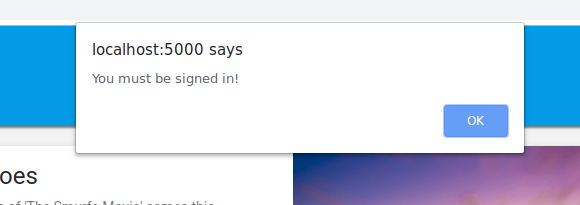
เลือกสินค้าในหน้าแรก แล้วคลิกเพิ่มลงในรถเข็น ขออภัย คุณจะพบข้อผิดพลาดต่อไปนี้
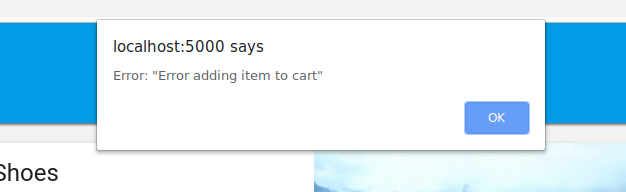
มาแก้ไขข้อบกพร่องนั้นกัน เนื่องจากทุกอย่างทำงานในโปรแกรมจำลอง เราจึงสามารถทดลองได้โดยไม่ต้องกังวลว่าจะส่งผลต่อข้อมูลจริง
5. แก้ไขข้อบกพร่องของแอป
ค้นหาข้อบกพร่อง
มาดูในคอนโซลนักพัฒนาซอฟต์แวร์ของ Chrome กัน กด Control+Shift+J (Windows, Linux, ChromeOS) หรือ Command+Option+J (Mac) เพื่อดูข้อผิดพลาดในคอนโซล

ดูเหมือนว่าจะมีข้อผิดพลาดในaddToCart เรามาดูข้อผิดพลาดนั้นกัน เราพยายามเข้าถึงสิ่งที่เรียกว่า uid ในวิธีการนั้นที่ใด และเหตุใดจึงเป็น null ปัจจุบันเมธอดมีลักษณะดังนี้ใน public/js/homepage.js
public/js/homepage.js
  addToCart(id, itemData) {
    console.log("addToCart", id, JSON.stringify(itemData));
    return this.db
      .collection("carts")
      .doc(this.auth.currentUser.uid)
      .collection("items")
      .doc(id)
      .set(itemData);
  }
อ๋อ เราไม่ได้ลงชื่อเข้าใช้แอป ตามเอกสารประกอบการตรวจสอบสิทธิ์ Firebase เมื่อเราไม่ได้ลงชื่อเข้าใช้ auth.currentUser จะเป็น null มาเพิ่มการตรวจสอบกัน
public/js/homepage.js
  addToCart(id, itemData) {
    // ADD THESE LINES
    if (this.auth.currentUser === null) {
      this.showError("You must be signed in!");
      return;
    }

    // ...
  }
ทดสอบแอป
ตอนนี้ให้รีเฟรชหน้าเว็บ แล้วคลิกเพิ่มลงในรถเข็น คราวนี้คุณควรได้รับข้อผิดพลาดที่ดูดีขึ้น
แต่หากคลิกลงชื่อเข้าใช้ในแถบเครื่องมือด้านบน แล้วคลิกเพิ่มลงในรถเข็นอีกครั้ง คุณจะเห็นว่าระบบได้อัปเดตรถเข็นแล้ว
แต่ดูเหมือนว่าตัวเลขจะไม่ถูกต้องเลย

ไม่ต้องกังวล เราจะแก้ไขข้อบกพร่องนั้นในเร็วๆ นี้ ก่อนอื่น มาเจาะลึกสิ่งที่เกิดขึ้นจริงเมื่อคุณเพิ่มสินค้าลงในรถเข็นกัน
6. ทริกเกอร์ฟังก์ชันในเครื่อง
การคลิกเพิ่มลงในรถเข็นจะเริ่มลำดับเหตุการณ์ที่เกี่ยวข้องกับโปรแกรมจำลองหลายรายการ ในบันทึกของ Firebase CLI คุณควรเห็นข้อความคล้ายกับข้อความต่อไปนี้หลังจากเพิ่มสินค้าลงในรถเข็น
i  functions: Beginning execution of "calculateCart"
i  functions: Finished "calculateCart" in ~1s
มีเหตุการณ์สำคัญ 4 อย่างที่เกิดขึ้นเพื่อสร้างบันทึกเหล่านั้นและการอัปเดต UI ที่คุณเห็น ดังนี้
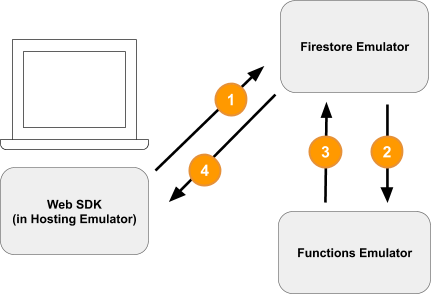
1) การเขียน Firestore - ไคลเอ็นต์
ระบบจะเพิ่มเอกสารใหม่ลงในคอลเล็กชัน Firestore /carts/{cartId}/items/{itemId}/ คุณจะเห็นโค้ดนี้ในฟังก์ชัน addToCart ภายใน public/js/homepage.js
public/js/homepage.js
  addToCart(id, itemData) {
    // ...
    console.log("addToCart", id, JSON.stringify(itemData));
    return this.db
      .collection("carts")
      .doc(this.auth.currentUser.uid)
      .collection("items")
      .doc(id)
      .set(itemData);
  }
2) ทริกเกอร์ Cloud Function
Cloud Function calculateCart จะรอรับเหตุการณ์การเขียน (สร้าง อัปเดต หรือลบ) ที่เกิดขึ้นกับสินค้าในรถเข็นโดยใช้ทริกเกอร์ onWrite ซึ่งคุณดูได้ใน functions/index.js
functions/index.js
exports.calculateCart = functions.firestore
    .document("carts/{cartId}/items/{itemId}")
    .onWrite(async (change, context) => {
      try {
        let totalPrice = 125.98;
        let itemCount = 8;

        const cartRef = db.collection("carts").doc(context.params.cartId);

        await cartRef.update({
          totalPrice,
          itemCount
        });
      } catch(err) {
      }
    }
);
3) การเขียน Firestore - ผู้ดูแลระบบ
ฟังก์ชัน calculateCart จะอ่านสินค้าทั้งหมดในรถเข็นและรวมจำนวนและราคาทั้งหมด จากนั้นจะอัปเดตเอกสาร "cart" ด้วยยอดรวมใหม่ (ดู cartRef.update(...) ด้านบน)
4) การอ่าน Firestore - ไคลเอ็นต์
ส่วนหน้าเว็บสมัครรับข้อมูลอัปเดตเกี่ยวกับการเปลี่ยนแปลงรถเข็น ระบบจะอัปเดตแบบเรียลไทม์หลังจากที่ฟังก์ชันระบบคลาวด์เขียนยอดรวมใหม่และอัปเดต UI ดังที่เห็นใน public/js/homepage.js
public/js/homepage.js
this.cartUnsub = cartRef.onSnapshot(cart => {
   // The cart document was changed, update the UI
   // ...
});
สรุป
เก่งมาก! คุณเพิ่งตั้งค่าแอปในเครื่องที่ใช้โปรแกรมจำลอง Firebase 3 แบบสำหรับการทดสอบในเครื่องโดยสมบูรณ์

แต่ยังไม่หมดเท่านี้! ในส่วนถัดไป คุณจะได้เรียนรู้สิ่งต่อไปนี้
- วิธีเขียนการทดสอบหน่วยที่ใช้โปรแกรมจำลอง Firebase
- วิธีใช้โปรแกรมจำลอง Firebase เพื่อแก้ไขข้อบกพร่องของกฎการรักษาความปลอดภัย
7. สร้างกฎความปลอดภัยที่ปรับให้เหมาะกับแอป
เว็บแอปของเราอ่านและเขียนข้อมูล แต่ที่ผ่านมาเราไม่ได้กังวลเรื่องความปลอดภัยเลย Cloud Firestore ใช้ระบบที่เรียกว่า "กฎความปลอดภัย" เพื่อประกาศว่าใครมีสิทธิ์อ่านและเขียนข้อมูล ชุดโปรแกรมจำลองเป็นวิธีที่ยอดเยี่ยมในการสร้างต้นแบบกฎเหล่านี้
เปิดไฟล์ emulators-codelab/codelab-initial-state/firestore.rules ในเอดิเตอร์ คุณจะเห็นว่ากฎของเรามี 3 ส่วนหลัก ดังนี้
rules_version = '2';
service cloud.firestore {
  match /databases/{database}/documents {
    // User's cart metadata
    match /carts/{cartID} {
      // TODO: Change these! Anyone can read or write.
      allow read, write: if true;
    }

    // Items inside the user's cart
    match /carts/{cartID}/items/{itemID} {
      // TODO: Change these! Anyone can read or write.
      allow read, write: if true;
    }

    // All items available in the store. Users can read
    // items but never write them.
    match /items/{itemID} {
      allow read: if true;
    }
  }
}
ตอนนี้ทุกคนสามารถอ่านและเขียนข้อมูลลงในฐานข้อมูลของเราได้ เราต้องการให้มั่นใจว่าจะมีเพียงการดำเนินการที่ถูกต้องเท่านั้นที่ผ่านเข้ามาได้ และเราจะไม่เปิดเผยข้อมูลที่ละเอียดอ่อน
ใน Codelab นี้ เราจะปฏิบัติตามหลักการให้สิทธิ์น้อยที่สุด โดยจะล็อกเอกสารทั้งหมดและค่อยๆ เพิ่มสิทธิ์เข้าถึงจนกว่าผู้ใช้ทุกคนจะมีสิทธิ์เข้าถึงที่จำเป็นทั้งหมด แต่จะไม่ให้สิทธิ์มากกว่านั้น มาอัปเดตกฎ 2 ข้อแรกเพื่อปฏิเสธการเข้าถึงโดยตั้งค่าเงื่อนไขเป็น false กัน
rules_version = '2';
service cloud.firestore {
  match /databases/{database}/documents {
    // User's cart metadata
    match /carts/{cartID} {
      // UPDATE THIS LINE
      allow read, write: if false;
    }

    // Items inside the user's cart
    match /carts/{cartID}/items/{itemID} {
      // UPDATE THIS LINE
      allow read, write: if false;
    }

    // All items available in the store. Users can read
    // items but never write them.
    match /items/{itemID} {
      allow read: if true;
    }
  }
}
8. เรียกใช้โปรแกรมจำลองและทดสอบ
เริ่มโปรแกรมจำลอง
ตรวจสอบว่าคุณอยู่ใน emulators-codelab/codelab-initial-state/ ในบรรทัดคำสั่ง คุณอาจยังคงมีโปรแกรมจำลองที่ทำงานจากขั้นตอนก่อนหน้า หากไม่ ให้เริ่มโปรแกรมจำลองอีกครั้งโดยทำดังนี้
$ firebase emulators:start --import=./seed
เมื่ออีมูเลเตอร์ทำงานแล้ว คุณจะเรียกใช้การทดสอบในเครื่องกับอีมูเลเตอร์ได้
ทำการทดสอบ
ในบรรทัดคำสั่งในแท็บเทอร์มินัลใหม่จากไดเรกทอรี emulators-codelab/codelab-initial-state/
ก่อนอื่น ให้ย้ายไปที่ไดเรกทอรีฟังก์ชัน (เราจะอยู่ที่นี่ตลอด Codelab ที่เหลือ)
$ cd functions
ตอนนี้ให้เรียกใช้การทดสอบ Mocha ในไดเรกทอรีฟังก์ชัน แล้วเลื่อนไปที่ด้านบนของเอาต์พุต
# Run the tests
$ npm test

> functions@ test .../emulators-codelab/codelab-initial-state/functions
> mocha

  shopping carts
    1) can be created and updated by the cart owner
    2) can be read only by the cart owner

  shopping cart items
    3) can be read only by the cart owner
    4) can be added only by the cart owner

  adding an item to the cart recalculates the cart total.
    - should sum the cost of their items


  0 passing (364ms)
  1 pending
  4 failing
ตอนนี้เรามีข้อผิดพลาด 4 รายการ ขณะสร้างไฟล์กฎ คุณสามารถวัดความคืบหน้าได้โดยดูว่าการทดสอบผ่านมากขึ้น
9. เข้าถึงรถเข็นอย่างปลอดภัย
ข้อผิดพลาด 2 รายการแรกคือการทดสอบ "รถเข็นช็อปปิ้ง" ซึ่งทดสอบสิ่งต่อไปนี้
- ผู้ใช้จะสร้างและอัปเดตได้เฉพาะรถเข็นของตนเองเท่านั้น
- ผู้ใช้จะอ่านได้เฉพาะรถเข็นของตนเอง
functions/test.js
  it('can be created and updated by the cart owner', async () => {
    // Alice can create her own cart
    await firebase.assertSucceeds(aliceDb.doc("carts/alicesCart").set({
      ownerUID: "alice",
      total: 0
    }));

    // Bob can't create Alice's cart
    await firebase.assertFails(bobDb.doc("carts/alicesCart").set({
      ownerUID: "alice",
      total: 0
    }));

    // Alice can update her own cart with a new total
    await firebase.assertSucceeds(aliceDb.doc("carts/alicesCart").update({
      total: 1
    }));

    // Bob can't update Alice's cart with a new total
    await firebase.assertFails(bobDb.doc("carts/alicesCart").update({
      total: 1
    }));
  });

  it("can be read only by the cart owner", async () => {
    // Setup: Create Alice's cart as admin
    await admin.doc("carts/alicesCart").set({
      ownerUID: "alice",
      total: 0
    });

    // Alice can read her own cart
    await firebase.assertSucceeds(aliceDb.doc("carts/alicesCart").get());

    // Bob can't read Alice's cart
    await firebase.assertFails(bobDb.doc("carts/alicesCart").get());
  });
มาทำให้การทดสอบเหล่านี้ผ่านกัน ในตัวแก้ไข ให้เปิดไฟล์กฎความปลอดภัย firestore.rules แล้วอัปเดตคำสั่งภายใน match /carts/{cartID} ดังนี้
firestore.rules
rules_version = '2';
service cloud.firestore {
    // UPDATE THESE LINES
    match /carts/{cartID} {
      allow create: if request.auth.uid == request.resource.data.ownerUID;
      allow read, update, delete: if request.auth.uid == resource.data.ownerUID;
    }

    // ...
  }
}
ตอนนี้กฎเหล่านี้อนุญาตให้เจ้าของรถเข็นมีสิทธิ์เข้าถึงแบบอ่านและเขียนเท่านั้น
เราใช้ 2 ออบเจ็กต์ที่อยู่ในบริบทของทุกกฎเพื่อยืนยันข้อมูลขาเข้าและการตรวจสอบสิทธิ์ของผู้ใช้
- ออบเจ็กต์
requestมีข้อมูลและข้อมูลเมตาเกี่ยวกับการดำเนินการที่กำลังพยายามทำ - หากโปรเจ็กต์ Firebase ใช้ Firebase Authentication ออบเจ็กต์
request.authจะอธิบายผู้ใช้ที่ทําคําขอ
10. สิทธิ์เข้าถึงรถเข็นทดสอบ
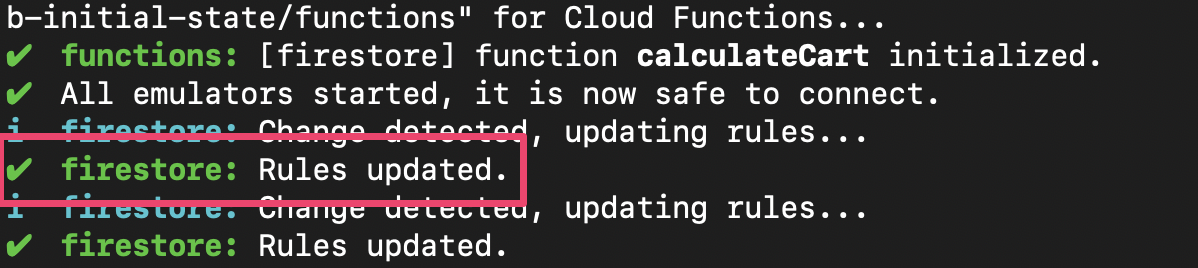
Emulator Suite จะอัปเดตกฎโดยอัตโนมัติทุกครั้งที่บันทึก firestore.rules คุณยืนยันว่าโปรแกรมจำลองได้อัปเดตกฎแล้วได้โดยดูข้อความ Rules updated ในแท็บที่เรียกใช้โปรแกรมจำลอง
เรียกใช้การทดสอบอีกครั้ง และตรวจสอบว่าการทดสอบ 2 รายการแรกผ่านแล้ว
$ npm test

> functions@ test .../emulators-codelab/codelab-initial-state/functions
> mocha

  shopping carts
    ✓ can be created and updated by the cart owner (195ms)
    ✓ can be read only by the cart owner (136ms)

  shopping cart items
    1) can be read only by the cart owner
    2) can be added only by the cart owner

  adding an item to the cart recalculates the cart total.
    - should sum the cost of their items

  2 passing (482ms)
  1 pending
  2 failing
เยี่ยมมาก ตอนนี้คุณได้รักษาความปลอดภัยในการเข้าถึงรถเข็นช็อปปิ้งแล้ว ไปที่การทดสอบที่ไม่ผ่านรายการถัดไปกัน
11. ตรวจสอบขั้นตอน "เพิ่มลงในรถเข็น" ใน UI
ปัจจุบันแม้ว่าเจ้าของรถเข็นจะอ่านและเขียนข้อมูลลงในรถเข็นได้ แต่ก็ไม่สามารถอ่านหรือเขียนข้อมูลสินค้าแต่ละรายการในรถเข็นได้ เนื่องจากแม้ว่าเจ้าของจะมีสิทธิ์เข้าถึงเอกสารรถเข็น แต่จะไม่มีสิทธิ์เข้าถึงคอลเล็กชันย่อยของสินค้าในรถเข็น
ซึ่งเป็นสถานะที่ใช้งานไม่ได้สำหรับผู้ใช้
กลับไปที่ UI ของเว็บซึ่งทำงานบน http://127.0.0.1:5000, แล้วลองเพิ่มสินค้าลงในรถเข็น คุณได้รับข้อผิดพลาด Permission Denied ซึ่งมองเห็นได้จากคอนโซลการแก้ไขข้อบกพร่อง เนื่องจากเรายังไม่ได้ให้สิทธิ์ผู้ใช้เข้าถึงเอกสารที่สร้างขึ้นในคอลเล็กชันย่อย items
12. อนุญาตให้เข้าถึงสินค้าในรถเข็น
การทดสอบ 2 รายการนี้ยืนยันว่าผู้ใช้จะเพิ่มหรืออ่านสินค้าจากรถเข็นของตนเองได้เท่านั้น
  it("can be read only by the cart owner", async () => {
    // Alice can read items in her own cart
    await firebase.assertSucceeds(aliceDb.doc("carts/alicesCart/items/milk").get());

    // Bob can't read items in alice's cart
    await firebase.assertFails(bobDb.doc("carts/alicesCart/items/milk").get())
  });

  it("can be added only by the cart owner",  async () => {
    // Alice can add an item to her own cart
    await firebase.assertSucceeds(aliceDb.doc("carts/alicesCart/items/lemon").set({
      name: "lemon",
      price: 0.99
    }));

    // Bob can't add an item to alice's cart
    await firebase.assertFails(bobDb.doc("carts/alicesCart/items/lemon").set({
      name: "lemon",
      price: 0.99
    }));
  });
ดังนั้นเราจึงเขียนกฎที่อนุญาตให้เข้าถึงได้หากผู้ใช้ปัจจุบันมี UID เดียวกันกับ ownerUID ในเอกสารรถเข็น เนื่องจากไม่จำเป็นต้องระบุกฎที่แตกต่างกันสำหรับ create, update, delete คุณจึงใช้กฎ write ได้ ซึ่งจะมีผลกับคำขอทั้งหมดที่แก้ไขข้อมูล
อัปเดตกฎสำหรับเอกสารในคอลเล็กชันย่อยของรายการ get ในเงื่อนไขจะอ่านค่าจาก Firestore ซึ่งในกรณีนี้คือ ownerUID ในเอกสารรถเข็น
rules_version = '2';
service cloud.firestore {
  match /databases/{database}/documents {
    // ...

    // UPDATE THESE LINES
    match /carts/{cartID}/items/{itemID} {
      allow read, write: if get(/databases/$(database)/documents/carts/$(cartID)).data.ownerUID == request.auth.uid;
    }

    // ...
  }
}
13. ทดสอบการเข้าถึงสินค้าในรถเข็น
ตอนนี้เราสามารถเรียกใช้การทดสอบอีกครั้งได้แล้ว เลื่อนไปที่ด้านบนของเอาต์พุตและตรวจสอบว่ามีการทดสอบเพิ่มเติมที่ผ่าน
$ npm test

> functions@ test .../emulators-codelab/codelab-initial-state/functions
> mocha

  shopping carts
    ✓ can be created and updated by the cart owner (195ms)
    ✓ can be read only by the cart owner (136ms)

  shopping cart items
    ✓ can be read only by the cart owner (111ms)
    ✓ can be added only by the cart owner


  adding an item to the cart recalculates the cart total.
    - should sum the cost of their items


  4 passing (401ms)
  1 pending
เยี่ยม ตอนนี้การทดสอบทั้งหมดของเราผ่านแล้ว เรามีการทดสอบที่รอดำเนินการอยู่ 1 รายการ แต่เราจะไปที่การทดสอบนั้นในอีกไม่กี่ขั้นตอน
14. ตรวจสอบขั้นตอน "เพิ่มลงในรถเข็น" อีกครั้ง
กลับไปที่ส่วนหน้าของเว็บ ( http://127.0.0.1:5000) แล้วเพิ่มสินค้าลงในรถเข็น ขั้นตอนนี้เป็นขั้นตอนสำคัญในการยืนยันว่าการทดสอบและกฎของเราตรงกับฟังก์ชันการทำงานที่ลูกค้าต้องการ (โปรดทราบว่าครั้งล่าสุดที่เราทดลองใช้ UI ผู้ใช้เพิ่มสินค้าลงในรถเข็นไม่ได้)
ไคลเอ็นต์จะโหลดกฎซ้ำโดยอัตโนมัติเมื่อมีการบันทึก firestore.rules ดังนั้น ลองเพิ่มสินค้าลงในรถเข็น
สรุป
เก่งมาก! คุณเพิ่งปรับปรุงการรักษาความปลอดภัยของแอป ซึ่งเป็นขั้นตอนสำคัญในการเตรียมแอปให้พร้อมสำหรับเวอร์ชันที่ใช้งานจริง หากนี่เป็นแอปเวอร์ชันที่ใช้งานจริง เราจะเพิ่มการทดสอบเหล่านี้ลงในไปป์ไลน์การผสานรวมอย่างต่อเนื่องได้ ซึ่งจะช่วยให้เรามั่นใจได้ว่าข้อมูลรถเข็นช็อปปิ้งของเราจะมีตัวควบคุมการเข้าถึงเหล่านี้ต่อไป แม้ว่าคนอื่นๆ จะแก้ไขกฎก็ตาม

แต่เดี๋ยวก่อน ยังมีอีก
หากดำเนินการต่อ คุณจะได้เรียนรู้สิ่งต่อไปนี้
- วิธีเขียนฟังก์ชันที่ทริกเกอร์โดยเหตุการณ์ Firestore
- วิธีสร้างการทดสอบที่ใช้ได้ในโปรแกรมจำลองหลายโปรแกรม
15. ตั้งค่าการทดสอบ Cloud Functions
ที่ผ่านมาเรามุ่งเน้นที่ส่วนหน้าของเว็บแอปและกฎความปลอดภัยของ Firestore แต่แอปนี้ยังใช้ Cloud Functions เพื่อให้รถเข็นของผู้ใช้เป็นข้อมูลล่าสุดด้วย ดังนั้นเราจึงต้องการทดสอบโค้ดนั้นด้วย
ชุดโปรแกรมจำลองช่วยให้ทดสอบ Cloud Functions ได้ง่ายมาก แม้แต่ฟังก์ชันที่ใช้ Cloud Firestore และบริการอื่นๆ
ในโปรแกรมแก้ไข ให้เปิดไฟล์ emulators-codelab/codelab-initial-state/functions/test.js แล้วเลื่อนไปที่การทดสอบสุดท้ายในไฟล์ ขณะนี้สถานะของคำขอคือ "รอดำเนินการ"
//  REMOVE .skip FROM THIS LINE
describe.skip("adding an item to the cart recalculates the cart total. ", () => {
  // ...

  it("should sum the cost of their items", async () => {
    ...
  });
});
หากต้องการเปิดใช้การทดสอบ ให้นำ .skip ออกเพื่อให้มีลักษณะดังนี้
describe("adding an item to the cart recalculates the cart total. ", () => {
  // ...

  it("should sum the cost of their items", async () => {
    ...
  });
});
จากนั้นค้นหาตัวแปร REAL_FIREBASE_PROJECT_ID ที่ด้านบนของไฟล์ แล้วเปลี่ยนเป็นรหัสโปรเจ็กต์ Firebase จริงของคุณ ดังนี้
// CHANGE THIS LINE
const REAL_FIREBASE_PROJECT_ID = "changeme";
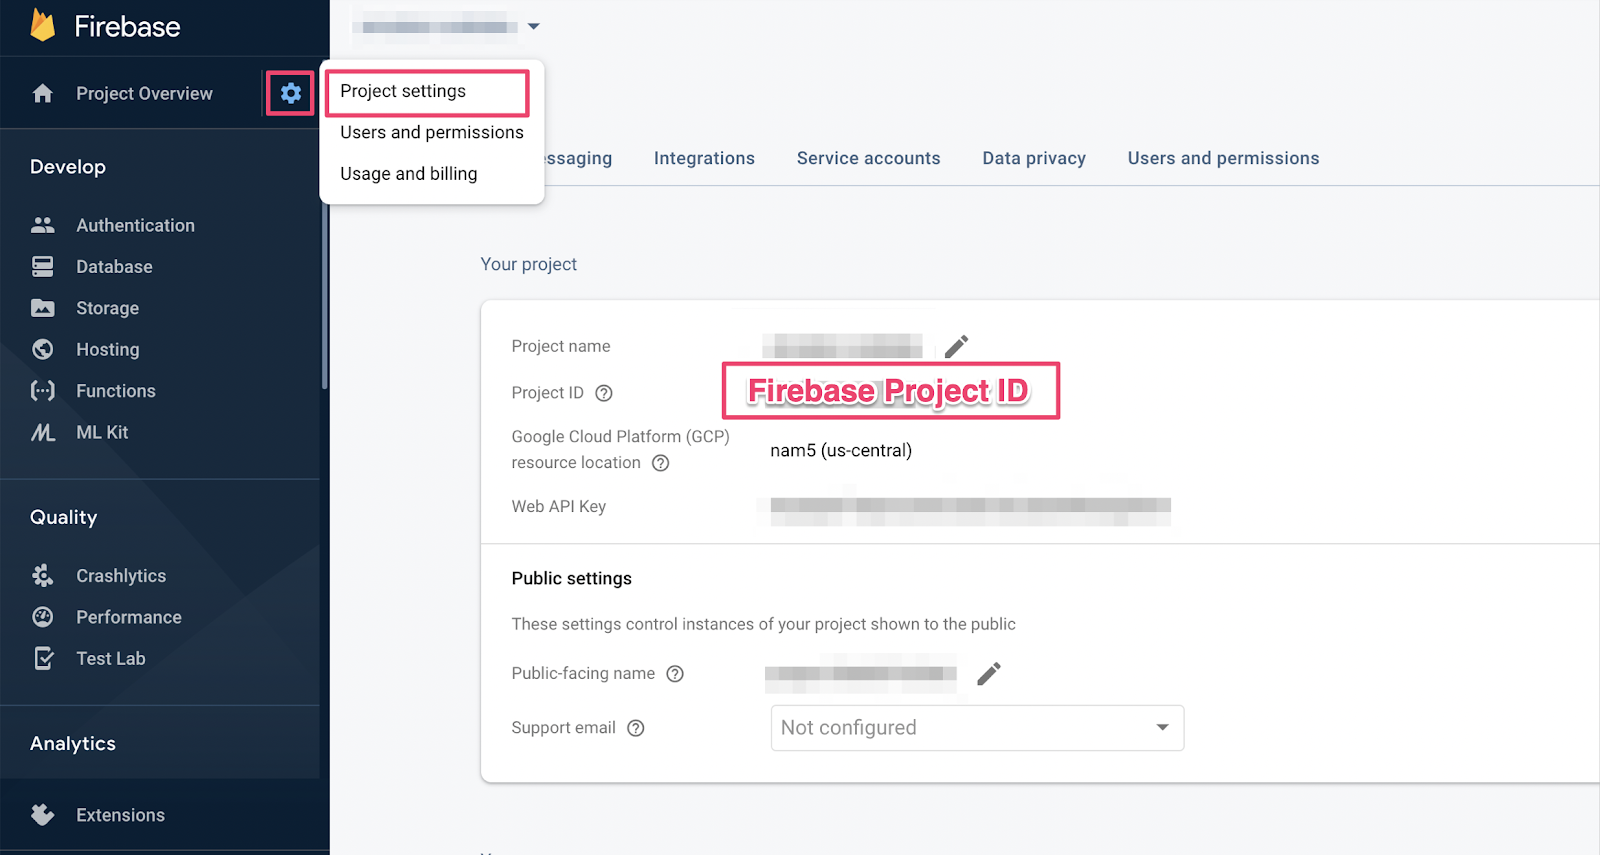
หากลืมรหัสโปรเจ็กต์ คุณสามารถดูรหัสโปรเจ็กต์ Firebase ได้ในการตั้งค่าโปรเจ็กต์ในคอนโซล Firebase โดยทำดังนี้
16. ดูการทดสอบฟังก์ชัน
เนื่องจากการทดสอบนี้จะตรวจสอบการโต้ตอบระหว่าง Cloud Firestore กับ Cloud Functions จึงต้องมีการตั้งค่ามากกว่าการทดสอบใน Codelab ก่อนหน้า มาดูการทดสอบนี้และทำความเข้าใจสิ่งที่คาดหวังกัน
สร้างรถเข็น
Cloud Functions ทำงานในสภาพแวดล้อมเซิร์ฟเวอร์ที่เชื่อถือได้ และใช้การตรวจสอบสิทธิ์บัญชีบริการที่ Admin SDK ใช้ได้ ก่อนอื่น ให้เริ่มต้นแอปโดยใช้ initializeAdminApp แทน initializeApp จากนั้นสร้าง DocumentReference สำหรับรถเข็นที่เราจะเพิ่มสินค้าลงไป และเริ่มต้นรถเข็น
it("should sum the cost of their items", async () => {
    const db = firebase
        .initializeAdminApp({ projectId: REAL_FIREBASE_PROJECT_ID })
        .firestore();

    // Setup: Initialize cart
    const aliceCartRef = db.doc("carts/alice")
    await aliceCartRef.set({ ownerUID: "alice", totalPrice: 0 });

    ...
  });
ทริกเกอร์ฟังก์ชัน
จากนั้นเพิ่มเอกสารไปยังitemsคอลเล็กชันย่อยของเอกสารรถเข็นเพื่อเรียกใช้ฟังก์ชัน เพิ่ม 2 รายการเพื่อให้แน่ใจว่าคุณกำลังทดสอบการเพิ่มที่เกิดขึ้นในฟังก์ชัน
it("should sum the cost of their items", async () => {
    const db = firebase
        .initializeAdminApp({ projectId: REAL_FIREBASE_PROJECT_ID })
        .firestore();

    // Setup: Initialize cart
    const aliceCartRef = db.doc("carts/alice")
    await aliceCartRef.set({ ownerUID: "alice", totalPrice: 0 });

    //  Trigger calculateCart by adding items to the cart
    const aliceItemsRef = aliceCartRef.collection("items");
    await aliceItemsRef.doc("doc1").set({name: "nectarine", price: 2.99});
    await aliceItemsRef.doc("doc2").set({ name: "grapefruit", price: 6.99 });

    ...
    });
  });
กำหนดความคาดหวังในการทดสอบ
ใช้ onSnapshot() เพื่อลงทะเบียน Listener สำหรับการเปลี่ยนแปลงในเอกสารรถเข็น onSnapshot() จะแสดงผลฟังก์ชันที่คุณเรียกใช้เพื่อยกเลิกการลงทะเบียน Listener ได้
สำหรับการทดสอบนี้ ให้เพิ่มสินค้า 2 รายการที่มีราคารวมกัน $9.98 จากนั้นตรวจสอบว่ารถเข็นมี itemCount และ totalPrice ตามที่คาดไว้หรือไม่ หากเป็นเช่นนั้น ฟังก์ชันก็ทำงานได้ตามที่ต้องการ
it("should sum the cost of their items", (done) => {
    const db = firebase
        .initializeAdminApp({ projectId: REAL_FIREBASE_PROJECT_ID })
        .firestore();

    // Setup: Initialize cart
    const aliceCartRef = db.doc("carts/alice")
    aliceCartRef.set({ ownerUID: "alice", totalPrice: 0 });

    //  Trigger calculateCart by adding items to the cart
    const aliceItemsRef = aliceCartRef.collection("items");
    aliceItemsRef.doc("doc1").set({name: "nectarine", price: 2.99});
    aliceItemsRef.doc("doc2").set({ name: "grapefruit", price: 6.99 });

    // Listen for every update to the cart. Every time an item is added to
    // the cart's subcollection of items, the function updates `totalPrice`
    // and `itemCount` attributes on the cart.
    // Returns a function that can be called to unsubscribe the listener.
    await new Promise((resolve) => {
      const unsubscribe = aliceCartRef.onSnapshot(snap => {
        // If the function worked, these will be cart's final attributes.
        const expectedCount = 2;
        const expectedTotal = 9.98;

        // When the `itemCount`and `totalPrice` match the expectations for the
        // two items added, the promise resolves, and the test passes.
        if (snap.data().itemCount === expectedCount && snap.data().totalPrice == expectedTotal) {
          // Call the function returned by `onSnapshot` to unsubscribe from updates
          unsubscribe();
          resolve();
        };
      });
    });
   });
 });
17. ทำการทดสอบ
คุณอาจยังคงมีโปรแกรมจำลองที่ทำงานจากการทดสอบก่อนหน้า หากยังไม่ได้เปิด ให้เปิดโปรแกรมจำลอง จากบรรทัดคำสั่ง ให้เรียกใช้
$ firebase emulators:start --import=./seed
เปิดแท็บเทอร์มินัลใหม่ (ปล่อยให้โปรแกรมจำลองทำงานต่อไป) แล้วย้ายไปที่ไดเรกทอรีฟังก์ชัน คุณอาจยังเปิดหน้านี้ไว้จากการทดสอบกฎความปลอดภัย
$ cd functions
ตอนนี้เรียกใช้ Unit Test คุณควรเห็นการทดสอบทั้งหมด 5 รายการ
$ npm test

> functions@ test .../emulators-codelab/codelab-initial-state/functions
> mocha

  shopping cart creation
    ✓ can be created by the cart owner (82ms)

  shopping cart reads, updates, and deletes
    ✓ cart can be read by the cart owner (42ms)

  shopping cart items
    ✓ items can be read by the cart owner (40ms)
    ✓ items can be added by the cart owner

  adding an item to the cart recalculates the cart total.
    1) should sum the cost of their items

  4 passing (2s)
  1 failing
หากดูที่ความล้มเหลวที่เฉพาะเจาะจง จะเห็นว่าเป็นข้อผิดพลาดเกี่ยวกับหมดเวลา เนื่องจากการทดสอบรอให้ฟังก์ชันอัปเดตอย่างถูกต้อง แต่ก็ไม่เคยเกิดขึ้น ตอนนี้เราพร้อมที่จะเขียนฟังก์ชันเพื่อให้ผ่านการทดสอบแล้ว
18. เขียนฟังก์ชัน
หากต้องการแก้ไขการทดสอบนี้ คุณต้องอัปเดตฟังก์ชันใน functions/index.js แม้ว่าฟังก์ชันบางอย่างจะเขียนไว้แล้ว แต่ก็ยังไม่สมบูรณ์ ฟังก์ชันนี้มีลักษณะดังนี้
// Recalculates the total cost of a cart; triggered when there's a change
// to any items in a cart.
exports.calculateCart = functions
    .firestore.document("carts/{cartId}/items/{itemId}")
    .onWrite(async (change, context) => {
      console.log(`onWrite: ${change.after.ref.path}`);
      if (!change.after.exists) {
        // Ignore deletes
        return;
      }

      let totalPrice = 125.98;
      let itemCount = 8;
      try {

        const cartRef = db.collection("carts").doc(context.params.cartId);

        await cartRef.update({
          totalPrice,
          itemCount
        });
      } catch(err) {
      }
    });
ฟังก์ชันนี้ตั้งค่าการอ้างอิงรถเข็นอย่างถูกต้อง แต่แทนที่จะคำนวณค่าของ totalPrice และ itemCount กลับอัปเดตค่าเหล่านั้นเป็นค่าที่ฮาร์ดโค้ด
ดึงข้อมูลและทำซ้ำผ่าน
items คอลเล็กชันย่อย
เริ่มต้นค่าคงที่ใหม่ itemsSnap ให้เป็นคอลเล็กชันย่อย items จากนั้นวนซ้ำเอกสารทั้งหมดในคอลเล็กชัน
// Recalculates the total cost of a cart; triggered when there's a change
// to any items in a cart.
exports.calculateCart = functions
    .firestore.document("carts/{cartId}/items/{itemId}")
    .onWrite(async (change, context) => {
      console.log(`onWrite: ${change.after.ref.path}`);
      if (!change.after.exists) {
        // Ignore deletes
        return;
      }


      try {
        let totalPrice = 125.98;
        let itemCount = 8;

        const cartRef = db.collection("carts").doc(context.params.cartId);
        // ADD LINES FROM HERE
        const itemsSnap = await cartRef.collection("items").get();

        itemsSnap.docs.forEach(item => {
          const itemData = item.data();
        })
        // TO HERE

        return cartRef.update({
          totalPrice,
          itemCount
        });
      } catch(err) {
      }
    });
คำนวณ totalPrice และ itemCount
ก่อนอื่น ให้เริ่มต้นค่าของ totalPrice และ itemCount เป็น 0
จากนั้นเพิ่มตรรกะลงในบล็อกการวนซ้ำ ก่อนอื่น ให้ตรวจสอบว่าสินค้ามีราคา หากไม่ได้ระบุจำนวนสินค้า ให้ใช้ค่าเริ่มต้นเป็น 1 จากนั้นให้เพิ่มจำนวนลงในยอดรวมที่กำลังดำเนินการของ itemCount สุดท้าย ให้เพิ่มราคาของสินค้าคูณด้วยจำนวนลงในยอดรวมที่กำลังคำนวณของ totalPrice ดังนี้
// Recalculates the total cost of a cart; triggered when there's a change
// to any items in a cart.
exports.calculateCart = functions
    .firestore.document("carts/{cartId}/items/{itemId}")
    .onWrite(async (change, context) => {
      console.log(`onWrite: ${change.after.ref.path}`);
      if (!change.after.exists) {
        // Ignore deletes
        return;
      }

      try {
        // CHANGE THESE LINES
        let totalPrice = 0;
        let itemCount = 0;

        const cartRef = db.collection("carts").doc(context.params.cartId);
        const itemsSnap = await cartRef.collection("items").get();

        itemsSnap.docs.forEach(item => {
          const itemData = item.data();
          // ADD LINES FROM HERE
          if (itemData.price) {
            // If not specified, the quantity is 1
            const quantity = itemData.quantity ? itemData.quantity : 1;
            itemCount += quantity;
            totalPrice += (itemData.price * quantity);
          }
          // TO HERE
        })

        await cartRef.update({
          totalPrice,
          itemCount
        });
      } catch(err) {
      }
    });
นอกจากนี้ คุณยังเพิ่มการบันทึกเพื่อช่วยแก้ไขข้อบกพร่องของสถานะสำเร็จและข้อผิดพลาดได้ด้วย โดยทำดังนี้
// Recalculates the total cost of a cart; triggered when there's a change
// to any items in a cart.
exports.calculateCart = functions
    .firestore.document("carts/{cartId}/items/{itemId}")
    .onWrite(async (change, context) => {
      console.log(`onWrite: ${change.after.ref.path}`);
      if (!change.after.exists) {
        // Ignore deletes
        return;
      }

      let totalPrice = 0;
      let itemCount = 0;
      try {
        const cartRef = db.collection("carts").doc(context.params.cartId);
        const itemsSnap = await cartRef.collection("items").get();

        itemsSnap.docs.forEach(item => {
          const itemData = item.data();
          if (itemData.price) {
            // If not specified, the quantity is 1
            const quantity = (itemData.quantity) ? itemData.quantity : 1;
            itemCount += quantity;
            totalPrice += (itemData.price * quantity);
          }
        });

        await cartRef.update({
          totalPrice,
          itemCount
        });

        // OPTIONAL LOGGING HERE
        console.log("Cart total successfully recalculated: ", totalPrice);
      } catch(err) {
        // OPTIONAL LOGGING HERE
        console.warn("update error", err);
      }
    });
19. เรียกใช้การทดสอบอีกครั้ง
ในบรรทัดคำสั่ง ให้ตรวจสอบว่าโปรแกรมจำลองยังทำงานอยู่และเรียกใช้การทดสอบอีกครั้ง คุณไม่จำเป็นต้องรีสตาร์ทโปรแกรมจำลองเนื่องจากโปรแกรมจำลองจะรับการเปลี่ยนแปลงฟังก์ชันโดยอัตโนมัติ คุณควรเห็นว่าการทดสอบทั้งหมดผ่านแล้ว
$ npm test
> functions@ test .../emulators-codelab/codelab-initial-state/functions
> mocha

  shopping cart creation
    ✓ can be created by the cart owner (306ms)

  shopping cart reads, updates, and deletes
    ✓ cart can be read by the cart owner (59ms)

  shopping cart items
    ✓ items can be read by the cart owner
    ✓ items can be added by the cart owner

  adding an item to the cart recalculates the cart total.
    ✓ should sum the cost of their items (800ms)


  5 passing (1s)
เยี่ยมมาก
20. ลองใช้โดยใช้ UI ของหน้าร้าน
สำหรับการทดสอบขั้นสุดท้าย ให้กลับไปที่เว็บแอป ( http://127.0.0.1:5000/) แล้วเพิ่มสินค้าลงในรถเข็น
ยืนยันว่ารถเข็นช็อปปิ้งอัปเดตยอดรวมที่ถูกต้อง สุดยอด
สรุป
คุณได้ดูตัวอย่างกรณีทดสอบที่ซับซ้อนระหว่าง Cloud Functions for Firebase กับ Cloud Firestore คุณเขียน Cloud Function เพื่อให้การทดสอบผ่าน นอกจากนี้ คุณยังยืนยันว่าฟังก์ชันการทำงานใหม่ใช้งานได้ใน UI ด้วย คุณทำทั้งหมดนี้ในเครื่องโดยเรียกใช้โปรแกรมจำลองในเครื่องของคุณเอง
นอกจากนี้ คุณยังได้สร้างไคลเอ็นต์เว็บที่ทำงานกับโปรแกรมจำลองในเครื่อง สร้างกฎความปลอดภัยที่ปรับแต่งเพื่อปกป้องข้อมูล และทดสอบกฎความปลอดภัยโดยใช้โปรแกรมจำลองในเครื่อง