
1. 概览
在此 Codelab 中,您将学习如何使用 Cloud Functions for Firebase 向聊天应用的用户发送通知,从而为聊天 Web 应用添加功能。
学习内容
- 使用 Firebase SDK 创建 Google Cloud Functions 函数。
- 根据 Auth、Cloud Storage 和 Cloud Firestore 事件触发 Cloud Functions 函数。
- 为您的 Web 应用添加 Firebase Cloud Messaging 支持。
您需要满足的条件
2. 获取示例代码
从命令行克隆 GitHub 代码库:
git clone https://github.com/firebase/friendlychat
导入 starter 应用
使用 IDE 打开或导入示例代码目录中的 
cloud-functions-start 目录。这个目录包含此 Codelab 的起始代码,其中包含一个功能齐全的聊天 Web 应用。
3. 创建 Firebase 项目并设置应用
创建项目
- 使用您的 Google 账号登录 Firebase 控制台。
- 点击相应按钮以创建新项目,然后输入项目名称(例如
FriendlyChat)。
- 点击继续。
- 如果看到相关提示,请查看并接受 Firebase 条款,然后点击继续。
- (可选)在 Firebase 控制台中启用 AI 辅助功能(称为“Gemini in Firebase”)。
- 在此 Codelab 中,您不需要使用 Google Analytics,因此请关闭 Google Analytics 选项。
- 点击创建项目,等待项目完成预配,然后点击继续。
升级到 Blaze 方案
如需使用 Cloud Functions for Firebase 和 Cloud Storage for Firebase,您的 Firebase 项目必须采用随用随付 (Blaze) 定价方案,这意味着该项目需要与一个 Cloud Billing 账号相关联。
- Cloud Billing 账号要求提供付款方式,例如信用卡。
- 如果您刚开始接触 Firebase 和 Google Cloud,请确认您是否有资格获得 $300 赠金和免费试用 Cloud Billing 账号。
- 如果您是在活动中完成此 Codelab,请询问活动组织者是否有可用的 Cloud 积分。
如果您无法使用信用卡,或者不想继续使用 Blaze 定价方案,请考虑使用 Firebase Emulator Suite,这样您就可以在本地计算机上免费模拟 Cloud Functions。
所有 Firebase 项目(包括采用 Blaze 定价方案的项目)仍然可以享受 Cloud Functions 的免费用量配额。此 Codelab 中列出的步骤将不会超出免费层级的用量限制。不过,您会看到 Cloud Storage 收取的小额费用(约 0.03 美元),该费用用于托管 Cloud Functions 构建映像。
如需将项目升级到 Blaze 方案,请按以下步骤操作:
- 在 Firebase 控制台中,选择升级您的方案。
- 选择 Blaze 方案。按照屏幕上的说明将 Cloud Billing 账号与您的项目相关联。
如果您需要在此升级过程中创建 Cloud Billing 账号,则可能需要返回 Firebase 控制台中的升级流程以完成升级。
启用 Google Auth
为了让用户登录应用,我们将使用需要启用的 Google 身份验证。
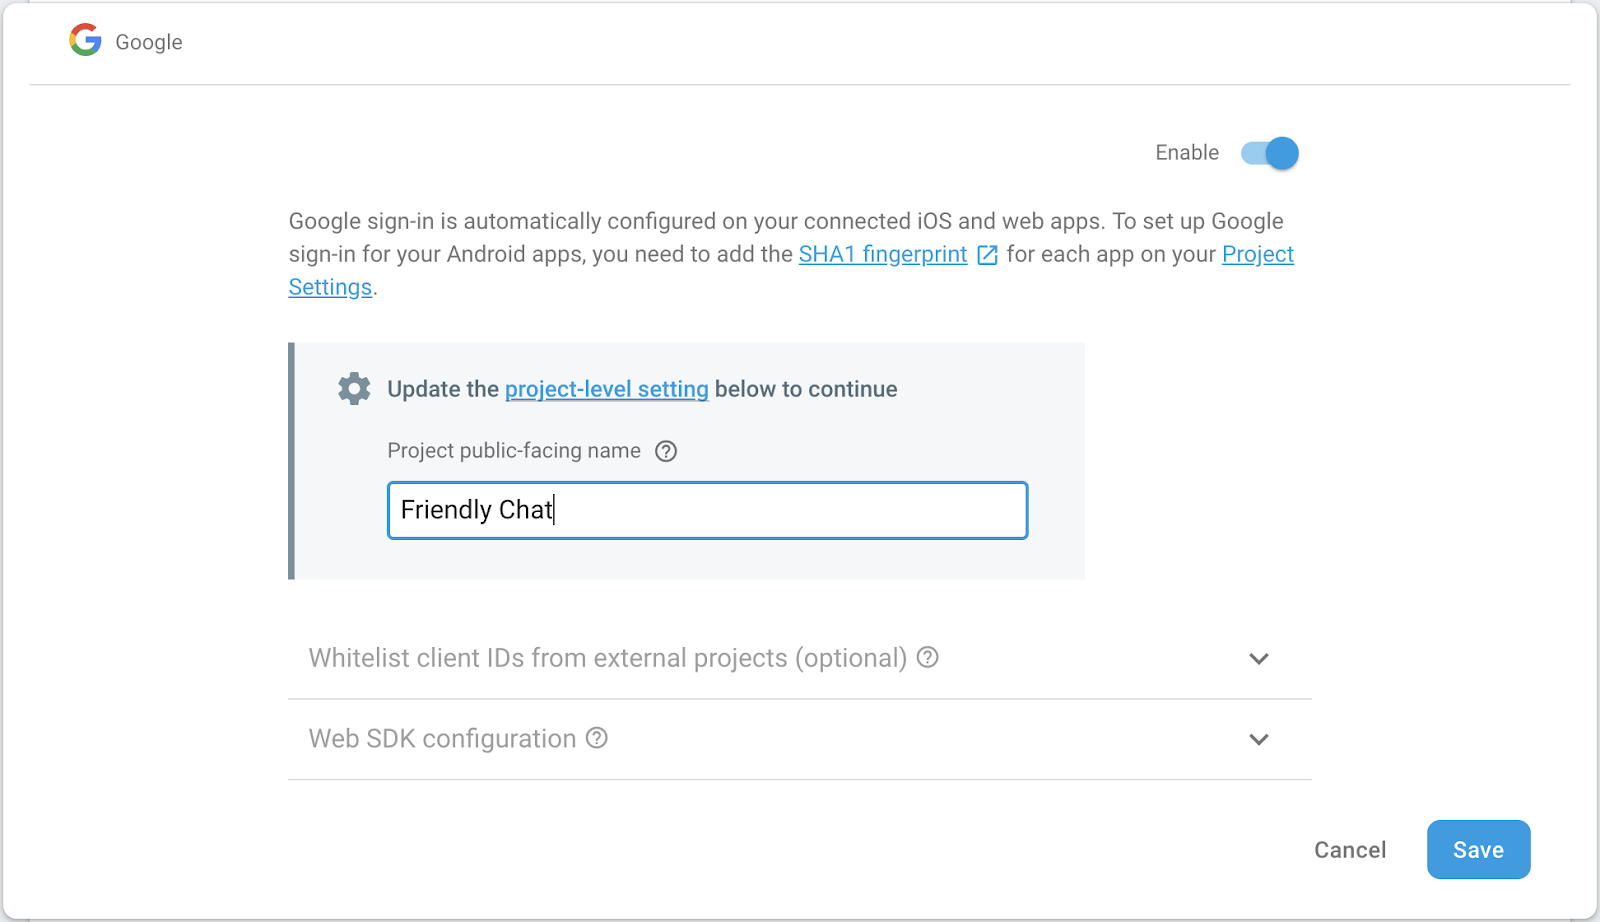
在 Firebase 控制台中,依次打开构建部分 > 身份验证 > 登录方法标签页(或点击此处前往该页面)。然后,启用 Google 登录服务提供方,并点击保存。这样一来,用户就可以使用自己的 Google 账号登录 Web 应用。
此外,您还可以将应用的公开名称设置为 Friendly Chat:
设置 Cloud Storage for Firebase
该应用使用 Cloud Storage 上传图片。
以下是在 Firebase 项目中设置 Cloud Storage for Firebase 的方法:
- 在 Firebase 控制台的左侧面板中,展开构建,然后选择存储。
- 点击开始使用。
- 为默认存储分区选择位置。
US-WEST1、US-CENTRAL1和US-EAST1中的存储分区可为 Google Cloud Storage 使用“始终免费”层级。所有其他位置的存储分区都遵循 Google Cloud Storage 价格和用量。 - 点击以测试模式开始。阅读有关安全规则的免责声明。
在未为您的存储分区添加安全规则的情况下,请不要公开分发或公开应用。 - 点击创建。
添加 Web 应用
在 Firebase 控制台上,添加一个 Web 应用。为此,请前往项目设置,然后向下滚动到添加应用。选择 Web 作为平台,勾选用于设置 Firebase Hosting 的复选框,然后注册应用并点击下一步以完成剩余步骤,最后点击继续前往控制台。
4. 安装 Firebase 命令行界面
借助 Firebase 命令行界面 (CLI),您可以在本地提供 Web 应用,并部署 Web 应用和 Cloud Functions。
如需安装或升级 CLI,请运行以下 npm 命令:
npm -g install firebase-tools
如需验证 CLI 是否已正确安装,请打开控制台并运行以下命令:
firebase --version
确保 Firebase CLI 的版本高于 4.0.0,这样它才具备 Cloud Functions 所需的全部最新功能。否则,请运行 npm install -g firebase-tools 进行升级,如上所示。
运行以下命令,向 Firebase CLI 授权:
firebase login
确保您位于 cloud-functions-start 目录中,然后设置 Firebase CLI 以使用您的 Firebase 项目:
firebase use --add
接下来,选择您的项目 ID,然后按照说明操作。系统显示提示时,您可以选择任何别名,例如 codelab。
5. 部署并运行 Web 应用
现在,您已导入并配置好项目,可以首次运行 Web 应用了!打开终端窗口,前往 cloud-functions-start 文件夹,然后使用以下命令将 Web 应用部署到 Firebase Hosting:
firebase deploy --except functions
您应该会看到以下控制台输出:
i deploying database, storage, hosting
✔  database: rules ready to deploy.
i  storage: checking rules for compilation errors...
✔  storage: rules file compiled successfully
i  hosting: preparing ./ directory for upload...
✔  hosting: ./ folder uploaded successfully
✔ storage: rules file compiled successfully
✔ hosting: 8 files uploaded successfully
i starting release process (may take several minutes)...

✔ Deploy complete!

Project Console: https://console.firebase.google.com/project/friendlychat-1234/overview
Hosting URL: https://friendlychat-1234.firebaseapp.com
打开 Web 应用
最后一行应显示托管网址。现在,Web 应用应通过此网址(格式应为 https://<project-id>.firebaseapp.com)提供。打开该网址。您应该会看到聊天应用的功能性界面。
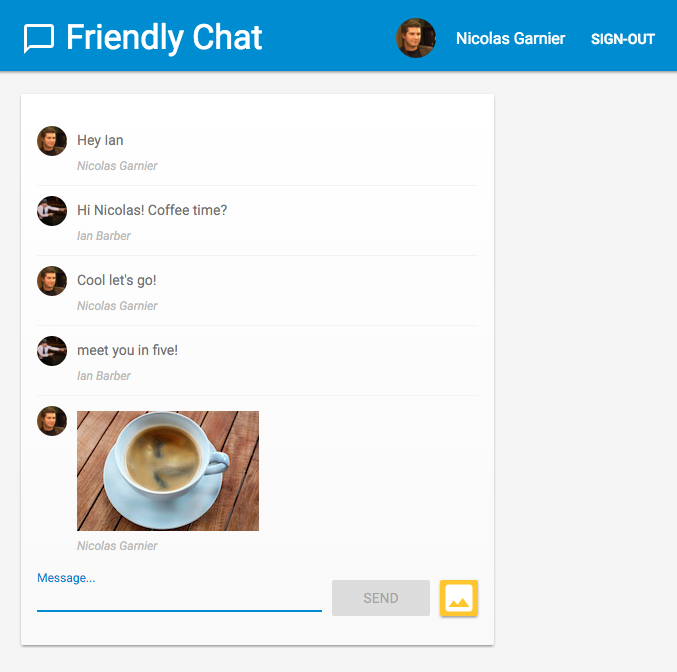
使用 SIGN-IN WITH GOOGLE 按钮登录应用,然后随意添加一些消息并发布图片:
如果您首次在新浏览器中登录该应用,请务必在系统提示时允许通知: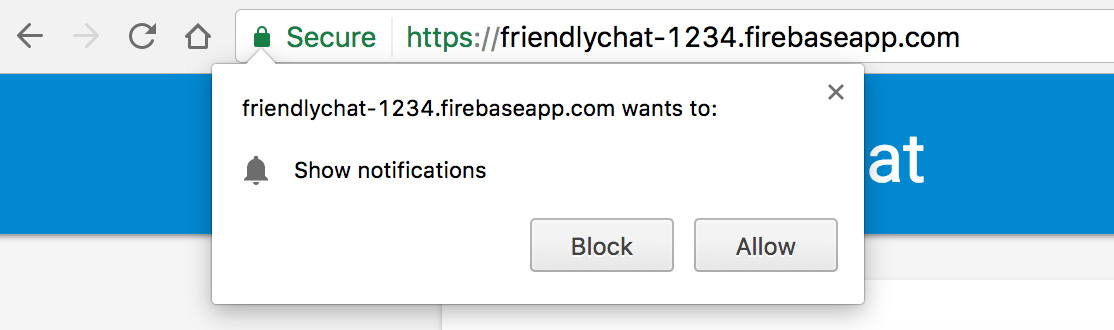
我们稍后需要启用通知。
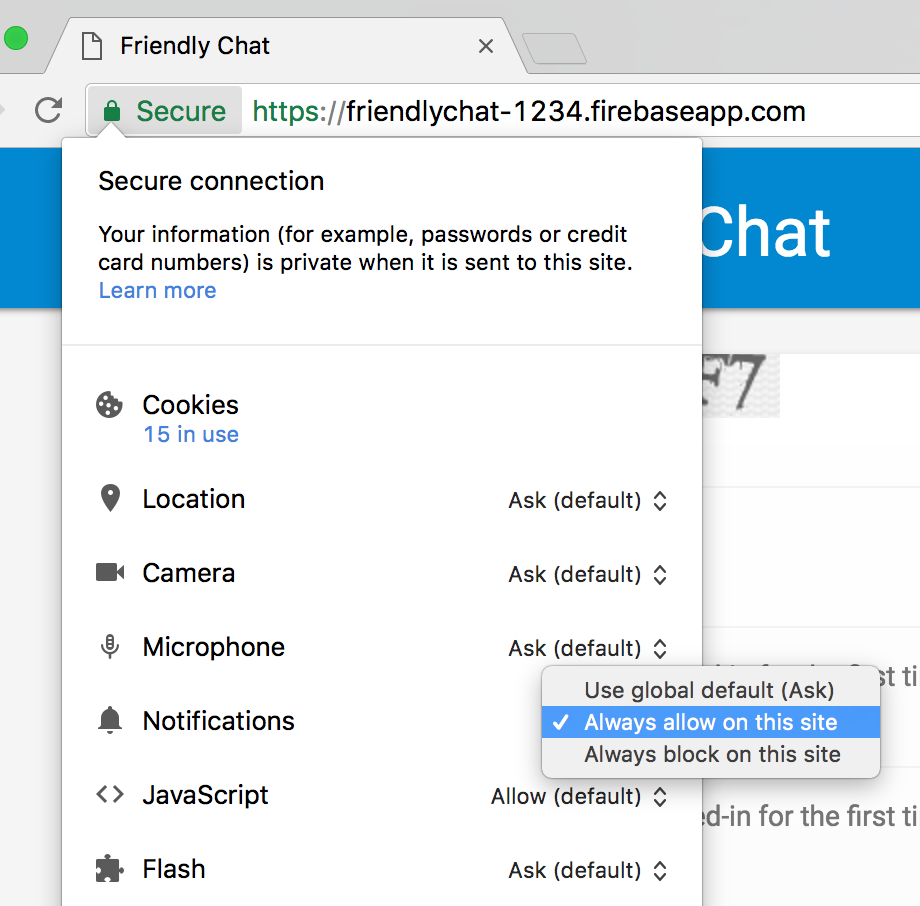
如果您不小心点击了屏蔽,可以更改此设置,方法是点击 Chrome 多功能框中网址左侧的🔒 安全按钮,然后切换通知旁边的栏:
现在,我们将使用 Firebase SDK for Cloud Functions 添加一些功能。
6. 函数目录
借助 Cloud Functions,您可以轻松地在云端运行代码,而无需设置服务器。我们将逐步介绍如何构建可对 Firebase Auth、Cloud Storage 和 Firebase Firestore 数据库事件做出响应的函数。我们先从身份验证开始。
使用 Firebase SDK for Cloud Functions 时,您的函数代码将位于 functions 目录(默认)下。您的函数代码也是一个 Node.js 应用,因此需要一个 package.json 来提供有关应用的一些信息并列出依赖项。
为方便起见,我们已创建 functions/index.js 文件,您的代码将放在其中。您可以先检查此文件,然后再继续。
cd functions
ls
如果您不熟悉 Node.js,建议您先详细了解它,然后再继续学习本 Codelab。
package.json 文件已列出两个必需的依赖项:Firebase SDK for Cloud Functions 和 Firebase Admin SDK。如需在本地安装这些文件,请前往 functions 文件夹并运行:
npm install
现在,我们来看看 index.js 文件:
index.js
/**
 * Copyright 2017 Google Inc. All Rights Reserved.
 * ...
 */

// TODO(DEVELOPER): Import the Cloud Functions for Firebase and the Firebase Admin modules here.

// TODO(DEVELOPER): Write the addWelcomeMessage Function here.

// TODO(DEVELOPER): Write the blurImages Function here.

// TODO(DEVELOPER): Write the sendNotification Function here.
我们将导入所需的模块,然后编写三个函数来替换 TODO。我们先导入所需的 Node 模块。
7. 导入 Cloud Functions 和 Firebase Admin 模块
在此 Codelab 中,您将需要两个模块:firebase-functions 用于编写 Cloud Functions 触发器和日志,而 firebase-admin 用于在具有管理员访问权限的服务器上使用 Firebase 平台来执行写入 Cloud Firestore 或发送 FCM 通知等操作。
在 index.js 文件中,将第一个 TODO 替换为以下内容:
index.js
/**
 * Copyright 2017 Google Inc. All Rights Reserved.
 * ...
 */

// Import the Firebase SDK for Google Cloud Functions.
const functions = require('firebase-functions');
// Import and initialize the Firebase Admin SDK.
const admin = require('firebase-admin');
admin.initializeApp();

// TODO(DEVELOPER): Write the addWelcomeMessage Function here.

// TODO(DEVELOPER): Write the blurImages Function here.

// TODO(DEVELOPER): Write the sendNotification Function here.
当部署到 Cloud Functions 环境或其他 Google Cloud Platform 容器时,Firebase Admin SDK 可以自动配置,而当我们调用不带任何实参的 admin.initializeApp() 时,就会发生这种情况。
现在,我们添加一个在用户首次登录聊天应用时运行的函数,并添加一条聊天消息来欢迎用户。
8. 欢迎新用户
聊天消息结构
发布到 FriendlyChat 聊天信息流中的消息会存储在 Cloud Firestore 中。我们来看看用于消息的数据结构。为此,请向聊天室发布一条新消息,内容为“Hello World”:

这应显示为:

在 Firebase 控制台中,点击构建部分下的 Firestore 数据库。您应该会看到消息集合以及包含您撰写的消息的一个文档:
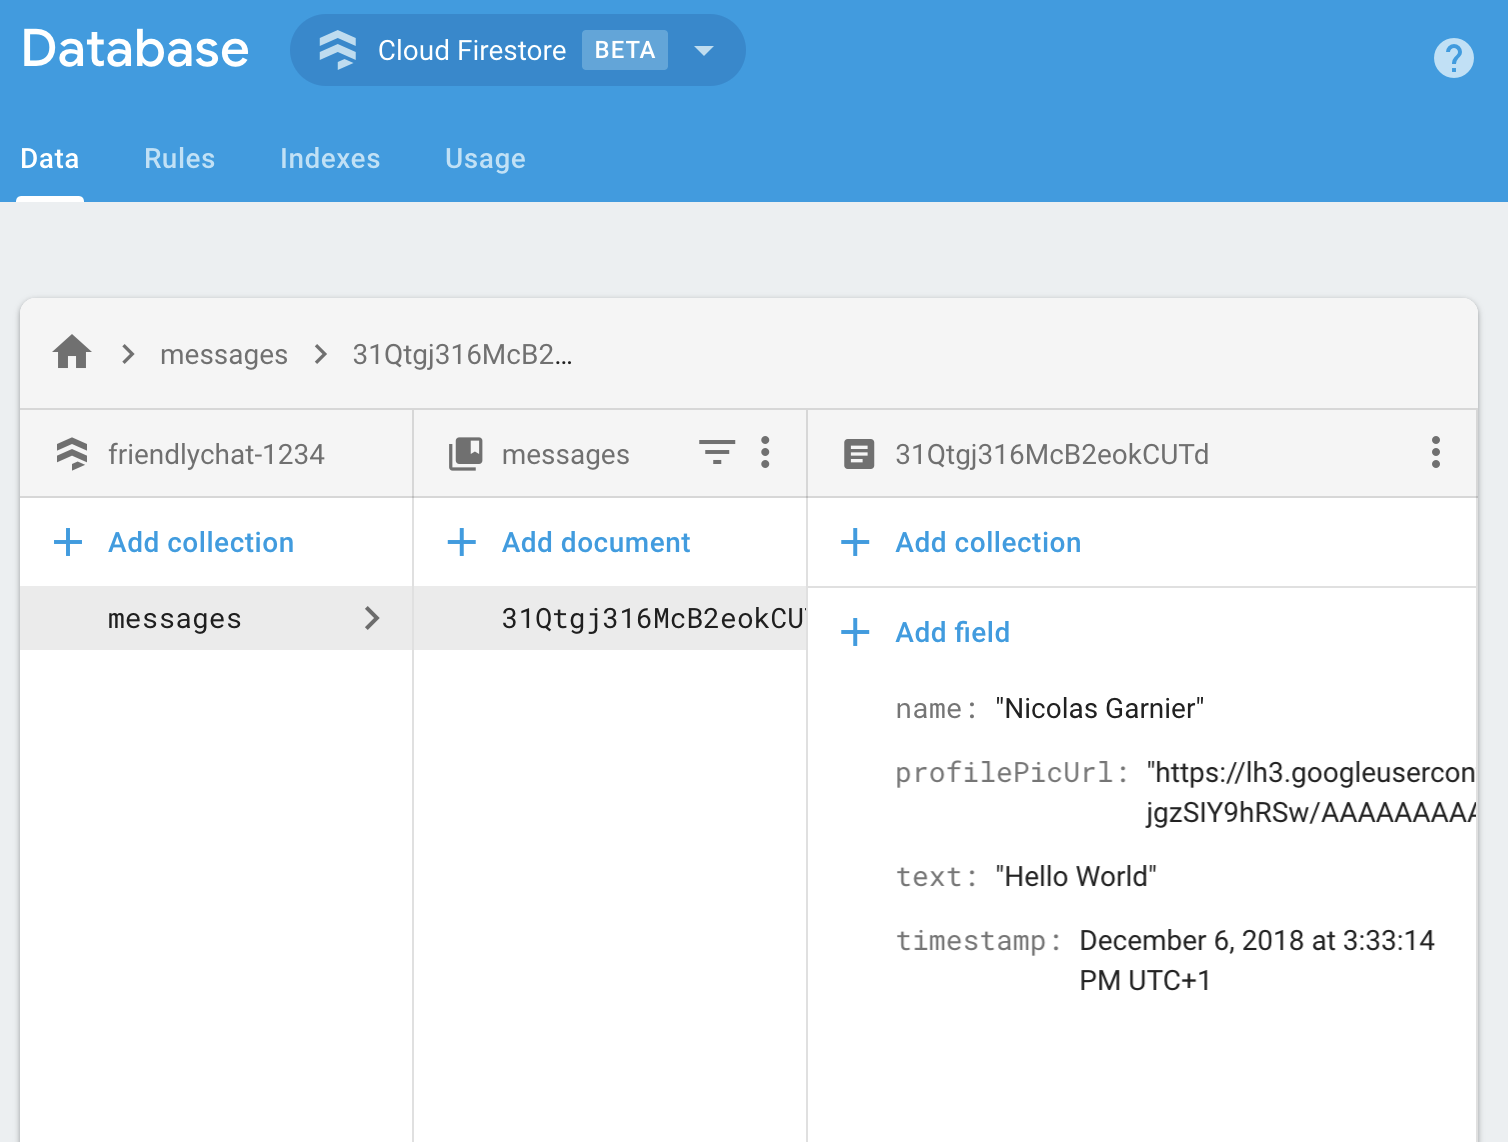
如您所见,聊天消息以文档形式存储在 Cloud Firestore 中,其中 messages 集合中添加了 name、profilePicUrl、text 和 timestamp 属性。
添加欢迎消息
第一个 Cloud Functions 函数会添加一条欢迎新用户加入聊天室的消息。为此,我们可以使用触发器 functions.auth().onCreate,该触发器会在用户首次登录 Firebase 应用时运行该函数。将 addWelcomeMessages 函数添加到 index.js 文件中:
index.js
// Adds a message that welcomes new users into the chat.
exports.addWelcomeMessages = functions.auth.user().onCreate(async (user) => {
  functions.logger.log('A new user signed in for the first time.');
  const fullName = user.displayName || 'Anonymous';

  // Saves the new welcome message into the database
  // which then displays it in the FriendlyChat clients.
  await admin.firestore().collection('messages').add({
    name: 'Firebase Bot',
    profilePicUrl: '/images/firebase-logo.png', // Firebase logo
    text: `${fullName} signed in for the first time! Welcome!`,
    timestamp: admin.firestore.FieldValue.serverTimestamp(),
  });
  functions.logger.log('Welcome message written to database.');
});
将此函数添加到特殊的 exports 对象是 Node 使该函数可在当前文件之外访问的方式,也是 Cloud Functions 所必需的。
在上面的函数中,我们将“Firebase Bot”发布的新欢迎辞添加到聊天消息列表中。为此,我们使用了 Cloud Firestore 中 messages 集合的 add 方法,聊天消息就存储在该集合中。
由于这是一项异步操作,我们需要返回 Promise,以指示 Cloud Firestore 何时完成写入,这样 Cloud Functions 就不会过早执行。
部署 Cloud Functions 函数
Cloud Functions 只有在部署后才会处于有效状态。为此,请在命令行中运行以下命令:
firebase deploy --only functions
您应该会看到以下控制台输出:
i  deploying functions
i  functions: ensuring necessary APIs are enabled...
⚠  functions: missing necessary APIs. Enabling now...
i  env: ensuring necessary APIs are enabled...
⚠  env: missing necessary APIs. Enabling now...
i  functions: waiting for APIs to activate...
i  env: waiting for APIs to activate...
✔  env: all necessary APIs are enabled
✔  functions: all necessary APIs are enabled
i  functions: preparing functions directory for uploading...
i  functions: packaged functions (X.XX KB) for uploading
✔  functions: functions folder uploaded successfully
i  starting release process (may take several minutes)...
i  functions: creating function addWelcomeMessages...
✔  functions[addWelcomeMessages]: Successful create operation.
✔  functions: all functions deployed successfully!

✔  Deploy complete!

Project Console: https://console.firebase.google.com/project/friendlypchat-1234/overview
测试函数
成功部署该函数后,您需要让用户首次登录。
- 使用托管网址(格式为
https://<project-id>.firebaseapp.com)在浏览器中打开应用。 - 对于新用户,请使用登录按钮在应用中首次登录。
- 如果您已登录该应用,可以打开 Firebase 控制台身份验证,然后从用户列表中删除您的账号。然后,重新登录。
- 登录后,系统应会自动显示欢迎消息:

9. 图片内容审核
用户可以在聊天中上传所有类型的图片,但务必要审核冒犯性图片,尤其是在公共社交平台上。在 FriendlyChat 中,发布到聊天中的图片会存储到 Cloud Storage 存储分区中。
借助 Cloud Functions,您可以使用 functions.storage().onFinalize 触发器检测新的图片上传。每当在 Cloud Storage 中上传或修改新文件时,此函数都会运行。
为了审核图片,我们将执行以下流程:
- 使用 Cloud Vision API 检查图片是否被标记为“成人”或“暴力”。
- 如果图片已被标记,请在正在运行的 Functions 实例上下载该图片。
- 使用 ImageMagick 对图片进行模糊处理。
- 将模糊处理后的图片上传到 Cloud Storage。
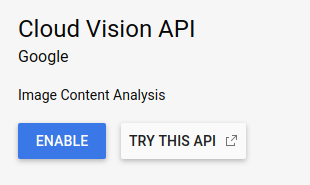
启用 Cloud Vision API
由于我们将在该函数中使用 Google Cloud Vision API,因此您必须在 Firebase 项目中启用该 API。点击此链接,然后选择您的 Firebase 项目并启用该 API:
安装依赖项
为了审核图片,我们将使用 Node.js 版 Google Cloud Vision 客户端库 @google-cloud/vision,通过 Cloud Vision API 运行图片,以检测不当图片。
如需将此软件包安装到 Cloud Functions 应用中,请运行以下 npm install --save 命令。请务必在 functions 目录中执行此操作。
npm install --save @google-cloud/vision@2.4.0
这会在本地安装相应软件包,并将其作为已声明的依赖项添加到 package.json 文件中。
导入和配置依赖项
如需导入已安装的依赖项和本部分中需要的一些 Node.js 核心模块(path、os 和 fs),请将以下行添加到 index.js 文件顶部:
index.js
const Vision = require('@google-cloud/vision');
const vision = new Vision.ImageAnnotatorClient();
const {promisify} = require('util');
const exec = promisify(require('child_process').exec);

const path = require('path');
const os = require('os');
const fs = require('fs');
由于您的函数将在 Google Cloud 环境中运行,因此无需配置 Cloud Storage 和 Cloud Vision 库:它们将自动配置为使用您的项目。
检测不当图片
您将使用 functions.storage.onChange Cloud Functions 触发器,该触发器会在 Cloud Storage 存储分区中创建或修改文件或文件夹后立即运行您的代码。将 blurOffensiveImages 函数添加到 index.js 文件中:
index.js
// Checks if uploaded images are flagged as Adult or Violence and if so blurs them.
exports.blurOffensiveImages = functions.runWith({memory: '2GB'}).storage.object().onFinalize(
    async (object) => {
      const imageUri = `gs://${object.bucket}/${object.name}`;
      // Check the image content using the Cloud Vision API.
      const batchAnnotateImagesResponse = await vision.safeSearchDetection(imageUri);
      const safeSearchResult = batchAnnotateImagesResponse[0].safeSearchAnnotation;
      const Likelihood = Vision.protos.google.cloud.vision.v1.Likelihood;
      if (Likelihood[safeSearchResult.adult] >= Likelihood.LIKELY ||
          Likelihood[safeSearchResult.violence] >= Likelihood.LIKELY) {
        functions.logger.log('The image', object.name, 'has been detected as inappropriate.');
        return blurImage(object.name);
      }
      functions.logger.log('The image', object.name, 'has been detected as OK.');
    });
请注意,我们添加了一些将运行该函数的 Cloud Functions 实例的配置。通过 .runWith({memory: '2GB'}),我们请求实例获得 2GB 的内存,而不是默认内存,因为此函数需要大量内存。
当函数被触发时,系统会通过 Cloud Vision API 运行图片,以检测图片是否被标记为成人或暴力内容。如果根据这些标准检测到图片不当,我们会模糊处理该图片,这将在 blurImage 函数中完成,我们将在下文中看到这一点。
模糊处理图片
在 index.js 文件中添加以下 blurImage 函数:
index.js
// Blurs the given image located in the given bucket using ImageMagick.
async function blurImage(filePath) {
  const tempLocalFile = path.join(os.tmpdir(), path.basename(filePath));
  const messageId = filePath.split(path.sep)[1];
  const bucket = admin.storage().bucket();

  // Download file from bucket.
  await bucket.file(filePath).download({destination: tempLocalFile});
  functions.logger.log('Image has been downloaded to', tempLocalFile);
  // Blur the image using ImageMagick.
  await exec(`convert "${tempLocalFile}" -channel RGBA -blur 0x24 "${tempLocalFile}"`);
  functions.logger.log('Image has been blurred');
  // Uploading the Blurred image back into the bucket.
  await bucket.upload(tempLocalFile, {destination: filePath});
  functions.logger.log('Blurred image has been uploaded to', filePath);
  // Deleting the local file to free up disk space.
  fs.unlinkSync(tempLocalFile);
  functions.logger.log('Deleted local file.');
  // Indicate that the message has been moderated.
  await admin.firestore().collection('messages').doc(messageId).update({moderated: true});
  functions.logger.log('Marked the image as moderated in the database.');
}
在上述函数中,系统会从 Cloud Storage 下载图片二进制文件。然后,使用 ImageMagick 的 convert 工具对图片进行模糊处理,并将模糊处理后的版本重新上传到存储分区。接下来,我们删除 Cloud Functions 实例上的文件以释放一些磁盘空间,这样做是因为同一个 Cloud Functions 实例可能会被重复使用,如果不清理文件,可能会耗尽磁盘空间。最后,我们向聊天消息添加了一个布尔值,用于指示图片是否经过审核,这会触发客户端刷新消息。
部署函数
只有在部署函数后,该函数才会处于有效状态。在命令行中,运行 firebase deploy --only functions:
firebase deploy --only functions
您应该会看到以下控制台输出:
i  deploying functions
i  functions: ensuring necessary APIs are enabled...
✔  functions: all necessary APIs are enabled
i  functions: preparing functions directory for uploading...
i  functions: packaged functions (X.XX KB) for uploading
✔  functions: functions folder uploaded successfully
i  starting release process (may take several minutes)...
i  functions: updating function addWelcomeMessages...
i  functions: creating function blurOffensiveImages...
✔  functions[addWelcomeMessages]: Successful update operation.
✔  functions[blurOffensiveImages]: Successful create operation.
✔  functions: all functions deployed successfully!

✔  Deploy complete!

Project Console: https://console.firebase.google.com/project/friendlychat-1234/overview
测试函数
函数成功部署后:
- 使用托管网址(格式为
https://<project-id>.firebaseapp.com)在浏览器中打开应用。 - 登录应用后,上传图片:

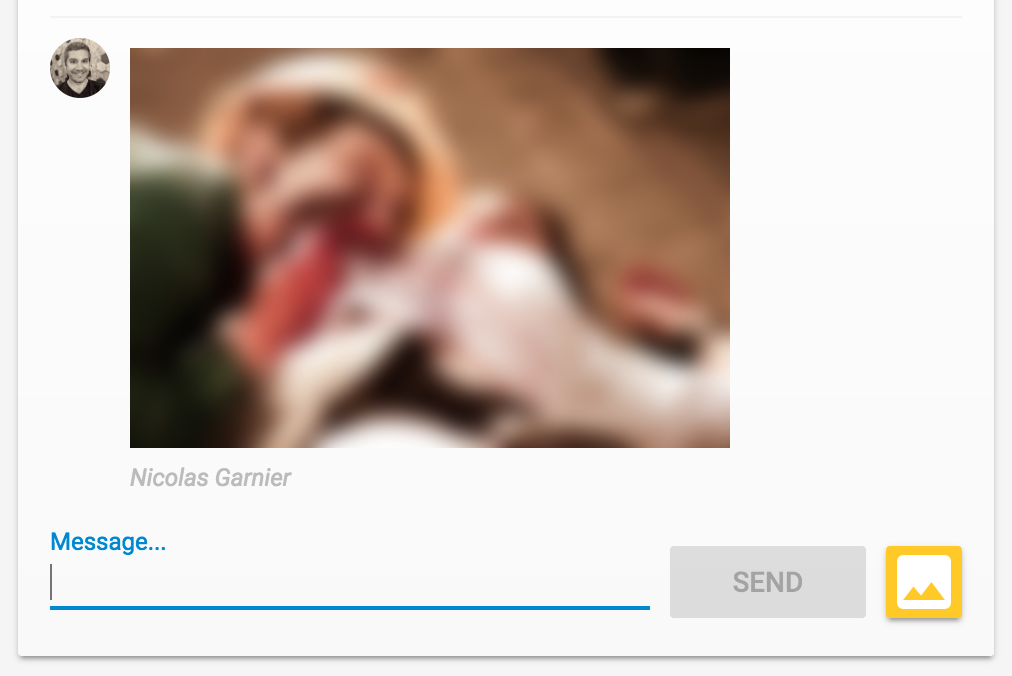
- 选择一张令人反感的图片进行上传(也可以使用这张肉食僵尸图片),稍等片刻,您应该会看到帖子刷新,图片已模糊处理:
10. 新消息通知
在本部分中,您将添加一个 Cloud Functions 函数,以便在发布新消息时向聊天参与者发送通知。
借助 Firebase Cloud Messaging (FCM),您可以跨平台可靠地向用户发送通知。如需向用户发送通知,您需要获取其 FCM 设备令牌。我们使用的聊天 Web 应用已在用户首次在新浏览器或设备上打开该应用时收集设备令牌。这些令牌存储在 Cloud Firestore 的 fcmTokens 集合中。
如果您想了解如何在 Web 应用上获取 FCM 设备令牌,可以完成 Firebase Web Codelab。
发送通知
为了检测何时发布了新消息,您将使用 functions.firestore.document().onCreate Cloud Functions 触发器,当在 Cloud Firestore 的给定路径中创建新对象时,该触发器会运行您的代码。将 sendNotifications 函数添加到 index.js 文件中:
index.js
// Sends a notifications to all users when a new message is posted.
exports.sendNotifications = functions.firestore.document('messages/{messageId}').onCreate(
  async (snapshot) => {
    // Notification details.
    const text = snapshot.data().text;
    const payload = {
      notification: {
        title: `${snapshot.data().name} posted ${text ? 'a message' : 'an image'}`,
        body: text ? (text.length <= 100 ? text : text.substring(0, 97) + '...') : '',
        icon: snapshot.data().profilePicUrl || '/images/profile_placeholder.png',
        click_action: `https://${process.env.GCLOUD_PROJECT}.firebaseapp.com`,
      }
    };

    // Get the list of device tokens.
    const allTokens = await admin.firestore().collection('fcmTokens').get();
    const tokens = [];
    allTokens.forEach((tokenDoc) => {
      tokens.push(tokenDoc.id);
    });

    if (tokens.length > 0) {
      // Send notifications to all tokens.
      const response = await admin.messaging().sendToDevice(tokens, payload);
      await cleanupTokens(response, tokens);
      functions.logger.log('Notifications have been sent and tokens cleaned up.');
    }
  });
在上面的函数中,我们从 Cloud Firestore 数据库中收集所有用户的设备令牌,并使用 admin.messaging().sendToDevice 函数向每个用户发送通知。
清理令牌
最后,我们希望移除不再有效的令牌。当浏览器或设备不再使用我们之前从用户那里获得的令牌时,就会发生这种情况。例如,如果用户已撤消浏览器会话的通知权限,就会发生这种情况。为此,请在 index.js 文件中添加以下 cleanupTokens 函数:
index.js
// Cleans up the tokens that are no longer valid.
function cleanupTokens(response, tokens) {
 // For each notification we check if there was an error.
 const tokensDelete = [];
 response.results.forEach((result, index) => {
   const error = result.error;
   if (error) {
     functions.logger.error('Failure sending notification to', tokens[index], error);
     // Cleanup the tokens that are not registered anymore.
     if (error.code === 'messaging/invalid-registration-token' ||
         error.code === 'messaging/registration-token-not-registered') {
       const deleteTask = admin.firestore().collection('fcmTokens').doc(tokens[index]).delete();
       tokensDelete.push(deleteTask);
     }
   }
 });
 return Promise.all(tokensDelete);
}
部署函数
只有在部署函数后,该函数才会处于有效状态。如需部署函数,请在命令行中运行以下命令:
firebase deploy --only functions
您应该会看到以下控制台输出:
i  deploying functions
i  functions: ensuring necessary APIs are enabled...
✔  functions: all necessary APIs are enabled
i  functions: preparing functions directory for uploading...
i  functions: packaged functions (X.XX KB) for uploading
✔  functions: functions folder uploaded successfully
i  starting release process (may take several minutes)...
i  functions: updating function addWelcomeMessages...
i  functions: updating function blurOffensiveImages...
i  functions: creating function sendNotifications...
✔  functions[addWelcomeMessages]: Successful update operation.
✔  functions[blurOffensiveImages]: Successful updating operation.
✔  functions[sendNotifications]: Successful create operation.
✔  functions: all functions deployed successfully!

✔  Deploy complete!

Project Console: https://console.firebase.google.com/project/friendlychat-1234/overview
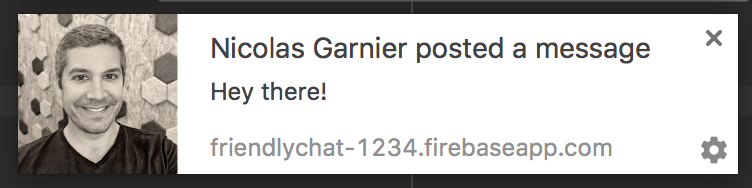
测试函数
- 函数成功部署后,使用托管网址(格式为
https://<project-id>.firebaseapp.com)在浏览器中打开应用。 - 如果您是首次登录该应用,请务必在系统提示时允许通知:
- 关闭聊天应用标签页或显示其他标签页:只有当应用在后台运行时,才会显示通知。如果您想了解如何在应用在前台运行时接收消息,请参阅我们的文档。
- 使用其他浏览器(或无痕式窗口)登录该应用,然后发布一条消息。您应该会看到第一个浏览器显示的通知:
11. 恭喜!
您已使用 Firebase SDK for Cloud Functions 并向聊天应用添加了服务器端组件。
所学内容
- 使用 Firebase SDK for Cloud Functions 编写 Cloud Functions。
- 根据 Auth、Cloud Storage 和 Cloud Firestore 事件触发 Cloud Functions 函数。
- 为您的 Web 应用添加 Firebase Cloud Messaging 支持。
- 使用 Firebase CLI 部署 Cloud Functions 函数。
后续步骤
- 了解其他 Cloud Functions 触发器类型。
- 将 Firebase 和 Cloud Functions 与您自己的应用搭配使用。