1. 准备工作
Cloud Firestore 和 Cloud Functions 等无服务器后端工具非常易于使用,但很难进行测试。借助 Firebase Local Emulator Suite,您可以在开发机器上运行这些服务的本地版本,从而快速安全地开发应用。
前提条件
- 一个简单的编辑器,例如 Visual Studio Code、Atom 或 Sublime Text
- Node.js 10.0.0 或更高版本(如需安装 Node.js,请使用 nvm;如需查看您的版本,请运行
node --version) - Java 7 或更高版本(如需安装 Java,请按照这些说明操作;如需查看您的版本,请运行
java -version)
您将执行的操作
在此 Codelab 中,您将运行并调试一个由多项 Firebase 服务提供支持的简单在线购物应用:
- Cloud Firestore:一种具有实时功能的全球可扩缩无服务器 NoSQL 数据库。
- Cloud Functions:一种无服务器后端代码,可响应事件或 HTTP 请求。
- Firebase Authentication:一项托管式身份验证服务,可与其他 Firebase 产品集成。
- Firebase Hosting:快速安全的 Web 应用托管服务。
您将应用连接到 Emulator Suite,以启用本地开发。
您还将了解如何:
- 如何将应用连接到 Emulator Suite,以及各个模拟器如何连接。
- Firebase 安全规则的工作原理,以及如何针对本地模拟器测试 Firestore 安全规则。
- 如何编写由 Firestore 事件触发的 Firebase 函数,以及如何编写针对 Emulator Suite 运行的集成测试。
2. 设置
获取源代码
在此 Codelab 中,您将从一个几乎完整的 The Fire Store 示例版本开始,因此您需要做的第一件事是克隆源代码:
$ git clone https://github.com/firebase/emulators-codelab.git
然后,进入 Codelab 目录,您将在本 Codelab 的剩余部分中在此目录中工作:
$ cd emulators-codelab/codelab-initial-state
现在,安装依赖项,以便您可以运行代码。如果您使用的是较慢的互联网连接,这可能需要一两分钟:
# Move into the functions directory
$ cd functions

# Install dependencies
$ npm install

# Move back into the previous directory
$ cd ../
获取 Firebase CLI
模拟器套件是 Firebase CLI(命令行界面)的一部分,您可以使用以下命令将其安装到您的机器上:
$ npm install -g firebase-tools
接下来,确认您使用的是最新版本的 CLI。此 Codelab 应该适用于 9.0.0 或更高版本,但更高版本包含更多 bug 修复。
$ firebase --version
9.6.0
关联到 Firebase 项目
创建 Firebase 项目
- 使用您的 Google 账号登录 Firebase 控制台。
- 点击相应按钮以创建新项目,然后输入项目名称(例如
Emulators Codelab)。
- 点击继续。
- 如果看到相关提示,请查看并接受 Firebase 条款,然后点击继续。
- (可选)在 Firebase 控制台中启用 AI 辅助功能(称为“Gemini in Firebase”)。
- 在此 Codelab 中,您不需要使用 Google Analytics,因此请关闭 Google Analytics 选项。
- 点击创建项目,等待项目完成预配,然后点击继续。
将代码关联到 Firebase 项目
现在,我们需要将此代码与您的 Firebase 项目相关联。首先,运行以下命令以登录 Firebase CLI:
$ firebase login
接下来,运行以下命令以创建项目别名。将 $YOUR_PROJECT_ID 替换为您的 Firebase 项目 ID。
$ firebase use $YOUR_PROJECT_ID
现在,您可以运行应用了!
3. 运行模拟器
在本部分中,您将在本地运行应用。这意味着,现在可以启动 Emulator Suite 了。
启动模拟器
在 Codelab 源目录中,运行以下命令以启动模拟器:
$ firebase emulators:start --import=./seed
您应该会看到类似于以下内容的输出:
$ firebase emulators:start --import=./seed
i  emulators: Starting emulators: auth, functions, firestore, hosting
⚠  functions: The following emulators are not running, calls to these services from the Functions emulator will affect production: database, pubsub
i  firestore: Importing data from /Users/samstern/Projects/emulators-codelab/codelab-initial-state/seed/firestore_export/firestore_export.overall_export_metadata
i  firestore: Firestore Emulator logging to firestore-debug.log
i  hosting: Serving hosting files from: public
✔  hosting: Local server: http://127.0.0.1:5000
i  ui: Emulator UI logging to ui-debug.log
i  functions: Watching "/Users/samstern/Projects/emulators-codelab/codelab-initial-state/functions" for Cloud Functions...
✔  functions[calculateCart]: firestore function initialized.

┌─────────────────────────────────────────────────────────────┐
│ ✔  All emulators ready! It is now safe to connect your app. │
│ i  View Emulator UI at http://127.0.0.1:4000                │
└─────────────────────────────────────────────────────────────┘

┌────────────────┬────────────────┬─────────────────────────────────┐
│ Emulator       │ Host:Port      │ View in Emulator UI             │
├────────────────┼────────────────┼─────────────────────────────────┤
│ Authentication │ 127.0.0.1:9099 │ http://127.0.0.1:4000/auth      │
├────────────────┼────────────────┼─────────────────────────────────┤
│ Functions      │ 127.0.0.1:5001 │ http://127.0.0.1:4000/functions │
├────────────────┼────────────────┼─────────────────────────────────┤
│ Firestore      │ 127.0.0.1:8080 │ http://127.0.0.1:4000/firestore │
├────────────────┼────────────────┼─────────────────────────────────┤
│ Hosting        │ 127.0.0.1:5000 │ n/a                             │
└────────────────┴────────────────┴─────────────────────────────────┘
  Emulator Hub running at 127.0.0.1:4400
  Other reserved ports: 4500

Issues? Report them at https://github.com/firebase/firebase-tools/issues and attach the *-debug.log files.
看到所有模拟器均已启动消息后,即可开始使用该应用。
将 Web 应用连接到模拟器
根据日志中的表格,我们可以看到 Cloud Firestore 模拟器正在侦听端口 8080,而 Authentication 模拟器正在侦听端口 9099。
┌────────────────┬────────────────┬─────────────────────────────────┐
│ Emulator       │ Host:Port      │ View in Emulator UI             │
├────────────────┼────────────────┼─────────────────────────────────┤
│ Authentication │ 127.0.0.1:9099 │ http://127.0.0.1:4000/auth      │
├────────────────┼────────────────┼─────────────────────────────────┤
│ Functions      │ 127.0.0.1:5001 │ http://127.0.0.1:4000/functions │
├────────────────┼────────────────┼─────────────────────────────────┤
│ Firestore      │ 127.0.0.1:8080 │ http://127.0.0.1:4000/firestore │
├────────────────┼────────────────┼─────────────────────────────────┤
│ Hosting        │ 127.0.0.1:5000 │ n/a                             │
└────────────────┴────────────────┴─────────────────────────────────┘
接下来,我们将前端代码连接到模拟器,而不是连接到正式版。打开 public/js/homepage.js 文件,然后找到 onDocumentReady 函数。我们可以看到,该代码访问了标准 Firestore 和 Auth 实例:
public/js/homepage.js
  const auth = firebaseApp.auth();
  const db = firebaseApp.firestore();
让我们更新 db 和 auth 对象,使其指向本地模拟器:
public/js/homepage.js
  const auth = firebaseApp.auth();
  const db = firebaseApp.firestore();

  // ADD THESE LINES
  if (location.hostname === "127.0.0.1") {
    console.log("127.0.0.1 detected!");
    auth.useEmulator("http://127.0.0.1:9099");
    db.useEmulator("127.0.0.1", 8080);
  }
现在,当应用在本地机器上运行时(由 Hosting 模拟器提供),Firestore 客户端也会指向本地模拟器,而不是生产数据库。
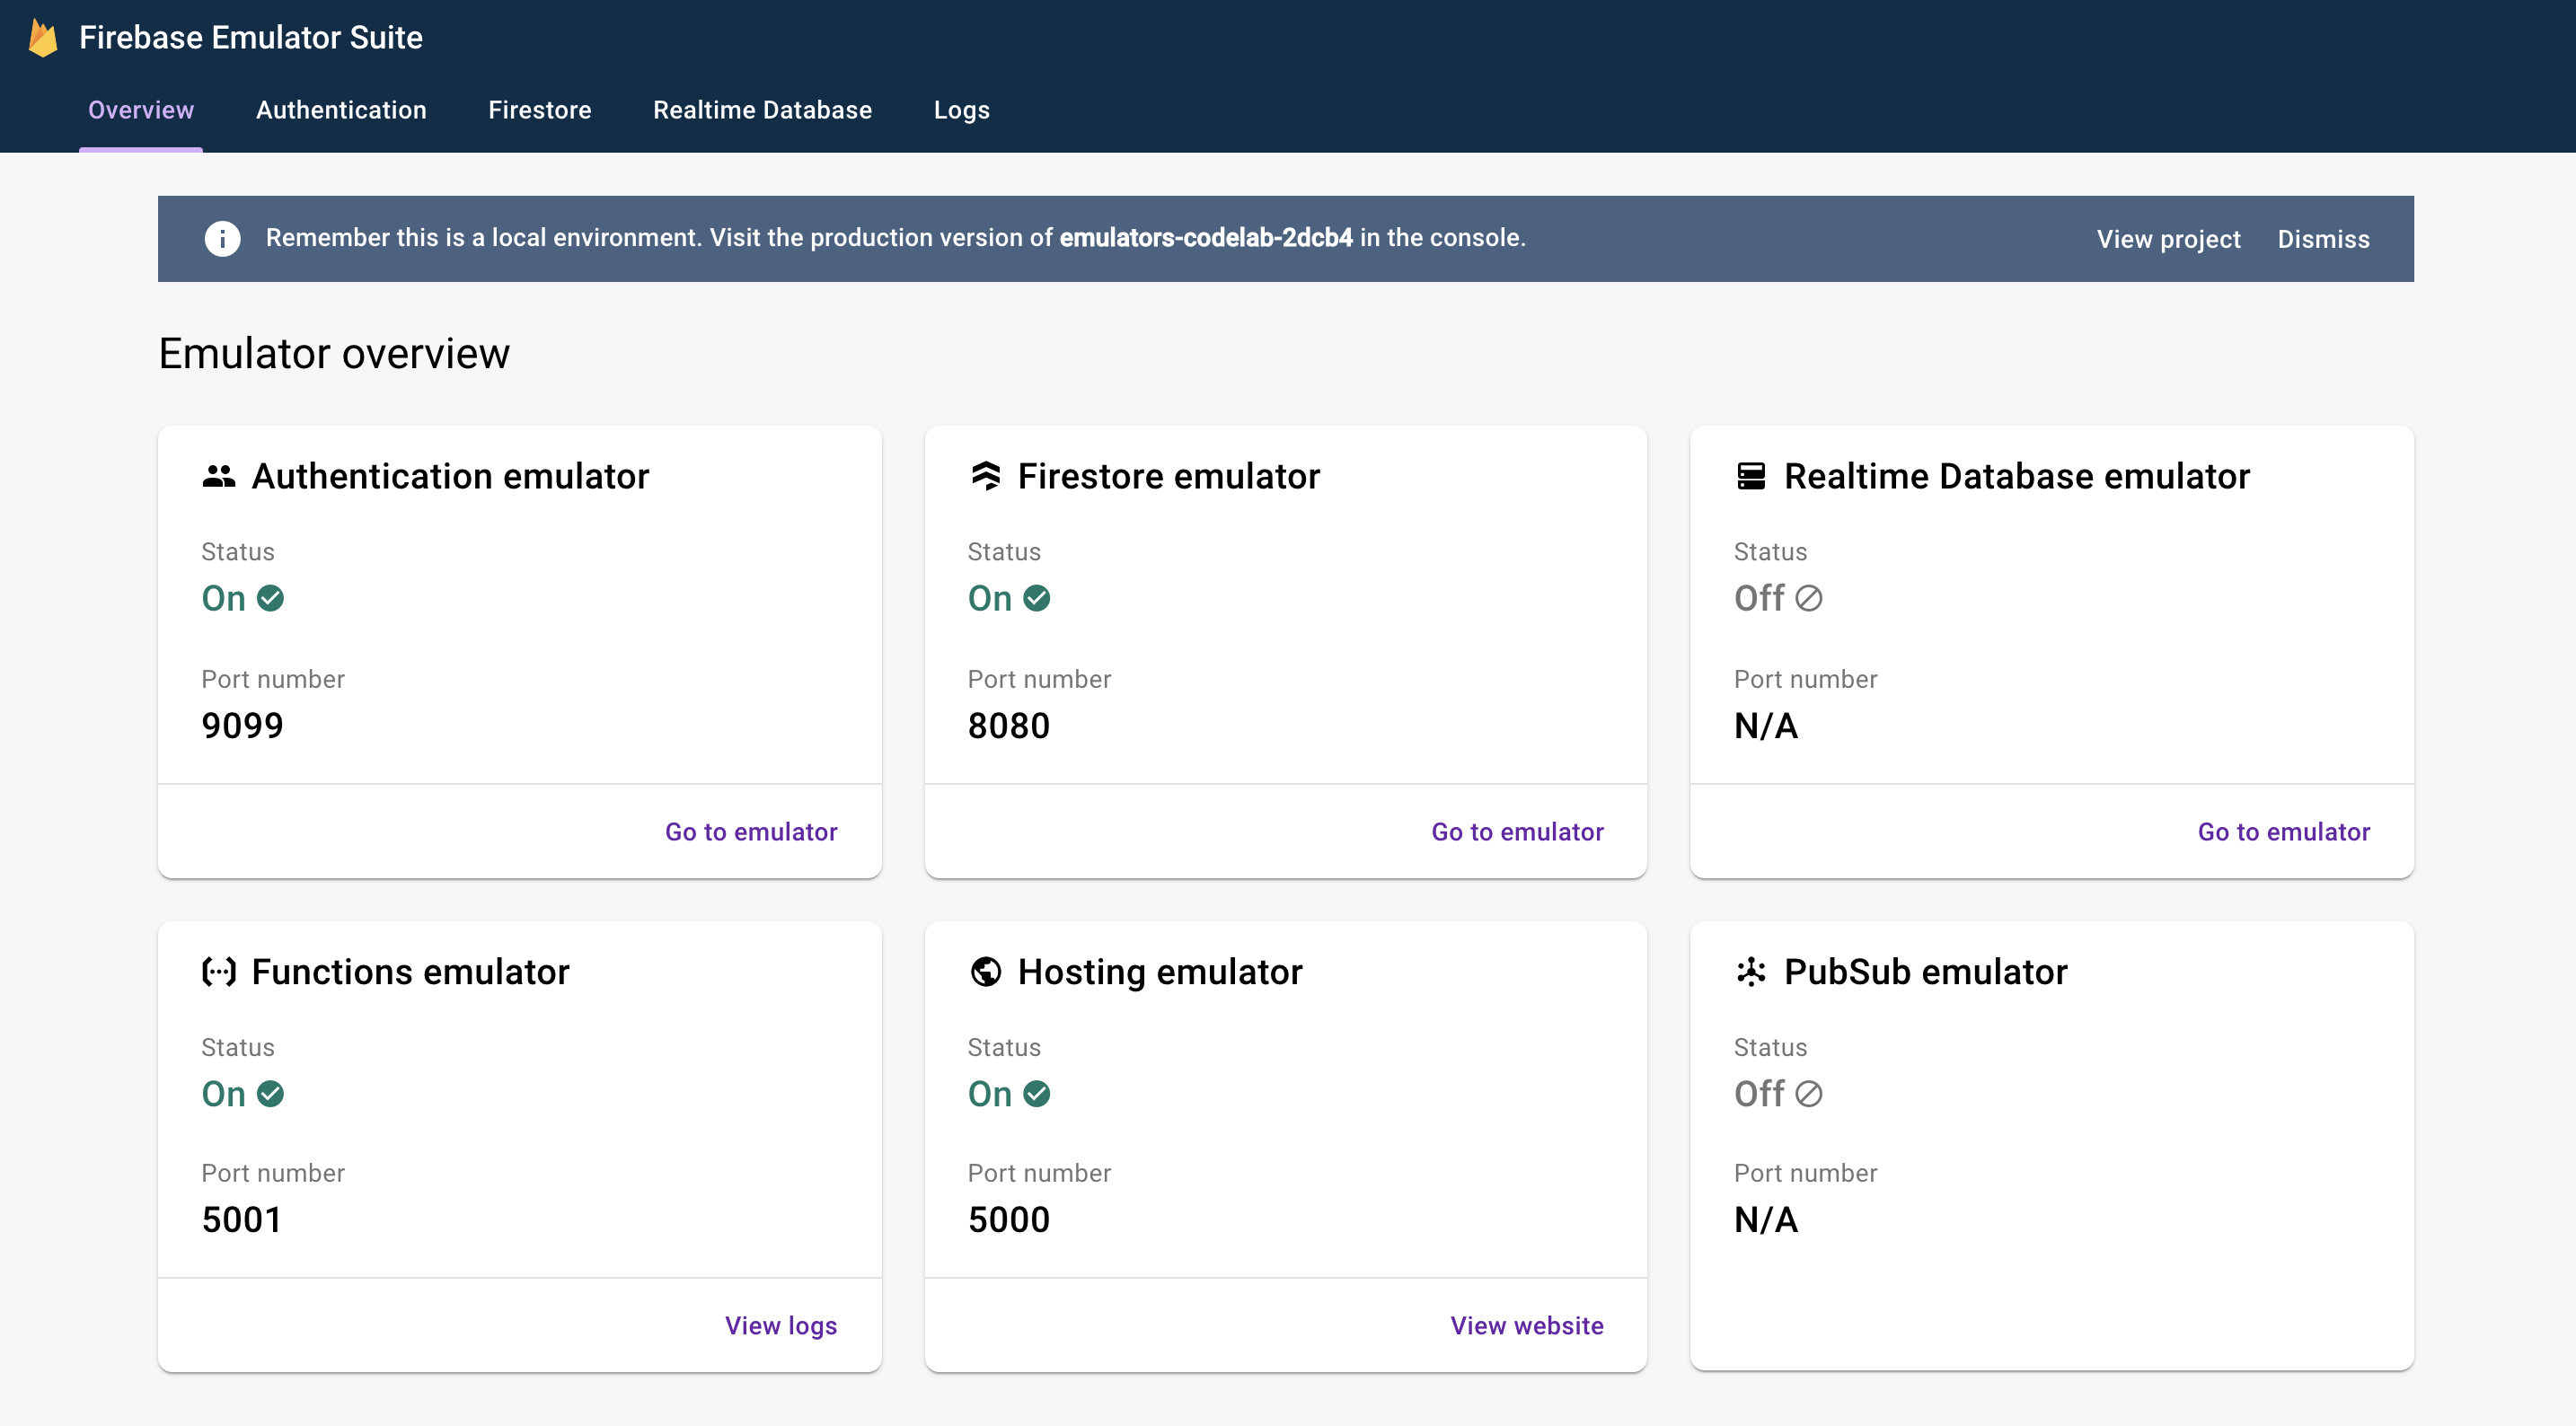
打开 EmulatorUI
在网络浏览器中,前往 http://127.0.0.1:4000/。您应该会看到 Emulator Suite 界面。
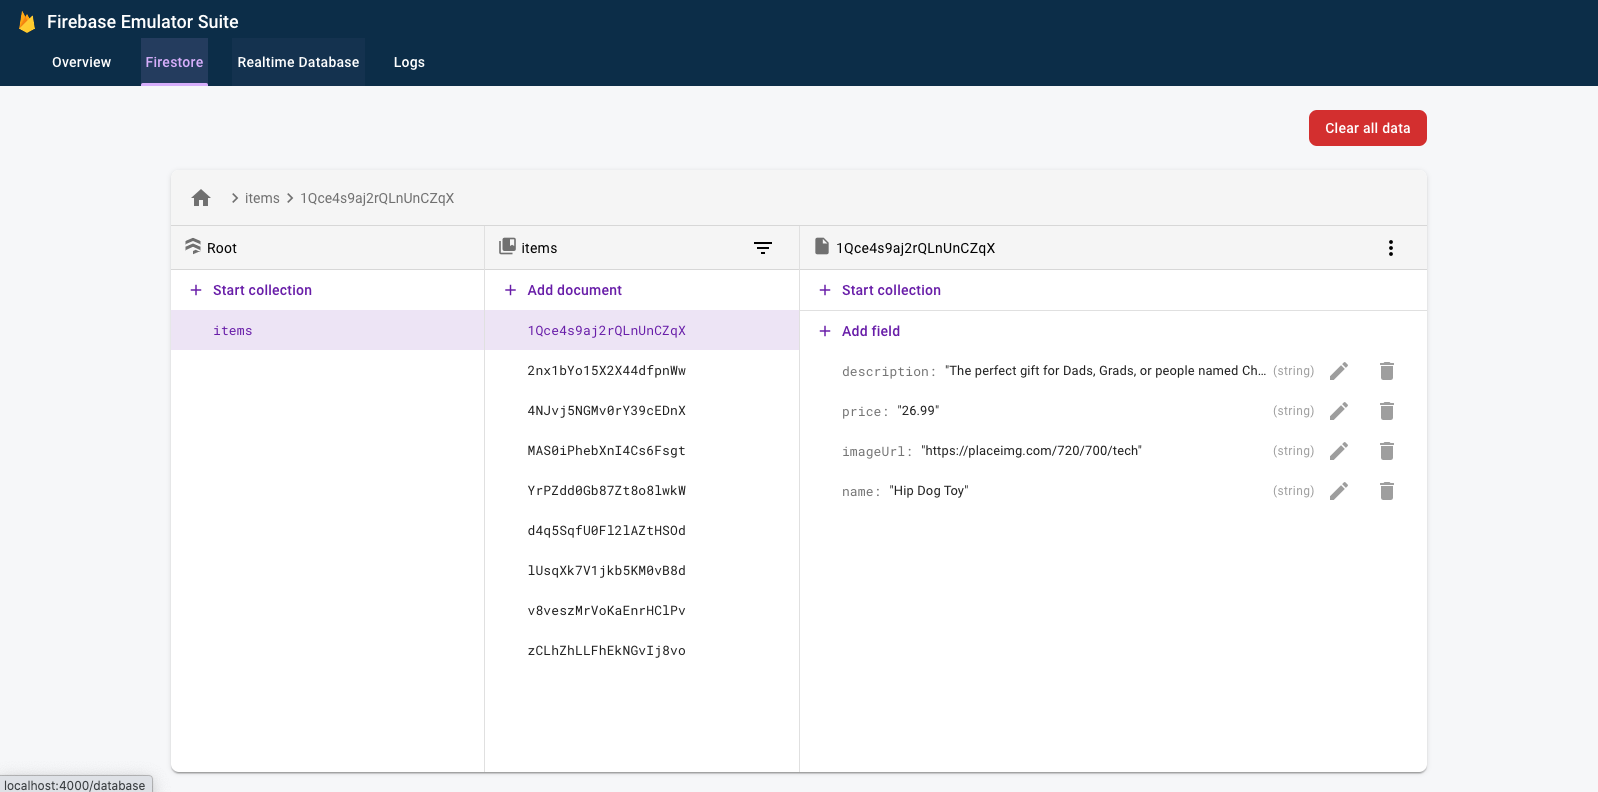
点击可查看 Firestore 模拟器的界面。由于使用 --import 标志导入的数据,items 集合已包含数据。
4. 运行应用
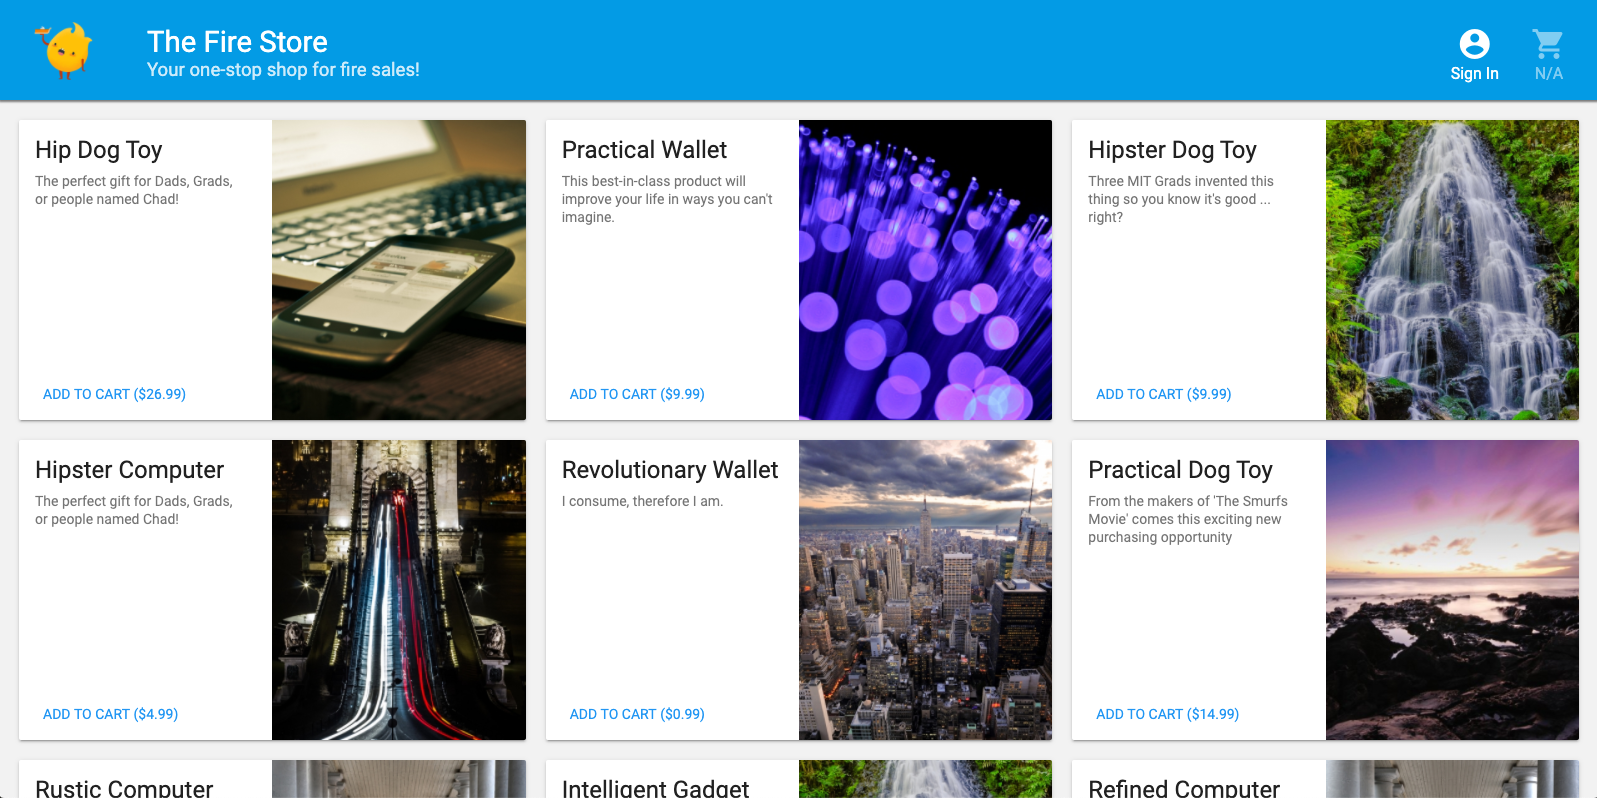
打开应用
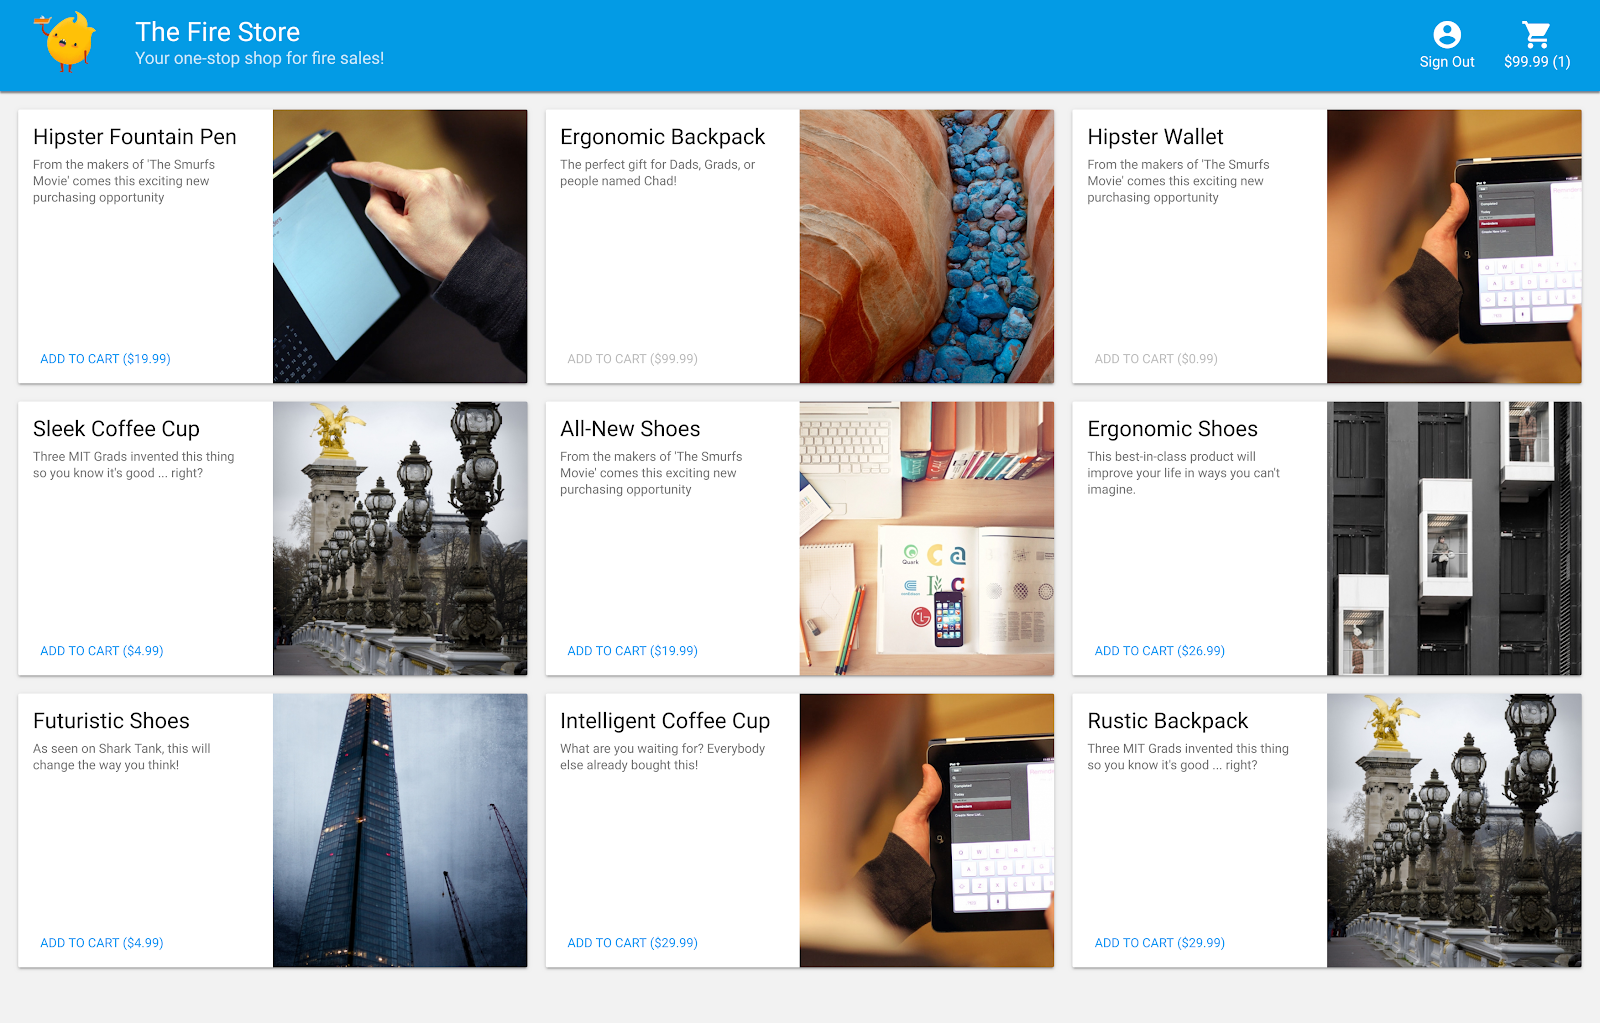
在网络浏览器中,前往 http://127.0.0.1:5000,您应该会看到在本地机器上运行的 Fire Store!
使用应用
在首页上选择商品,然后点击添加到购物车。遗憾的是,您会遇到以下错误:
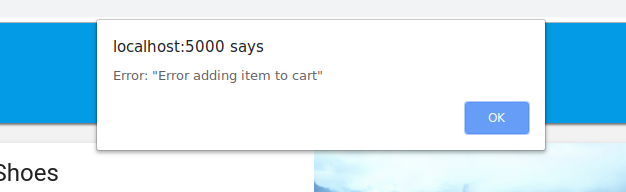
让我们修复这个 bug!由于所有内容都在模拟器中运行,因此我们可以进行实验,而不必担心影响真实数据。
5. 调试应用
查找 bug
好的,我们来看看 Chrome 开发者控制台。按 Control+Shift+J(Windows、Linux、ChromeOS)或 Command+Option+J (Mac) 可在控制台上看到错误:

addToCart 方法中似乎存在一些错误,我们来看一下。在该方法中,我们尝试访问名为 uid 的内容,为什么它会是 null?目前,该方法在 public/js/homepage.js 中如下所示:
public/js/homepage.js
  addToCart(id, itemData) {
    console.log("addToCart", id, JSON.stringify(itemData));
    return this.db
      .collection("carts")
      .doc(this.auth.currentUser.uid)
      .collection("items")
      .doc(id)
      .set(itemData);
  }
啊哈!我们未登录应用。根据 Firebase Authentication 文档,当我们未登录时,auth.currentUser 为 null。我们来添加一项检查:
public/js/homepage.js
  addToCart(id, itemData) {
    // ADD THESE LINES
    if (this.auth.currentUser === null) {
      this.showError("You must be signed in!");
      return;
    }

    // ...
  }
测试应用
现在,刷新页面,然后点击添加到购物车。这次,您应该会收到更友好的错误消息:
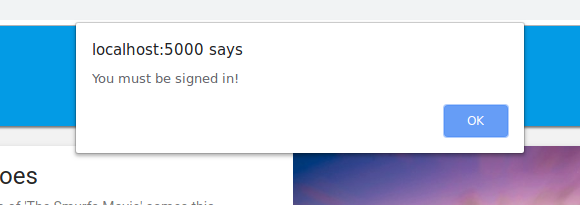
不过,如果您点击顶部工具栏中的登录,然后再次点击添加到购物车,您会发现购物车已更新。
不过,这些数字看起来完全不正确:

别担心,我们很快就会修复该 bug。首先,我们来深入了解一下您将商品添加到购物车时实际发生了什么。
6. 本地函数触发器
点击添加到购物车会触发一系列涉及多个模拟器的事件。在 Firebase CLI 日志中,您应该会在将商品添加到购物车后看到类似以下内容的消息:
i  functions: Beginning execution of "calculateCart"
i  functions: Finished "calculateCart" in ~1s
以下四个关键事件的发生导致了您看到的这些日志和界面更新:

1) Firestore 写入 - 客户端
系统会向 Firestore 集合 /carts/{cartId}/items/{itemId}/ 添加新文档。您可以在 public/js/homepage.js 内的 addToCart 函数中看到此代码:
public/js/homepage.js
  addToCart(id, itemData) {
    // ...
    console.log("addToCart", id, JSON.stringify(itemData));
    return this.db
      .collection("carts")
      .doc(this.auth.currentUser.uid)
      .collection("items")
      .doc(id)
      .set(itemData);
  }
2) Cloud Functions 触发
Cloud Functions 函数 calculateCart 使用 onWrite 触发器监听购物车商品发生的任何写入事件(创建、更新或删除),您可以在 functions/index.js 中看到该触发器:
functions/index.js
exports.calculateCart = functions.firestore
    .document("carts/{cartId}/items/{itemId}")
    .onWrite(async (change, context) => {
      try {
        let totalPrice = 125.98;
        let itemCount = 8;

        const cartRef = db.collection("carts").doc(context.params.cartId);

        await cartRef.update({
          totalPrice,
          itemCount
        });
      } catch(err) {
      }
    }
);
3) Firestore Write - Admin
calculateCart 函数会读取购物车中的所有商品,并计算总数量和总价格,然后使用新的总数更新“购物车”文档(请参阅上文中的 cartRef.update(...))。
4) Firestore 读取 - 客户端
Web 前端已订阅,可接收有关购物车变更的更新。在 Cloud Functions 写入新的总数并更新界面后,它会获得实时更新,如 public/js/homepage.js 中所示:
public/js/homepage.js
this.cartUnsub = cartRef.onSnapshot(cart => {
   // The cart document was changed, update the UI
   // ...
});
回顾
做得好!您刚刚设置了一个完全本地化的应用,该应用使用三个不同的 Firebase 模拟器进行完全本地化的测试。

但不止如此!在下一部分中,您将了解:
- 如何编写使用 Firebase Emulator 的单元测试。
- 如何使用 Firebase 模拟器调试安全规则。
7. 创建适合您应用的安全规则
我们的 Web 应用可以读取和写入数据,但到目前为止,我们还没有真正担心过安全性。Cloud Firestore 使用名为“安全规则”的系统来声明哪些人有权读取和写入数据。Emulator Suite 是原型设计这些规则的绝佳方式。
在编辑器中,打开文件 emulators-codelab/codelab-initial-state/firestore.rules。您会看到,我们的规则分为三个主要部分:
rules_version = '2';
service cloud.firestore {
  match /databases/{database}/documents {
    // User's cart metadata
    match /carts/{cartID} {
      // TODO: Change these! Anyone can read or write.
      allow read, write: if true;
    }

    // Items inside the user's cart
    match /carts/{cartID}/items/{itemID} {
      // TODO: Change these! Anyone can read or write.
      allow read, write: if true;
    }

    // All items available in the store. Users can read
    // items but never write them.
    match /items/{itemID} {
      allow read: if true;
    }
  }
}
现在,任何人都可以读取和写入我们数据库中的数据!我们希望确保只有有效操作才能通过,并且不会泄露任何敏感信息。
在此 Codelab 中,我们将遵循最小权限原则,锁定所有文档,然后逐步添加访问权限,直到所有用户都拥有所需的全部访问权限,但不会添加更多权限。我们将前两条规则更新为拒绝访问,方法是将条件设置为 false:
rules_version = '2';
service cloud.firestore {
  match /databases/{database}/documents {
    // User's cart metadata
    match /carts/{cartID} {
      // UPDATE THIS LINE
      allow read, write: if false;
    }

    // Items inside the user's cart
    match /carts/{cartID}/items/{itemID} {
      // UPDATE THIS LINE
      allow read, write: if false;
    }

    // All items available in the store. Users can read
    // items but never write them.
    match /items/{itemID} {
      allow read: if true;
    }
  }
}
8. 运行模拟器和测试
启动模拟器
在命令行中,确保您位于 emulators-codelab/codelab-initial-state/ 中。您可能仍有之前步骤中运行的模拟器。如果未显示,请重新启动模拟器:
$ firebase emulators:start --import=./seed
模拟器运行后,您可以在本地针对它们运行测试。
运行测试
在命令行中通过新的终端标签页从目录 emulators-codelab/codelab-initial-state/
首先,移动到 functions 目录(在整个 Codelab 的剩余部分中,我们将一直在此目录中操作):
$ cd functions
现在,在函数目录中运行 Mocha 测试,然后滚动到输出的顶部:
# Run the tests
$ npm test

> functions@ test .../emulators-codelab/codelab-initial-state/functions
> mocha

  shopping carts
    1) can be created and updated by the cart owner
    2) can be read only by the cart owner

  shopping cart items
    3) can be read only by the cart owner
    4) can be added only by the cart owner

  adding an item to the cart recalculates the cart total.
    - should sum the cost of their items


  0 passing (364ms)
  1 pending
  4 failing
目前,我们有 4 个失败。在构建规则文件时,您可以观察通过的测试数量,从而衡量进度。
9. 安全访问购物车
前两项失败是“购物车”测试,用于测试以下内容:
- 用户只能创建和更新自己的购物车
- 用户只能读取自己的购物车
functions/test.js
  it('can be created and updated by the cart owner', async () => {
    // Alice can create her own cart
    await firebase.assertSucceeds(aliceDb.doc("carts/alicesCart").set({
      ownerUID: "alice",
      total: 0
    }));

    // Bob can't create Alice's cart
    await firebase.assertFails(bobDb.doc("carts/alicesCart").set({
      ownerUID: "alice",
      total: 0
    }));

    // Alice can update her own cart with a new total
    await firebase.assertSucceeds(aliceDb.doc("carts/alicesCart").update({
      total: 1
    }));

    // Bob can't update Alice's cart with a new total
    await firebase.assertFails(bobDb.doc("carts/alicesCart").update({
      total: 1
    }));
  });

  it("can be read only by the cart owner", async () => {
    // Setup: Create Alice's cart as admin
    await admin.doc("carts/alicesCart").set({
      ownerUID: "alice",
      total: 0
    });

    // Alice can read her own cart
    await firebase.assertSucceeds(aliceDb.doc("carts/alicesCart").get());

    // Bob can't read Alice's cart
    await firebase.assertFails(bobDb.doc("carts/alicesCart").get());
  });
我们来让这些测试通过。在编辑器中,打开安全规则文件 firestore.rules,然后更新 match /carts/{cartID} 中的语句:
firestore.rules
rules_version = '2';
service cloud.firestore {
    // UPDATE THESE LINES
    match /carts/{cartID} {
      allow create: if request.auth.uid == request.resource.data.ownerUID;
      allow read, update, delete: if request.auth.uid == resource.data.ownerUID;
    }

    // ...
  }
}
这些规则现在仅允许购物车所有者进行读写访问。
为了验证传入的数据和用户的身份验证,我们使用了两个在每条规则的上下文中都可用的对象:
request对象包含有关正在尝试的操作的数据和元数据。- 如果某个 Firebase 项目使用了 Firebase Authentication,
request.auth对象会描述发出请求的用户。
10. 测试购物车访问权限
每次保存 firestore.rules 时,Emulator Suite 都会自动更新规则。您可以在运行模拟器的标签页中查找 Rules updated 消息,以确认模拟器已更新规则:
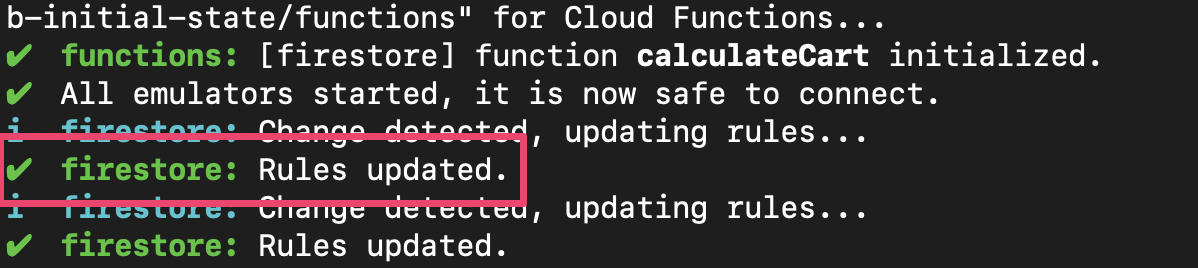
重新运行测试,并检查前两项测试现在是否能顺利通过:
$ npm test

> functions@ test .../emulators-codelab/codelab-initial-state/functions
> mocha

  shopping carts
    ✓ can be created and updated by the cart owner (195ms)
    ✓ can be read only by the cart owner (136ms)

  shopping cart items
    1) can be read only by the cart owner
    2) can be added only by the cart owner

  adding an item to the cart recalculates the cart total.
    - should sum the cost of their items

  2 passing (482ms)
  1 pending
  2 failing
做得好!您现在已获得对购物车的安全访问权限。我们继续来看下一个失败的测试。
11. 检查界面中的“添加到购物车”流程
目前,虽然购物车所有者可以读取和写入购物车,但无法读取或写入购物车中的各个商品。这是因为所有者虽然有权访问购物车文档,但无权访问购物车的 items 子集合。
这对用户来说是一种损坏状态。
返回到在 http://127.0.0.1:5000, 上运行的 Web 界面,然后尝试向购物车中添加商品。您会收到来自调试控制台的 Permission Denied 错误,这是因为我们尚未向用户授予对 items 子集合中已创建文档的访问权限。
12. 允许访问购物车中的商品
以下两项测试确认用户只能向自己的购物车添加商品或从自己的购物车中读取商品:
  it("can be read only by the cart owner", async () => {
    // Alice can read items in her own cart
    await firebase.assertSucceeds(aliceDb.doc("carts/alicesCart/items/milk").get());

    // Bob can't read items in alice's cart
    await firebase.assertFails(bobDb.doc("carts/alicesCart/items/milk").get())
  });

  it("can be added only by the cart owner",  async () => {
    // Alice can add an item to her own cart
    await firebase.assertSucceeds(aliceDb.doc("carts/alicesCart/items/lemon").set({
      name: "lemon",
      price: 0.99
    }));

    // Bob can't add an item to alice's cart
    await firebase.assertFails(bobDb.doc("carts/alicesCart/items/lemon").set({
      name: "lemon",
      price: 0.99
    }));
  });
因此,我们可以编写一条规则,规定如果当前用户的 UID 与购物车文档中的 ownerUID 相同,则允许访问。由于无需为 create, update, delete 指定不同的规则,因此您可以使用 write 规则,该规则适用于所有修改数据的请求。
更新商品子集合中相应文档的规则。条件中的 get 正在从 Firestore 读取值,在本例中,该值为购物车文档中的 ownerUID。
rules_version = '2';
service cloud.firestore {
  match /databases/{database}/documents {
    // ...

    // UPDATE THESE LINES
    match /carts/{cartID}/items/{itemID} {
      allow read, write: if get(/databases/$(database)/documents/carts/$(cartID)).data.ownerUID == request.auth.uid;
    }

    // ...
  }
}
13. 测试购物车商品访问权限
现在,我们可以重新运行测试。滚动到输出的顶部,并检查是否有更多测试通过:
$ npm test

> functions@ test .../emulators-codelab/codelab-initial-state/functions
> mocha

  shopping carts
    ✓ can be created and updated by the cart owner (195ms)
    ✓ can be read only by the cart owner (136ms)

  shopping cart items
    ✓ can be read only by the cart owner (111ms)
    ✓ can be added only by the cart owner


  adding an item to the cart recalculates the cart total.
    - should sum the cost of their items


  4 passing (401ms)
  1 pending
好极了!现在,所有测试都通过了。我们有一项待处理的测试,但会在接下来的几个步骤中完成。
14. 再次检查“添加到购物车”流程
返回到 Web 前端 ( http://127.0.0.1:5000),然后将商品添加到购物车。这是重要的一步,可确认我们的测试和规则是否符合客户所需的功能。(请注意,上次我们试用该界面时,用户无法将商品添加到购物车!)

保存 firestore.rules 时,客户端会自动重新加载规则。因此,请尝试向购物车中添加商品。
回顾
非常棒!您刚刚提高了应用的安全性,这是让应用做好正式发布准备的必要步骤!如果这是一个生产应用,我们可以将这些测试添加到持续集成流水线中。这样一来,即使其他人修改规则,我们也能放心地确保购物车数据具有这些访问权限控制。

且慢,还有更多益处!
如果您继续学习,将了解以下内容:
- 如何编写由 Firestore 事件触发的函数
- 如何创建可在多个模拟器上运行的测试
15. 设置 Cloud Functions 测试
到目前为止,我们一直专注于 Web 应用的前端和 Firestore 安全规则。不过,此应用还使用 Cloud Functions 来保持用户购物车处于最新状态,因此我们也想测试该代码。
借助 Emulator Suite,您可以轻松测试 Cloud Functions,即使是使用 Cloud Firestore 和其他服务的函数也不例外。
在编辑器中,打开 emulators-codelab/codelab-initial-state/functions/test.js 文件,然后滚动到文件中的最后一个测试。目前,它标记为“待处理”:
//  REMOVE .skip FROM THIS LINE
describe.skip("adding an item to the cart recalculates the cart total. ", () => {
  // ...

  it("should sum the cost of their items", async () => {
    ...
  });
});
如需启用测试,请移除 .skip,使其如下所示:
describe("adding an item to the cart recalculates the cart total. ", () => {
  // ...

  it("should sum the cost of their items", async () => {
    ...
  });
});
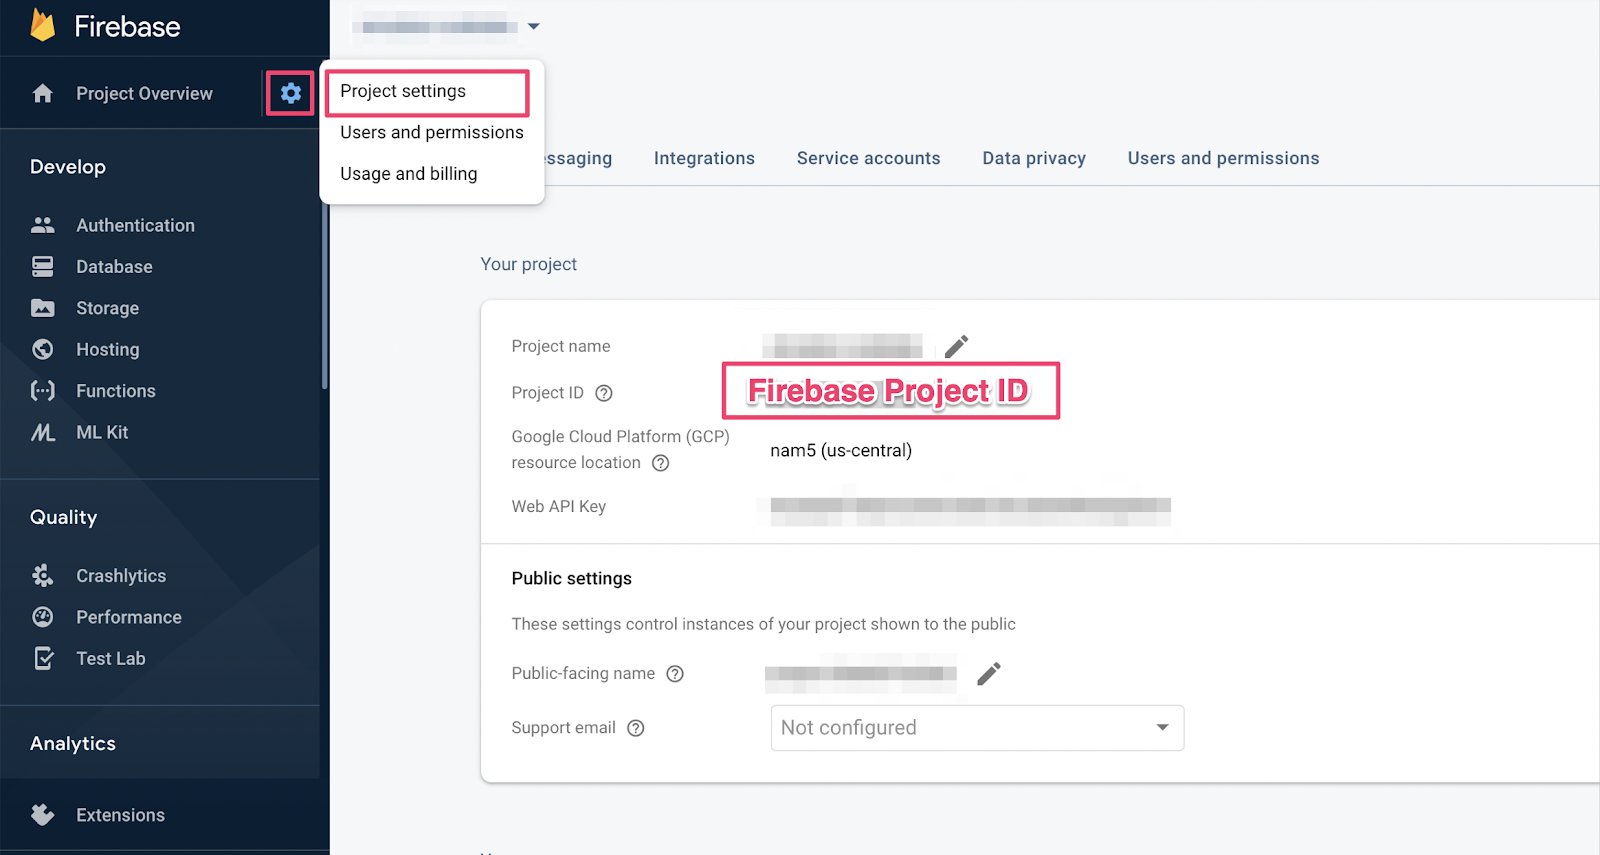
接下来,找到文件顶部的 REAL_FIREBASE_PROJECT_ID 变量,并将其更改为您的真实 Firebase 项目 ID:
// CHANGE THIS LINE
const REAL_FIREBASE_PROJECT_ID = "changeme";
如果您忘记了项目 ID,可以在 Firebase 控制台的项目设置中找到您的 Firebase 项目 ID:
16. 浏览函数测试
由于此测试会验证 Cloud Firestore 与 Cloud Functions 之间的互动,因此与之前 Codelab 中的测试相比,它涉及的设置更多。我们来逐步了解一下此测试,看看它需要什么。
创建购物车
Cloud Functions 在受信任的服务器环境中运行,可以使用 Admin SDK 使用的服务账号身份验证。首先,您可以使用 initializeAdminApp 而不是 initializeApp 来初始化应用。然后,为要添加商品的购物车创建一个 DocumentReference 并初始化购物车:
it("should sum the cost of their items", async () => {
    const db = firebase
        .initializeAdminApp({ projectId: REAL_FIREBASE_PROJECT_ID })
        .firestore();

    // Setup: Initialize cart
    const aliceCartRef = db.doc("carts/alice")
    await aliceCartRef.set({ ownerUID: "alice", totalPrice: 0 });

    ...
  });
触发函数
然后,向购物车文档的 items 子集合添加文档,以触发该函数。添加两项,确保您测试的是函数中发生的加法运算。
it("should sum the cost of their items", async () => {
    const db = firebase
        .initializeAdminApp({ projectId: REAL_FIREBASE_PROJECT_ID })
        .firestore();

    // Setup: Initialize cart
    const aliceCartRef = db.doc("carts/alice")
    await aliceCartRef.set({ ownerUID: "alice", totalPrice: 0 });

    //  Trigger calculateCart by adding items to the cart
    const aliceItemsRef = aliceCartRef.collection("items");
    await aliceItemsRef.doc("doc1").set({name: "nectarine", price: 2.99});
    await aliceItemsRef.doc("doc2").set({ name: "grapefruit", price: 6.99 });

    ...
    });
  });
设定测试预期
使用 onSnapshot() 为购物车文档上的任何更改注册监听器。onSnapshot() 会返回一个函数,您可以调用该函数来取消注册监听器。
在此测试中,添加两件总价为 9.98 美元的商品。然后,检查购物车中是否包含预期的 itemCount 和 totalPrice。如果确实如此,则表示该函数已完成其工作。
it("should sum the cost of their items", (done) => {
    const db = firebase
        .initializeAdminApp({ projectId: REAL_FIREBASE_PROJECT_ID })
        .firestore();

    // Setup: Initialize cart
    const aliceCartRef = db.doc("carts/alice")
    aliceCartRef.set({ ownerUID: "alice", totalPrice: 0 });

    //  Trigger calculateCart by adding items to the cart
    const aliceItemsRef = aliceCartRef.collection("items");
    aliceItemsRef.doc("doc1").set({name: "nectarine", price: 2.99});
    aliceItemsRef.doc("doc2").set({ name: "grapefruit", price: 6.99 });

    // Listen for every update to the cart. Every time an item is added to
    // the cart's subcollection of items, the function updates `totalPrice`
    // and `itemCount` attributes on the cart.
    // Returns a function that can be called to unsubscribe the listener.
    await new Promise((resolve) => {
      const unsubscribe = aliceCartRef.onSnapshot(snap => {
        // If the function worked, these will be cart's final attributes.
        const expectedCount = 2;
        const expectedTotal = 9.98;

        // When the `itemCount`and `totalPrice` match the expectations for the
        // two items added, the promise resolves, and the test passes.
        if (snap.data().itemCount === expectedCount && snap.data().totalPrice == expectedTotal) {
          // Call the function returned by `onSnapshot` to unsubscribe from updates
          unsubscribe();
          resolve();
        };
      });
    });
   });
 });
17. 运行测试
您可能仍有之前测试中运行的模拟器。如果未启动,请启动模拟器。在命令行中,运行
$ firebase emulators:start --import=./seed
打开新的终端标签页(让模拟器保持运行状态),然后进入函数目录。您可能仍处于安全规则测试的打开状态。
$ cd functions
现在运行单元测试,您应该会看到总共有 5 个测试:
$ npm test

> functions@ test .../emulators-codelab/codelab-initial-state/functions
> mocha

  shopping cart creation
    ✓ can be created by the cart owner (82ms)

  shopping cart reads, updates, and deletes
    ✓ cart can be read by the cart owner (42ms)

  shopping cart items
    ✓ items can be read by the cart owner (40ms)
    ✓ items can be added by the cart owner

  adding an item to the cart recalculates the cart total.
    1) should sum the cost of their items

  4 passing (2s)
  1 failing
如果您查看具体失败情况,会发现这是一个超时错误。这是因为测试正在等待函数正确更新,但函数始终没有更新。现在,我们可以编写函数来满足测试要求了。
18. 编写函数
如需修复此测试,您需要更新 functions/index.js 中的函数。虽然此函数的部分代码已编写,但尚未完成。该函数目前如下所示:
// Recalculates the total cost of a cart; triggered when there's a change
// to any items in a cart.
exports.calculateCart = functions
    .firestore.document("carts/{cartId}/items/{itemId}")
    .onWrite(async (change, context) => {
      console.log(`onWrite: ${change.after.ref.path}`);
      if (!change.after.exists) {
        // Ignore deletes
        return;
      }

      let totalPrice = 125.98;
      let itemCount = 8;
      try {

        const cartRef = db.collection("carts").doc(context.params.cartId);

        await cartRef.update({
          totalPrice,
          itemCount
        });
      } catch(err) {
      }
    });
该函数正确设置了购物车引用,但随后不是计算 totalPrice 和 itemCount 的值,而是将它们更新为硬编码的值。
提取并迭代
items 子集合
初始化一个新常量 itemsSnap,使其成为 items 子集合。然后,遍历集合中的所有文档。
// Recalculates the total cost of a cart; triggered when there's a change
// to any items in a cart.
exports.calculateCart = functions
    .firestore.document("carts/{cartId}/items/{itemId}")
    .onWrite(async (change, context) => {
      console.log(`onWrite: ${change.after.ref.path}`);
      if (!change.after.exists) {
        // Ignore deletes
        return;
      }


      try {
        let totalPrice = 125.98;
        let itemCount = 8;

        const cartRef = db.collection("carts").doc(context.params.cartId);
        // ADD LINES FROM HERE
        const itemsSnap = await cartRef.collection("items").get();

        itemsSnap.docs.forEach(item => {
          const itemData = item.data();
        })
        // TO HERE

        return cartRef.update({
          totalPrice,
          itemCount
        });
      } catch(err) {
      }
    });
计算 totalPrice 和 itemCount
首先,我们将 totalPrice 和 itemCount 的值初始化为零。
然后,将逻辑添加到迭代代码块。首先,检查商品是否具有价格。如果商品未指定数量,则默认数量为 1。然后,将数量添加到 itemCount 的运行总计中。最后,将商品价格乘以数量所得的值添加到 totalPrice 的运行总计中:
// Recalculates the total cost of a cart; triggered when there's a change
// to any items in a cart.
exports.calculateCart = functions
    .firestore.document("carts/{cartId}/items/{itemId}")
    .onWrite(async (change, context) => {
      console.log(`onWrite: ${change.after.ref.path}`);
      if (!change.after.exists) {
        // Ignore deletes
        return;
      }

      try {
        // CHANGE THESE LINES
        let totalPrice = 0;
        let itemCount = 0;

        const cartRef = db.collection("carts").doc(context.params.cartId);
        const itemsSnap = await cartRef.collection("items").get();

        itemsSnap.docs.forEach(item => {
          const itemData = item.data();
          // ADD LINES FROM HERE
          if (itemData.price) {
            // If not specified, the quantity is 1
            const quantity = itemData.quantity ? itemData.quantity : 1;
            itemCount += quantity;
            totalPrice += (itemData.price * quantity);
          }
          // TO HERE
        })

        await cartRef.update({
          totalPrice,
          itemCount
        });
      } catch(err) {
      }
    });
您还可以添加日志记录,以帮助调试成功和错误状态:
// Recalculates the total cost of a cart; triggered when there's a change
// to any items in a cart.
exports.calculateCart = functions
    .firestore.document("carts/{cartId}/items/{itemId}")
    .onWrite(async (change, context) => {
      console.log(`onWrite: ${change.after.ref.path}`);
      if (!change.after.exists) {
        // Ignore deletes
        return;
      }

      let totalPrice = 0;
      let itemCount = 0;
      try {
        const cartRef = db.collection("carts").doc(context.params.cartId);
        const itemsSnap = await cartRef.collection("items").get();

        itemsSnap.docs.forEach(item => {
          const itemData = item.data();
          if (itemData.price) {
            // If not specified, the quantity is 1
            const quantity = (itemData.quantity) ? itemData.quantity : 1;
            itemCount += quantity;
            totalPrice += (itemData.price * quantity);
          }
        });

        await cartRef.update({
          totalPrice,
          itemCount
        });

        // OPTIONAL LOGGING HERE
        console.log("Cart total successfully recalculated: ", totalPrice);
      } catch(err) {
        // OPTIONAL LOGGING HERE
        console.warn("update error", err);
      }
    });
19. 重新运行测试
在命令行中,确保模拟器仍在运行并重新运行测试。您无需重启模拟器,因为它们会自动获取函数的变更。您应该会看到所有测试都通过了:
$ npm test
> functions@ test .../emulators-codelab/codelab-initial-state/functions
> mocha

  shopping cart creation
    ✓ can be created by the cart owner (306ms)

  shopping cart reads, updates, and deletes
    ✓ cart can be read by the cart owner (59ms)

  shopping cart items
    ✓ items can be read by the cart owner
    ✓ items can be added by the cart owner

  adding an item to the cart recalculates the cart total.
    ✓ should sum the cost of their items (800ms)


  5 passing (1s)
干得漂亮!
20. 使用店面界面试用
对于最终测试,请返回到 Web 应用 ( http://127.0.0.1:5000/),然后向购物车中添加商品。
确认购物车会更新为正确的总价。太好了!
回顾
您已完成 Cloud Functions for Firebase 与 Cloud Firestore 之间复杂测试用例的演练。您编写了一个 Cloud Functions 函数,使测试通过。您还确认了新功能在界面中正常运行!您在本地完成了所有这些操作,在自己的机器上运行模拟器。
您还创建了一个针对本地模拟器运行的网络客户端,定制了用于保护数据的安全规则,并使用本地模拟器测试了这些安全规则。