
1. 總覽
在本程式碼研究室中,您將瞭解如何使用 Cloud Functions for Firebase,將通知傳送給即時通訊應用程式的使用者,為即時通訊網路應用程式新增功能。
課程內容
- 使用 Firebase SDK 建立 Google Cloud Functions。
- 根據 Auth、Cloud Storage 和 Cloud Firestore 事件觸發 Cloud Functions。
- 在網頁應用程式中新增 Firebase 雲端通訊支援。
事前準備
2. 取得程式碼範例
從指令列複製 GitHub 存放區:
git clone https://github.com/firebase/friendlychat
匯入範例應用程式
使用 IDE 開啟或匯入範例程式碼目錄中的 
cloud-functions-start 目錄。這個目錄包含程式碼研究室的起始程式碼,其中包含功能齊全的 Chat Web App。
3. 建立 Firebase 專案並設定應用程式
建立專案
- 使用 Google 帳戶登入 Firebase 控制台。
- 按一下按鈕建立新專案,然後輸入專案名稱 (例如
FriendlyChat)。
- 按一下「繼續」。
- 如果系統提示,請詳閱並接受 Firebase 條款,然後按一下「繼續」。
- (選用) 在 Firebase 控制台中啟用 AI 輔助功能 (稱為「Gemini in Firebase」)。
- 本程式碼研究室不需要 Google Analytics,因此請關閉 Google Analytics 選項。
- 按一下「建立專案」,等待專案佈建完成,然後按一下「繼續」。
升級至 Blaze 方案
如要使用 Cloud Functions for Firebase 和 Cloud Storage for Firebase,Firebase 專案必須採用即付即用 (Blaze) 定價方案,也就是連結至 Cloud Billing 帳戶。
- Cloud Billing 帳戶需要付款方式,例如信用卡。
- 如果您剛開始使用 Firebase 和 Google Cloud,請確認是否符合 $300 美元抵免額和免費試用 Cloud Billing 帳戶的資格。
- 如果您是在活動中進行這項程式碼研究室,請詢問主辦單位是否有可用的 Cloud 抵免額。
如果沒有信用卡,或不想繼續使用 Blaze 價格方案,建議使用 Firebase Emulator Suite,在本地電腦上免費模擬 Cloud Functions。
所有 Firebase 專案 (包括採用 Blaze 定價方案的專案) 仍可享有 Cloud Functions 的免付費用量配額。本程式碼研究室中列出的步驟不會超出免費方案用量限制。不過,您會看到 Cloud Storage 的小額費用 (約 $0.03 美元),這是因為 Cloud Storage 用於代管 Cloud Functions 建構映像檔。
如要將專案升級至 Blaze 方案,請按照下列步驟操作:
- 在 Firebase 控制台中,選取「升級方案」。
- 選取 Blaze 方案。按照畫面上的指示,將 Cloud Billing 帳戶連結至專案。
如果你在升級過程中需要建立 Cloud Billing 帳戶,可能需要返回 Firebase 控制台的升級流程,才能完成升級。
啟用 Google 驗證
如要讓使用者登入應用程式,我們將使用必須啟用的 Google 驗證。
在 Firebase 控制台中,依序開啟「Build」(建構) 區段 >「Authentication」(驗證) >「Sign-in method」(登入方式) 分頁標籤 (或按這裡前往)。然後啟用「Google」登入供應商,並點選「儲存」。這樣一來,使用者就能透過 Google 帳戶登入網路應用程式。
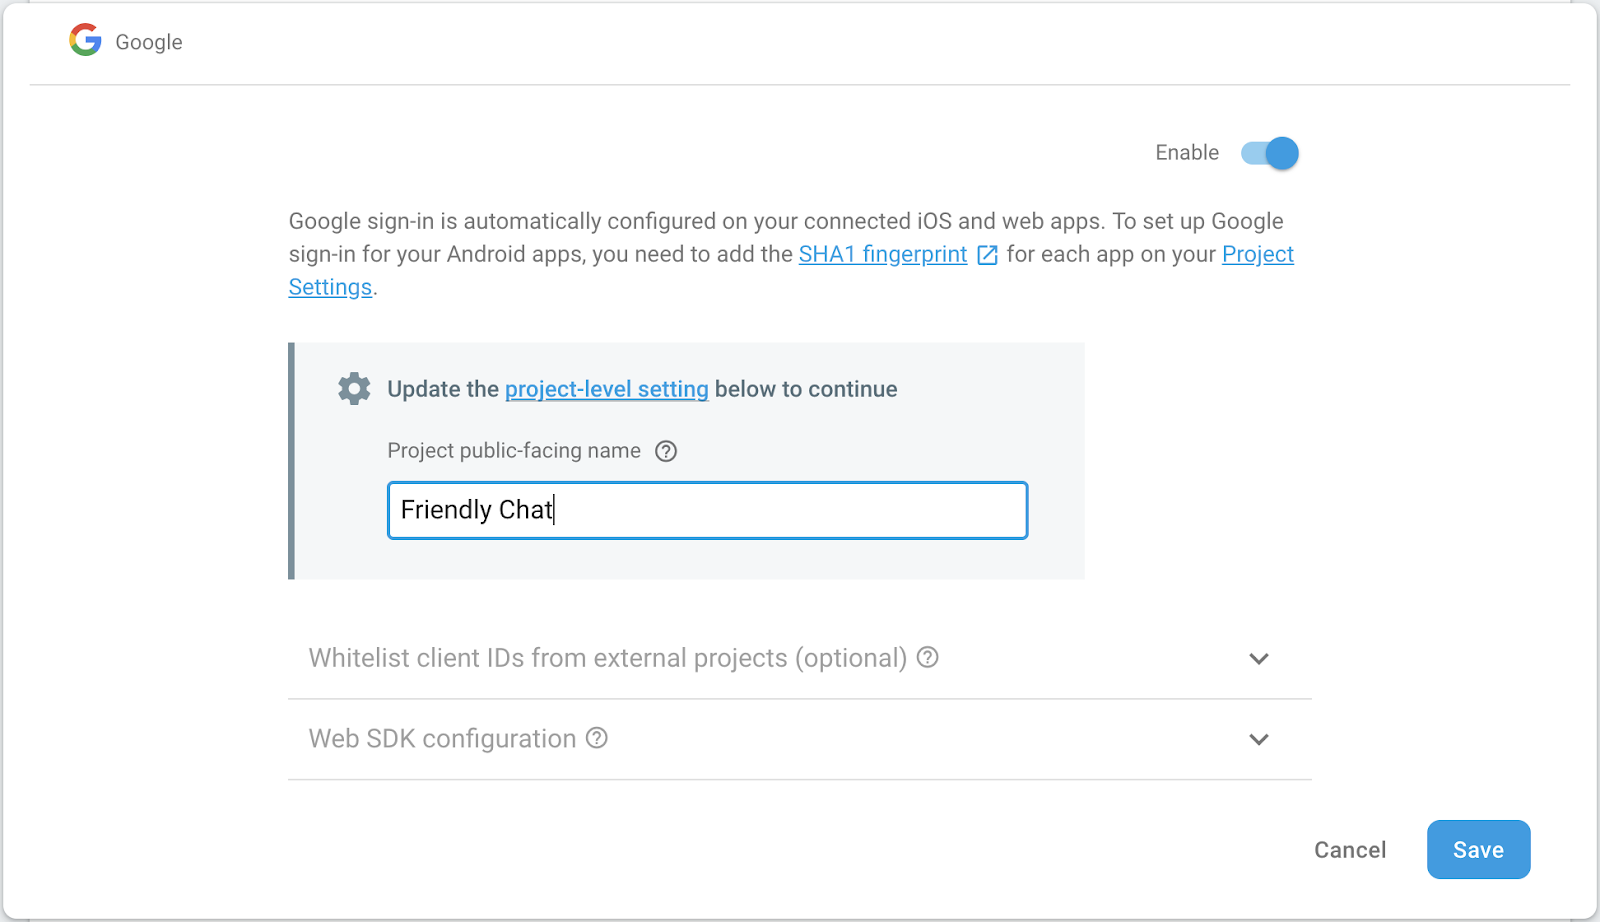
此外,您也可以將應用程式的公開名稱設為「Friendly Chat」:
設定 Cloud Storage for Firebase
應用程式會使用 Cloud Storage 上傳圖片。
如要在 Firebase 專案中設定 Cloud Storage for Firebase,請按照下列步驟操作:
- 在 Firebase 主控台的左側面板中,展開「Build」,然後選取「Storage」。
- 按一下「開始使用」。
- 選取預設 Storage bucket 的位置。
位於US-WEST1、US-CENTRAL1和US-EAST1的 bucket 可享有 Google Cloud Storage 的「永久免費」方案。其他所有位置的值區均適用 Google Cloud Storage 定價和用量。 - 按一下「以測試模式啟動」。請詳閱安全性規則免責事項。
請勿在未為 Storage 儲存空間值區新增安全性規則的情況下,發布或公開應用程式。 - 點選「建立」。
新增網路應用程式
在 Firebase 控制台中新增網頁應用程式。如要這麼做,請前往「專案設定」,然後向下捲動至「新增應用程式」。選取網頁做為平台,勾選設定 Firebase Hosting 的方塊,然後註冊應用程式並按一下「下一步」完成其餘步驟,最後按一下「繼續前往控制台」。
4. 安裝 Firebase 指令列介面
Firebase 指令列介面 (CLI) 可讓您在本機提供網頁應用程式,並部署網頁應用程式和 Cloud Functions。
如要安裝或升級 CLI,請執行下列 npm 指令:
npm -g install firebase-tools
如要確認 CLI 是否已正確安裝,請開啟控制台並執行下列指令:
firebase --version
請確認 Firebase CLI 版本高於 4.0.0,以便使用 Cloud Functions 的所有最新功能。如果沒有,請如上所示執行 npm install -g firebase-tools 來升級。
執行下列指令,授權 Firebase CLI:
firebase login
確認您位於 cloud-functions-start 目錄中,然後設定 Firebase CLI 以使用 Firebase 專案:
firebase use --add
接著選取專案 ID,然後按照指示操作。系統提示時,您可以選擇任何別名,例如 codelab。
5. 部署及執行網頁應用程式
匯入及設定專案後,您就可以首次執行網頁應用程式!開啟終端機視窗,前往 cloud-functions-start 資料夾,然後使用下列指令將網頁應用程式部署至 Firebase 託管服務:
firebase deploy --except functions
您應該會看到下列控制台輸出內容:
i deploying database, storage, hosting
✔  database: rules ready to deploy.
i  storage: checking rules for compilation errors...
✔  storage: rules file compiled successfully
i  hosting: preparing ./ directory for upload...
✔  hosting: ./ folder uploaded successfully
✔ storage: rules file compiled successfully
✔ hosting: 8 files uploaded successfully
i starting release process (may take several minutes)...

✔ Deploy complete!

Project Console: https://console.firebase.google.com/project/friendlychat-1234/overview
Hosting URL: https://friendlychat-1234.firebaseapp.com
開啟網頁應用程式
最後一行應會顯示代管網址。現在應該可以透過這個網址提供 Web 應用程式,網址格式應為 https://<project-id>.firebaseapp.com。請開啟這個網址。畫面上應會顯示可運作的即時通訊應用程式 UI。
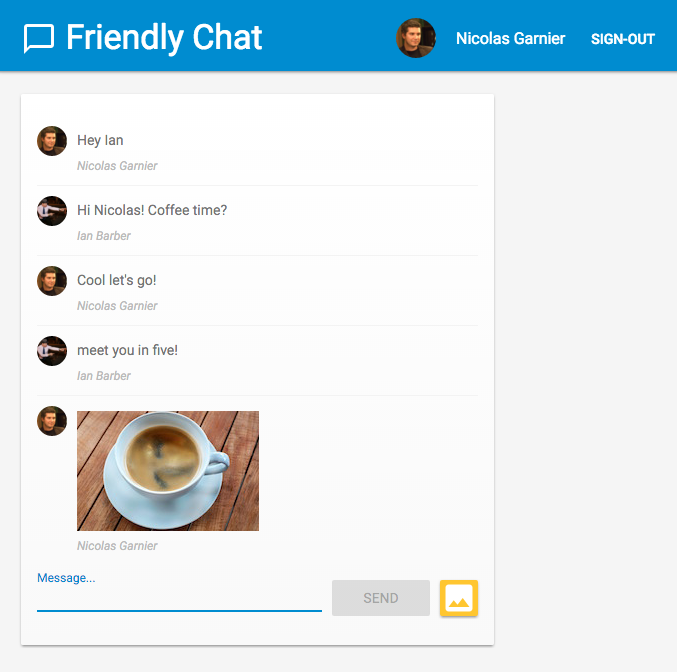
使用「SIGN-IN WITH GOOGLE」(使用 Google 帳戶登入) 按鈕登入應用程式,然後隨意新增訊息及發布圖片:
如果首次在新瀏覽器上登入應用程式,請務必在系統提示時允許接收通知: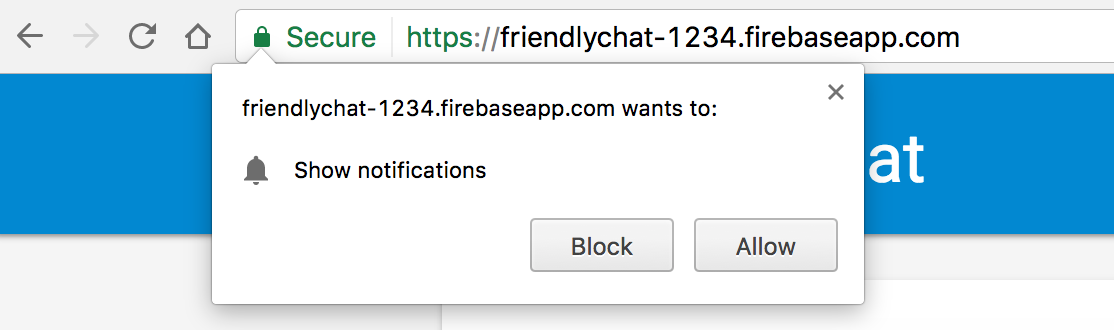
稍後我們需要啟用通知。
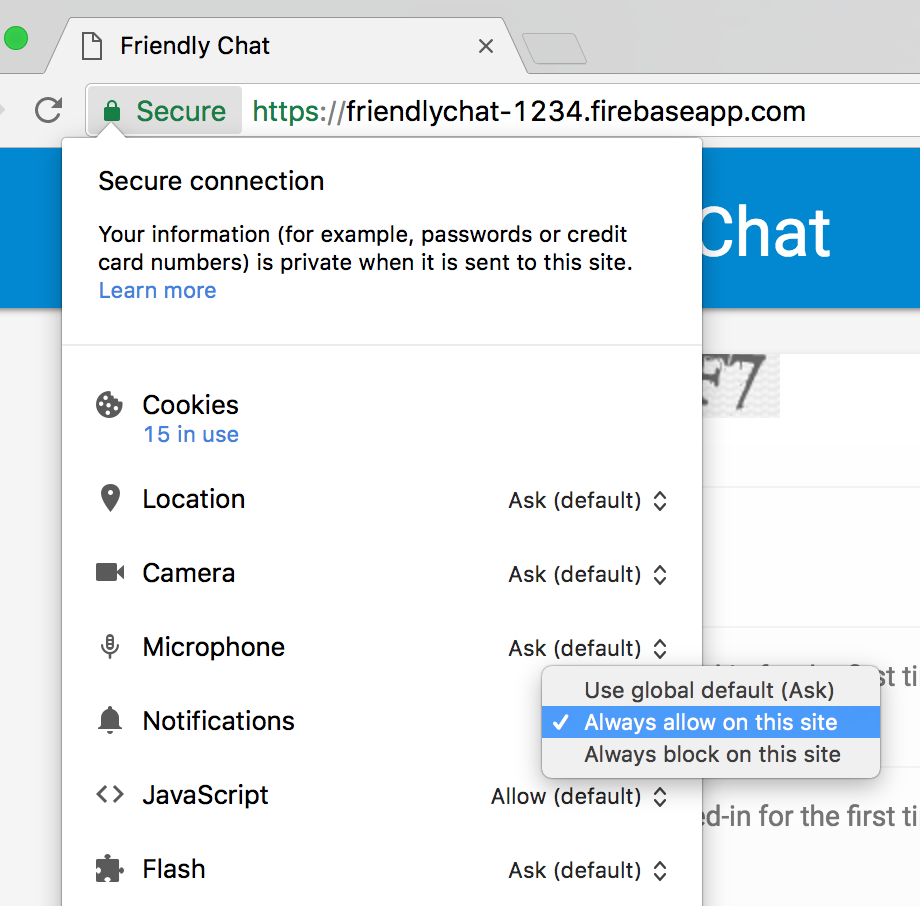
如果不小心點選了「封鎖」,可以點選 Chrome 多功能方塊中網址左側的「安全」按鈕,然後切換「通知」旁的列,即可變更這項設定:
現在,我們要使用 Cloud Functions 專用的 Firebase SDK 新增一些功能。
6. 函式目錄
您可以使用 Cloud Functions 輕鬆在雲端執行程式碼,不必設定伺服器。我們將逐步說明如何建構函式,以因應 Firebase 驗證、Cloud Storage 和 Firebase Firestore 資料庫事件。我們先從 Auth 開始。
使用 Cloud Functions 專用的 Firebase SDK 時,函式程式碼會位於 functions 目錄 (預設) 下方。您的 Functions 程式碼也是 Node.js 應用程式,因此需要 package.json 提供應用程式的相關資訊,並列出依附元件。
為方便您操作,我們已建立 functions/index.js 檔案,您可以在其中編寫程式碼。請隨意檢查這個檔案,再繼續進行後續步驟。
cd functions
ls
如果您不熟悉 Node.js,建議先瞭解相關資訊,再繼續進行本程式碼研究室。
package.json 檔案已列出兩項必要依附元件:Cloud Functions 專用的 Firebase SDK 和 Firebase Admin SDK。如要在本機安裝這些項目,請前往 functions 資料夾並執行下列指令:
npm install
現在來看看 index.js 檔案:
index.js
/**
 * Copyright 2017 Google Inc. All Rights Reserved.
 * ...
 */

// TODO(DEVELOPER): Import the Cloud Functions for Firebase and the Firebase Admin modules here.

// TODO(DEVELOPER): Write the addWelcomeMessage Function here.

// TODO(DEVELOPER): Write the blurImages Function here.

// TODO(DEVELOPER): Write the sendNotification Function here.
我們將匯入必要模組,然後撰寫三個函式來取代 TODO。首先,請匯入必要的 Node 模組。
7. 匯入 Cloud Functions 和 Firebase Admin 模組
本程式碼研究室需要兩個模組:firebase-functions 可編寫 Cloud Functions 觸發條件和記錄,而 firebase-admin 則可透過管理員存取權在伺服器上使用 Firebase 平台,執行寫入 Cloud Firestore 或傳送 FCM 通知等動作。
在 index.js 檔案中,將第一個 TODO 替換為下列程式碼:
index.js
/**
 * Copyright 2017 Google Inc. All Rights Reserved.
 * ...
 */

// Import the Firebase SDK for Google Cloud Functions.
const functions = require('firebase-functions');
// Import and initialize the Firebase Admin SDK.
const admin = require('firebase-admin');
admin.initializeApp();

// TODO(DEVELOPER): Write the addWelcomeMessage Function here.

// TODO(DEVELOPER): Write the blurImages Function here.

// TODO(DEVELOPER): Write the sendNotification Function here.
部署至 Cloud Functions 環境或其他 Google Cloud Platform 容器時,Firebase Admin SDK 可以自動設定,這會在我們呼叫 admin.initializeApp() 時發生,且沒有任何引數。
現在,讓我們新增函式,在使用者首次登入即時通訊應用程式時執行,並新增即時通訊訊息來歡迎使用者。
8. 歡迎新使用者
即時通訊訊息結構
發布至 FriendlyChat 聊天動態消息的訊息會儲存在 Cloud Firestore 中。我們來看看訊息使用的資料結構。如要執行這項操作,請在聊天室中發布新訊息「Hello World」:

應該會顯示:

在 Firebase 控制台中,點選「Build」專區下方的「Firestore Database」。您應該會看到「messages」集合,以及包含您所撰寫訊息的一份文件:
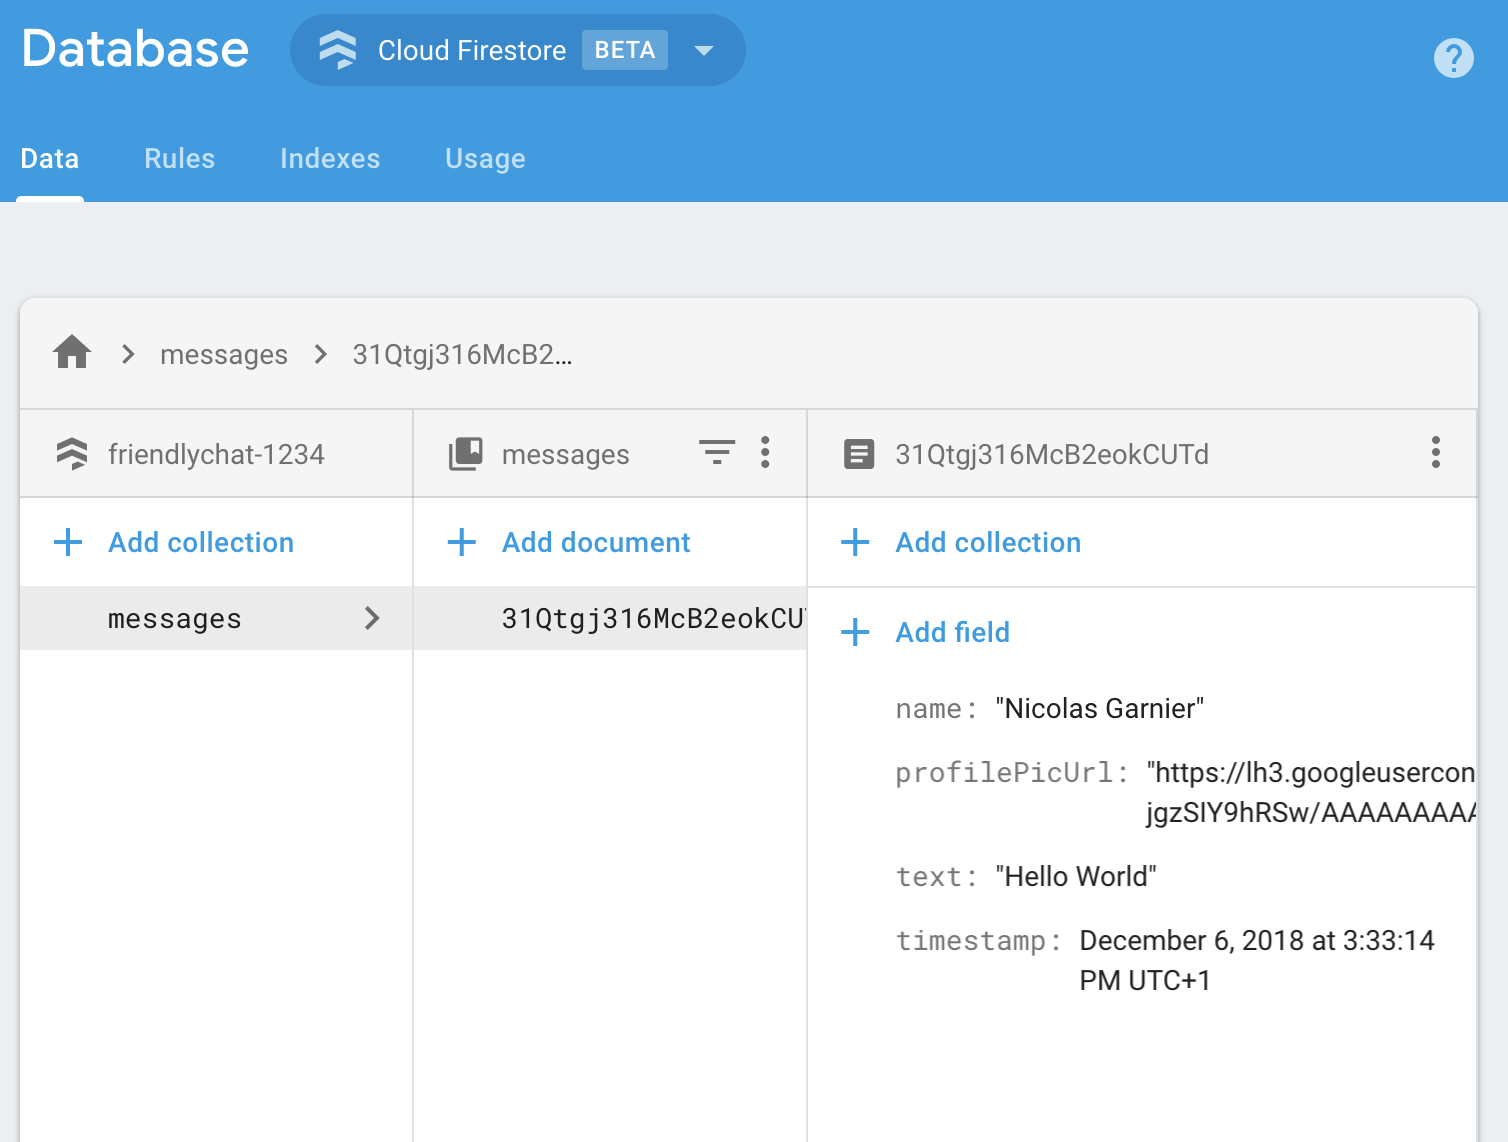
如您所見,聊天訊息會以文件的形式儲存在 Cloud Firestore 中,並在 messages 集合中加入 name、profilePicUrl、text 和 timestamp 屬性。
新增歡迎訊息
第一個 Cloud 函式會在聊天室中新增歡迎新使用者的訊息。為此,我們可以使用觸發條件 functions.auth().onCreate,在使用者首次登入 Firebase 應用程式時執行函式。將 addWelcomeMessages 函式新增至 index.js 檔案:
index.js
// Adds a message that welcomes new users into the chat.
exports.addWelcomeMessages = functions.auth.user().onCreate(async (user) => {
  functions.logger.log('A new user signed in for the first time.');
  const fullName = user.displayName || 'Anonymous';

  // Saves the new welcome message into the database
  // which then displays it in the FriendlyChat clients.
  await admin.firestore().collection('messages').add({
    name: 'Firebase Bot',
    profilePicUrl: '/images/firebase-logo.png', // Firebase logo
    text: `${fullName} signed in for the first time! Welcome!`,
    timestamp: admin.firestore.FieldValue.serverTimestamp(),
  });
  functions.logger.log('Welcome message written to database.');
});
將這個函式新增至特殊 exports 物件,是 Node 讓函式可從目前檔案外部存取的方式,也是 Cloud Functions 的必要做法。
在上述函式中,我們將「Firebase 機器人」發布的新歡迎訊息新增至即時通訊訊息清單。我們會在 Cloud Firestore 的 messages 集合上使用 add 方法,因為這是儲存即時通訊訊息的位置。
由於這是非同步作業,我們需要傳回 Promise,指出 Cloud Firestore 何時完成寫入作業,以免 Cloud Functions 過早執行。
部署 Cloud Functions
部署 Cloud Functions 後,這些函式才會啟用。如要這麼做,請在指令列執行下列指令:
firebase deploy --only functions
您應該會看到下列控制台輸出內容:
i  deploying functions
i  functions: ensuring necessary APIs are enabled...
⚠  functions: missing necessary APIs. Enabling now...
i  env: ensuring necessary APIs are enabled...
⚠  env: missing necessary APIs. Enabling now...
i  functions: waiting for APIs to activate...
i  env: waiting for APIs to activate...
✔  env: all necessary APIs are enabled
✔  functions: all necessary APIs are enabled
i  functions: preparing functions directory for uploading...
i  functions: packaged functions (X.XX KB) for uploading
✔  functions: functions folder uploaded successfully
i  starting release process (may take several minutes)...
i  functions: creating function addWelcomeMessages...
✔  functions[addWelcomeMessages]: Successful create operation.
✔  functions: all functions deployed successfully!

✔  Deploy complete!

Project Console: https://console.firebase.google.com/project/friendlypchat-1234/overview
測試函式
函式部署完成後,您需要讓使用者首次登入。
- 使用主機網址 (格式為
https://<project-id>.firebaseapp.com),在瀏覽器中開啟應用程式。 - 如果是新使用者,請使用「登入」按鈕首次登入應用程式。
- 如果您已登入應用程式,可以開啟 Firebase 控制台驗證,然後從使用者清單中刪除帳戶。然後重新登入。
- 登入後,系統應會自動顯示歡迎訊息:

9. 圖片內容審查
使用者可以在即時通訊中上傳所有類型的圖片,因此請務必審查不雅圖片,尤其是在公開社群平台。在 FriendlyChat 中,發布到對話的圖片會儲存在 Cloud Storage 值區。
使用 Cloud Functions 時,您可以透過 functions.storage().onFinalize 觸發程序偵測新上傳的圖片。每當 Cloud Storage 中有新檔案上傳或修改時,這項作業就會執行。
我們會透過下列程序管理圖片:
- 使用 Cloud Vision API 檢查圖片是否標示為成人或暴力內容。
- 如果圖片遭到標記,請在執行中的函式例項中下載。
- 使用 ImageMagick 模糊處理圖片。
- 將模糊處理的圖片上傳至 Cloud Storage。
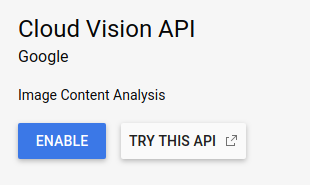
啟用 Cloud Vision API
由於我們將在這個函式中使用 Google Cloud Vision API,因此請務必在 Firebase 專案中啟用該 API。請按照這個連結的指示,選取 Firebase 專案並啟用 API:
安裝依附元件
如要審查圖片,我們會使用適用於 Node.js 的 Google Cloud Vision 用戶端程式庫 @google-cloud/vision,透過 Cloud Vision API 偵測不當圖片。
如要將這個套件安裝到 Cloud Functions 應用程式,請執行下列 npm install --save 指令。請務必從 functions 目錄執行這項操作。
npm install --save @google-cloud/vision@2.4.0
這會在本地安裝套件,並將其新增為 package.json 檔案中宣告的依附元件。
匯入及設定依附元件
如要匯入已安裝的依附元件,以及本節中需要的一些 Node.js 核心模組 (path、os 和 fs),請在 index.js 檔案頂端新增下列程式碼:
index.js
const Vision = require('@google-cloud/vision');
const vision = new Vision.ImageAnnotatorClient();
const {promisify} = require('util');
const exec = promisify(require('child_process').exec);

const path = require('path');
const os = require('os');
const fs = require('fs');
由於函式會在 Google Cloud 環境中執行,因此不需要設定 Cloud Storage 和 Cloud Vision 程式庫,系統會自動設定這些程式庫,以便使用您的專案。
偵測不當圖片
您將使用 functions.storage.onChange Cloud Functions 觸發條件,在 Cloud Storage 值區中建立或修改檔案/資料夾時,立即執行程式碼。將 blurOffensiveImages 函式新增至 index.js 檔案:
index.js
// Checks if uploaded images are flagged as Adult or Violence and if so blurs them.
exports.blurOffensiveImages = functions.runWith({memory: '2GB'}).storage.object().onFinalize(
    async (object) => {
      const imageUri = `gs://${object.bucket}/${object.name}`;
      // Check the image content using the Cloud Vision API.
      const batchAnnotateImagesResponse = await vision.safeSearchDetection(imageUri);
      const safeSearchResult = batchAnnotateImagesResponse[0].safeSearchAnnotation;
      const Likelihood = Vision.protos.google.cloud.vision.v1.Likelihood;
      if (Likelihood[safeSearchResult.adult] >= Likelihood.LIKELY ||
          Likelihood[safeSearchResult.violence] >= Likelihood.LIKELY) {
        functions.logger.log('The image', object.name, 'has been detected as inappropriate.');
        return blurImage(object.name);
      }
      functions.logger.log('The image', object.name, 'has been detected as OK.');
    });
請注意,我們新增了 Cloud Functions 執行個體的某些設定,這些設定會執行函式。使用 .runWith({memory: '2GB'}) 時,我們要求執行個體取得 2 GB 的記憶體,而非預設值,因為這個函式會耗用大量記憶體。
函式觸發後,系統會透過 Cloud Vision API 檢查圖片是否含有成人或暴力內容。如果系統根據這些條件偵測到不當圖片,就會模糊處理圖片,這會在 blurImage 函式中完成,我們會在下一個步驟中看到。
模糊處理圖片
在 index.js 檔案中新增下列 blurImage 函式:
index.js
// Blurs the given image located in the given bucket using ImageMagick.
async function blurImage(filePath) {
  const tempLocalFile = path.join(os.tmpdir(), path.basename(filePath));
  const messageId = filePath.split(path.sep)[1];
  const bucket = admin.storage().bucket();

  // Download file from bucket.
  await bucket.file(filePath).download({destination: tempLocalFile});
  functions.logger.log('Image has been downloaded to', tempLocalFile);
  // Blur the image using ImageMagick.
  await exec(`convert "${tempLocalFile}" -channel RGBA -blur 0x24 "${tempLocalFile}"`);
  functions.logger.log('Image has been blurred');
  // Uploading the Blurred image back into the bucket.
  await bucket.upload(tempLocalFile, {destination: filePath});
  functions.logger.log('Blurred image has been uploaded to', filePath);
  // Deleting the local file to free up disk space.
  fs.unlinkSync(tempLocalFile);
  functions.logger.log('Deleted local file.');
  // Indicate that the message has been moderated.
  await admin.firestore().collection('messages').doc(messageId).update({moderated: true});
  functions.logger.log('Marked the image as moderated in the database.');
}
在上述函式中,圖片二進位檔是從 Cloud Storage 下載。接著使用 ImageMagick 的 convert 工具模糊處理圖片,並將模糊處理後的版本重新上傳至 Storage Bucket。接著,我們刪除 Cloud Functions 執行個體上的檔案,以釋出一些磁碟空間。這麼做是因為系統可能會重複使用同一個 Cloud Functions 執行個體,如果沒有清除檔案,磁碟空間可能會用盡。最後,我們在即時通訊訊息中加入布林值,指出圖片已審查完畢,這會觸發用戶端重新整理訊息。
部署函式
您必須先部署函式,函式才會啟用。在指令列中執行 firebase deploy --only functions:
firebase deploy --only functions
您應該會看到下列控制台輸出內容:
i  deploying functions
i  functions: ensuring necessary APIs are enabled...
✔  functions: all necessary APIs are enabled
i  functions: preparing functions directory for uploading...
i  functions: packaged functions (X.XX KB) for uploading
✔  functions: functions folder uploaded successfully
i  starting release process (may take several minutes)...
i  functions: updating function addWelcomeMessages...
i  functions: creating function blurOffensiveImages...
✔  functions[addWelcomeMessages]: Successful update operation.
✔  functions[blurOffensiveImages]: Successful create operation.
✔  functions: all functions deployed successfully!

✔  Deploy complete!

Project Console: https://console.firebase.google.com/project/friendlychat-1234/overview
測試函式
函式部署完成後:
- 使用主機網址 (格式為
https://<project-id>.firebaseapp.com),在瀏覽器中開啟應用程式。 - 登入應用程式後,上傳圖片:

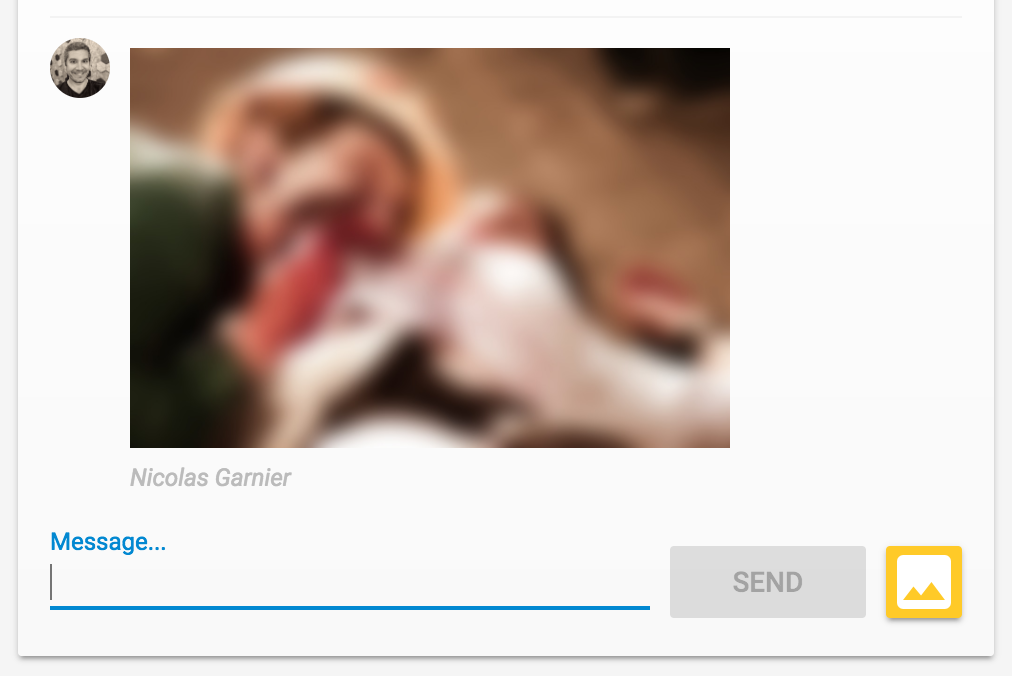
- 選擇要上傳的最佳冒犯內容圖片 (或使用這張食肉殭屍!),稍待片刻後,貼文應該會重新整理,並顯示圖片的模糊版本:
10. 新訊息通知
在本節中,您將新增 Cloud 函式,在發布新訊息時傳送通知給即時通訊參與者。
使用 Firebase 雲端通訊 (FCM),即可在各個平台穩定地傳送通知給使用者。如要傳送通知給使用者,您需要對方的 FCM 裝置權杖。我們使用的即時通訊網頁應用程式,會在使用者透過新瀏覽器或裝置初次開啟應用程式時,收集裝置權杖。這些權杖會儲存在 Cloud Firestore 的 fcmTokens 集合中。
如要瞭解如何在網頁應用程式中取得 FCM 裝置權杖,請參閱 Firebase 網頁程式碼研究室。
傳送通知
如要偵測新訊息發布時間,您將使用 functions.firestore.document().onCreate Cloud Functions 觸發條件,在 Cloud Firestore 的指定路徑建立新物件時執行程式碼。在 index.js 檔案中新增 sendNotifications 函式:
index.js
// Sends a notifications to all users when a new message is posted.
exports.sendNotifications = functions.firestore.document('messages/{messageId}').onCreate(
  async (snapshot) => {
    // Notification details.
    const text = snapshot.data().text;
    const payload = {
      notification: {
        title: `${snapshot.data().name} posted ${text ? 'a message' : 'an image'}`,
        body: text ? (text.length <= 100 ? text : text.substring(0, 97) + '...') : '',
        icon: snapshot.data().profilePicUrl || '/images/profile_placeholder.png',
        click_action: `https://${process.env.GCLOUD_PROJECT}.firebaseapp.com`,
      }
    };

    // Get the list of device tokens.
    const allTokens = await admin.firestore().collection('fcmTokens').get();
    const tokens = [];
    allTokens.forEach((tokenDoc) => {
      tokens.push(tokenDoc.id);
    });

    if (tokens.length > 0) {
      // Send notifications to all tokens.
      const response = await admin.messaging().sendToDevice(tokens, payload);
      await cleanupTokens(response, tokens);
      functions.logger.log('Notifications have been sent and tokens cleaned up.');
    }
  });
在上述函式中,我們會從 Cloud Firestore 資料庫收集所有使用者的裝置權杖,並使用 admin.messaging().sendToDevice 函式將通知傳送給每位使用者。
清除權杖
最後,我們要移除無效的權杖。如果瀏覽器或裝置不再使用我們先前從使用者取得的權杖,就會發生這種情況。舉例來說,如果使用者撤銷瀏覽器工作階段的通知權限,就會發生這種情況。如要這麼做,請在 index.js 檔案中加入下列 cleanupTokens 函式:
index.js
// Cleans up the tokens that are no longer valid.
function cleanupTokens(response, tokens) {
 // For each notification we check if there was an error.
 const tokensDelete = [];
 response.results.forEach((result, index) => {
   const error = result.error;
   if (error) {
     functions.logger.error('Failure sending notification to', tokens[index], error);
     // Cleanup the tokens that are not registered anymore.
     if (error.code === 'messaging/invalid-registration-token' ||
         error.code === 'messaging/registration-token-not-registered') {
       const deleteTask = admin.firestore().collection('fcmTokens').doc(tokens[index]).delete();
       tokensDelete.push(deleteTask);
     }
   }
 });
 return Promise.all(tokensDelete);
}
部署函式
函式必須部署後才會啟用,如要部署,請在指令列中執行下列指令:
firebase deploy --only functions
您應該會看到下列控制台輸出內容:
i  deploying functions
i  functions: ensuring necessary APIs are enabled...
✔  functions: all necessary APIs are enabled
i  functions: preparing functions directory for uploading...
i  functions: packaged functions (X.XX KB) for uploading
✔  functions: functions folder uploaded successfully
i  starting release process (may take several minutes)...
i  functions: updating function addWelcomeMessages...
i  functions: updating function blurOffensiveImages...
i  functions: creating function sendNotifications...
✔  functions[addWelcomeMessages]: Successful update operation.
✔  functions[blurOffensiveImages]: Successful updating operation.
✔  functions[sendNotifications]: Successful create operation.
✔  functions: all functions deployed successfully!

✔  Deploy complete!

Project Console: https://console.firebase.google.com/project/friendlychat-1234/overview
測試函式
- 函式部署完成後,請使用主機網址 (格式為
https://<project-id>.firebaseapp.com) 在瀏覽器中開啟應用程式。 - 首次登入應用程式時,請務必在系統提示時允許通知:
- 關閉即時通訊應用程式分頁或顯示其他分頁:只有在應用程式處於背景時,系統才會顯示通知。如要瞭解如何在應用程式處於前景時接收訊息,請參閱說明文件。
- 使用其他瀏覽器 (或無痕視窗) 登入應用程式並發布訊息。第一個瀏覽器應該會顯示通知:

11. 恭喜!
您已使用 Cloud Functions 專用的 Firebase SDK,並在即時通訊應用程式中新增伺服器端元件。
涵蓋內容
- 使用 Cloud Functions 專用的 Firebase SDK 撰寫 Cloud Functions。
- 根據 Auth、Cloud Storage 和 Cloud Firestore 事件觸發 Cloud Functions。
- 在網頁應用程式中新增 Firebase 雲端通訊支援。
- 使用 Firebase CLI 部署 Cloud Functions。
後續步驟
- 瞭解其他 Cloud Functions 觸發類型。
- 在自己的應用程式中使用 Firebase 和 Cloud Functions。